A Beginner's Guide to Transferring Patterns to Fabric
Introduction
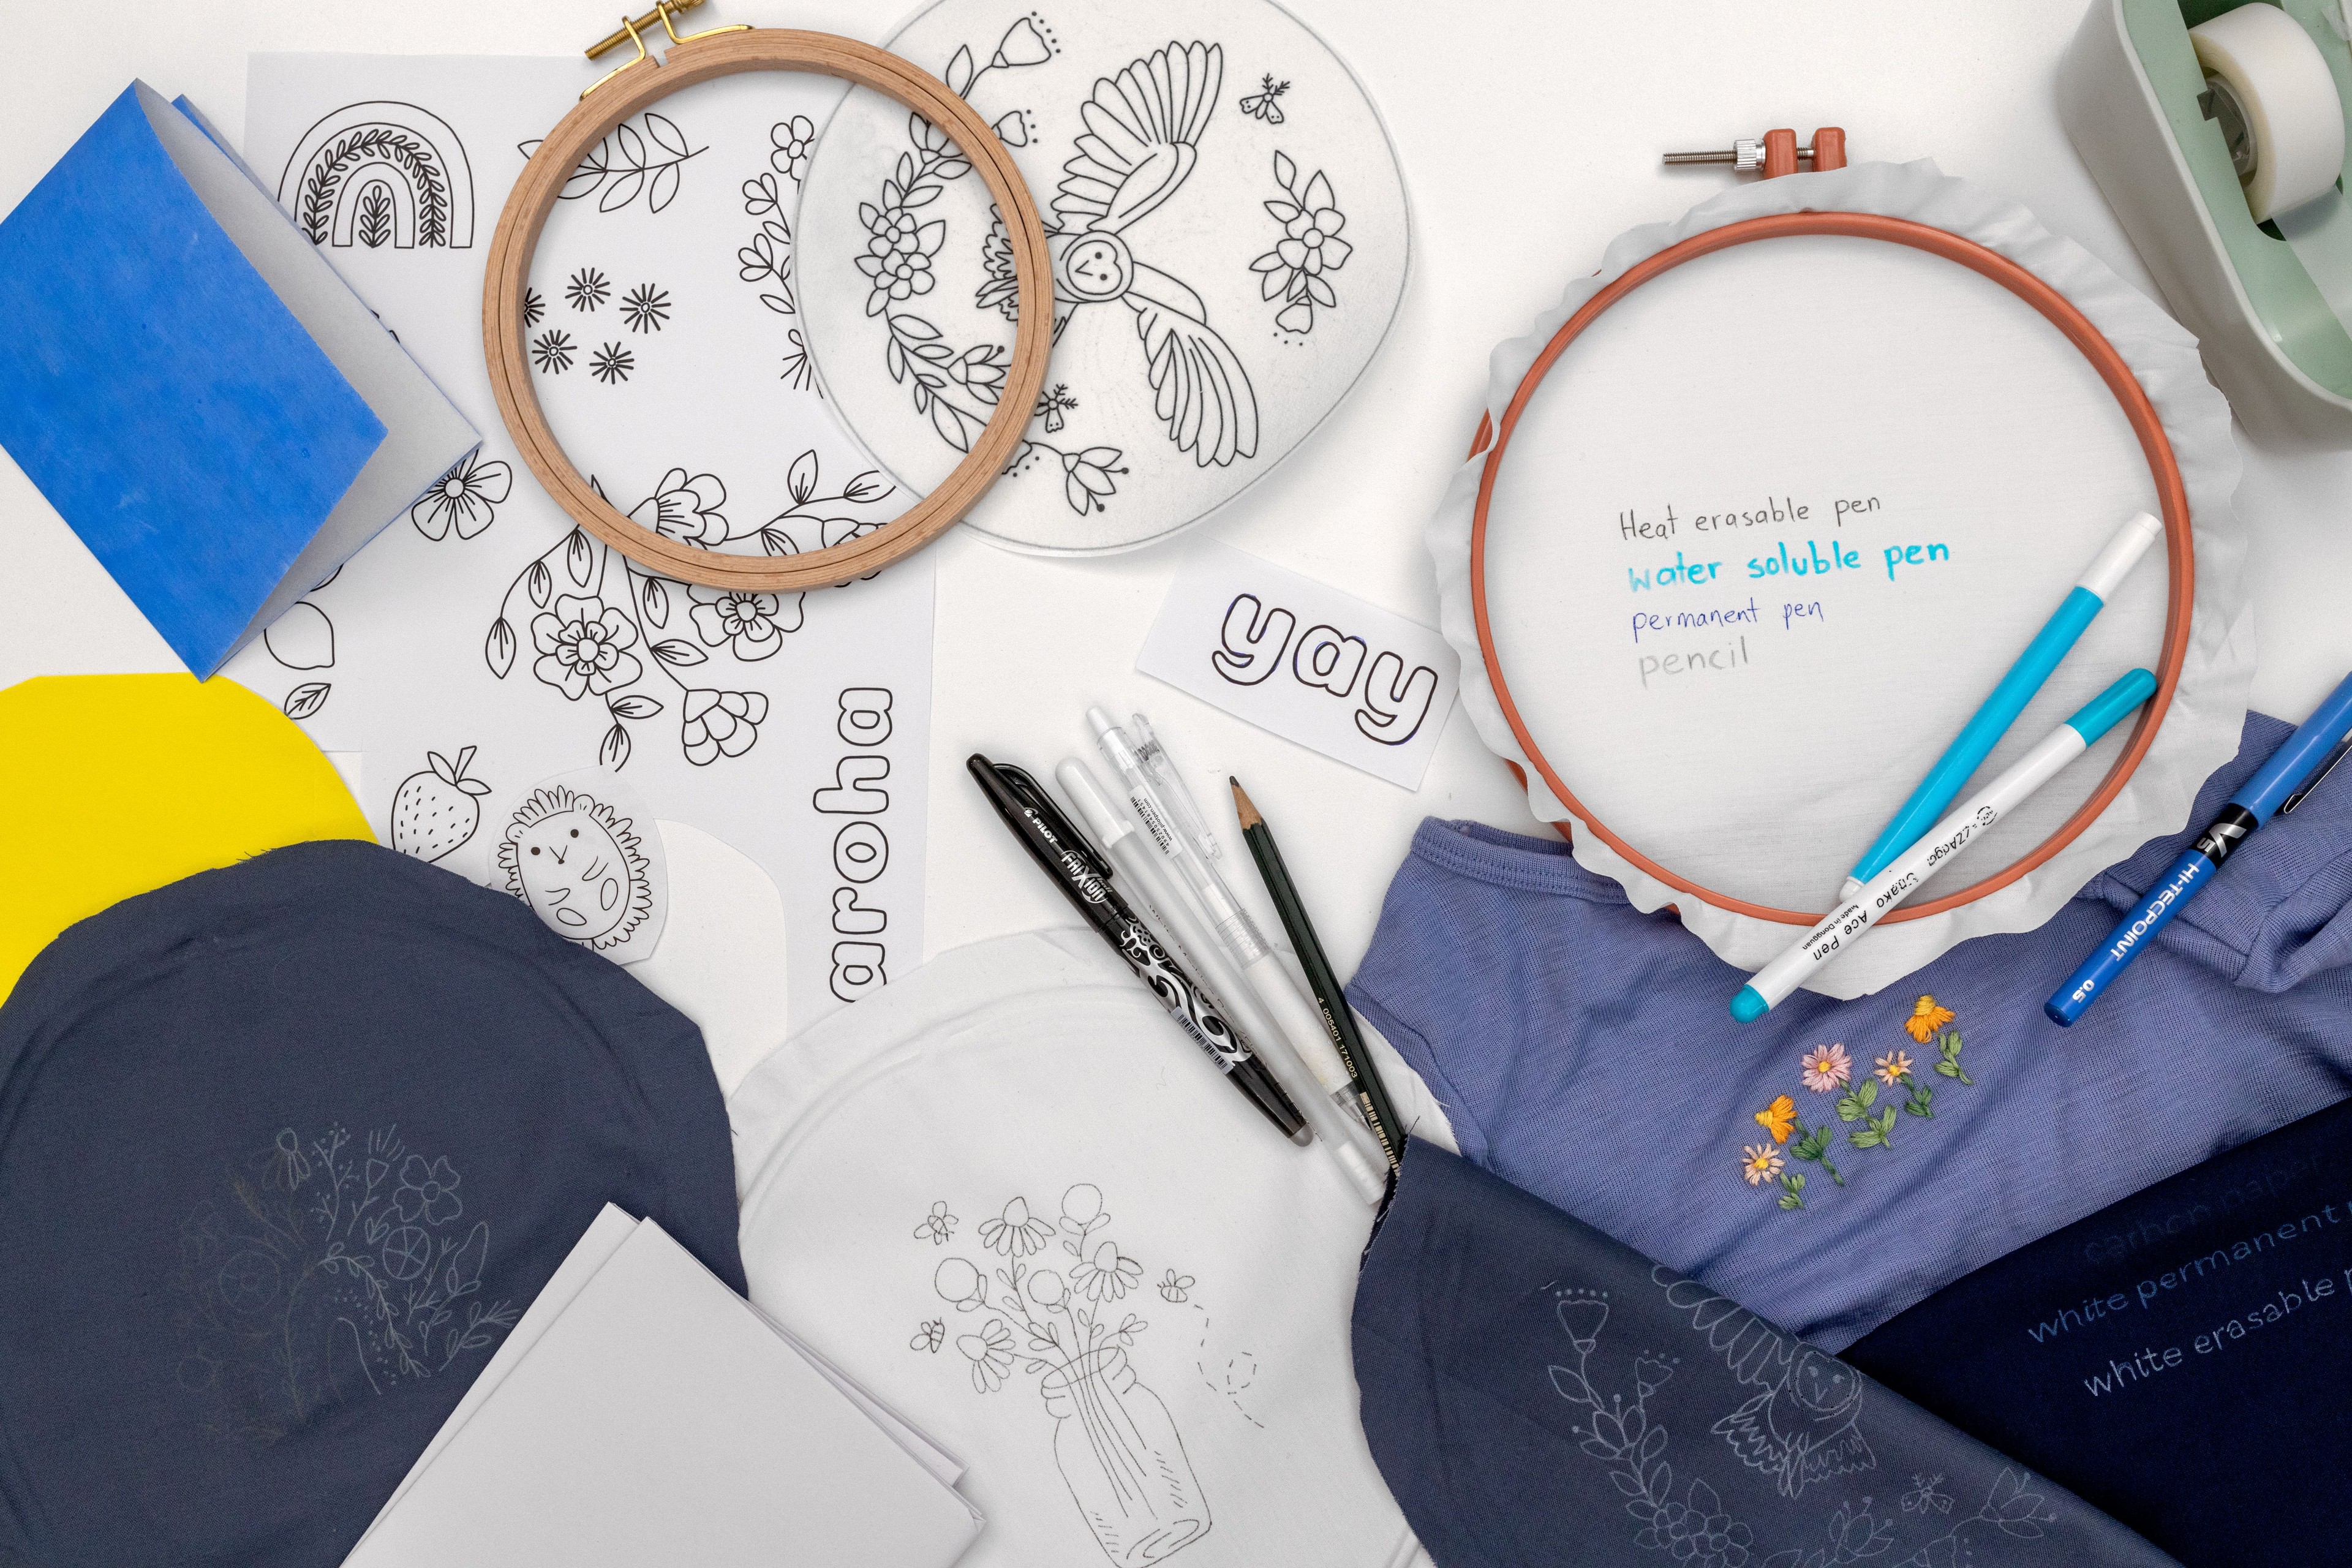
One of the first steps for working on an embroidery pattern is transferring the design to your fabric. There are lots of different methods of doing this – which is great (lots of options, woo hoo!) but that can also make it quite daunting for beginners (how on earth do you know which one to use?!).
But don’t worry, I’m here to help! In this guide, I’m going to show you my absolute fav methods for transferring your pattern to fabric. Then, I’m going to walk you through lots of other options, including the pros and cons of each. Plus there’s a short quiz to help you decide which method works for your particular project.
Most confident embroiderers will have their own favourite method, which they’ve got down pat and can do every time. And you will have your own too, before you know it!
And in case you’re wondering, this guide also covers how to transfer your pattern to dark fabric - thank goodness right?!
I’ve designed this blog so that you can choose a method to try, and then jump straight to that bit to learn all about it and get started.
Ok, let’s get started!
Download the pdf: A Beginner's Guide to Transferring Patterns to Fabric
Before we go any further, I want to let you know that I've also collated all of these tips and learnings into a pdf download. Which makes it super easy for you to save and refer to my tips whenever you need to.
You can keep scrolling to read this blog, or jump straight to my pdf guide.
Just head here to grab your free copy!
Find your method
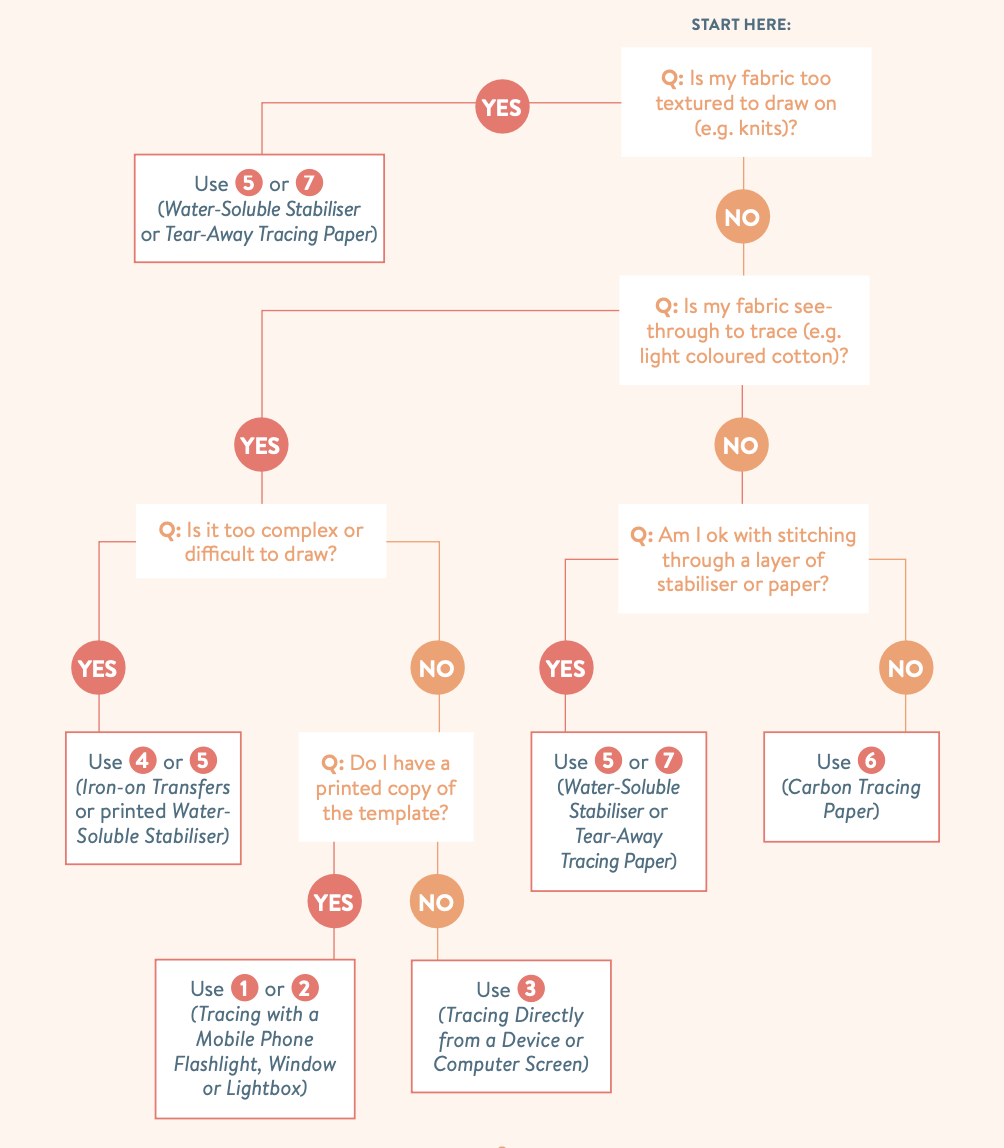
Here’s a quick quiz to help you choose which method to use. Note that this isn’t an exhaustive list (you may consider other factors), but it recaps my key thought process when I am deciding.
Before you transfer, read this info about Transfer Pens and how to remove them...
This a key thing to consider – because you might not end up covering all of the template lines with your stitches – for instance, if you alter the design, or go off track (we all do it!). That’s why using an erasable pen is fantastic – once you finish stitching, you can easily remove any visible marks, and your final piece will look neat and tidy.
Tip to test before you start stitching: Just cut off a surplus corner or edge of your fabric, draw some lines with the pen, carry out the removal method, and check it works as expected. Better safe than sorry, right!?
Tip to draw fine lines: With any pen, it is usually better to draw a nice fine line than a super chunky outline. So long as it’s visible, this means less hassle removing pen marks at the end.
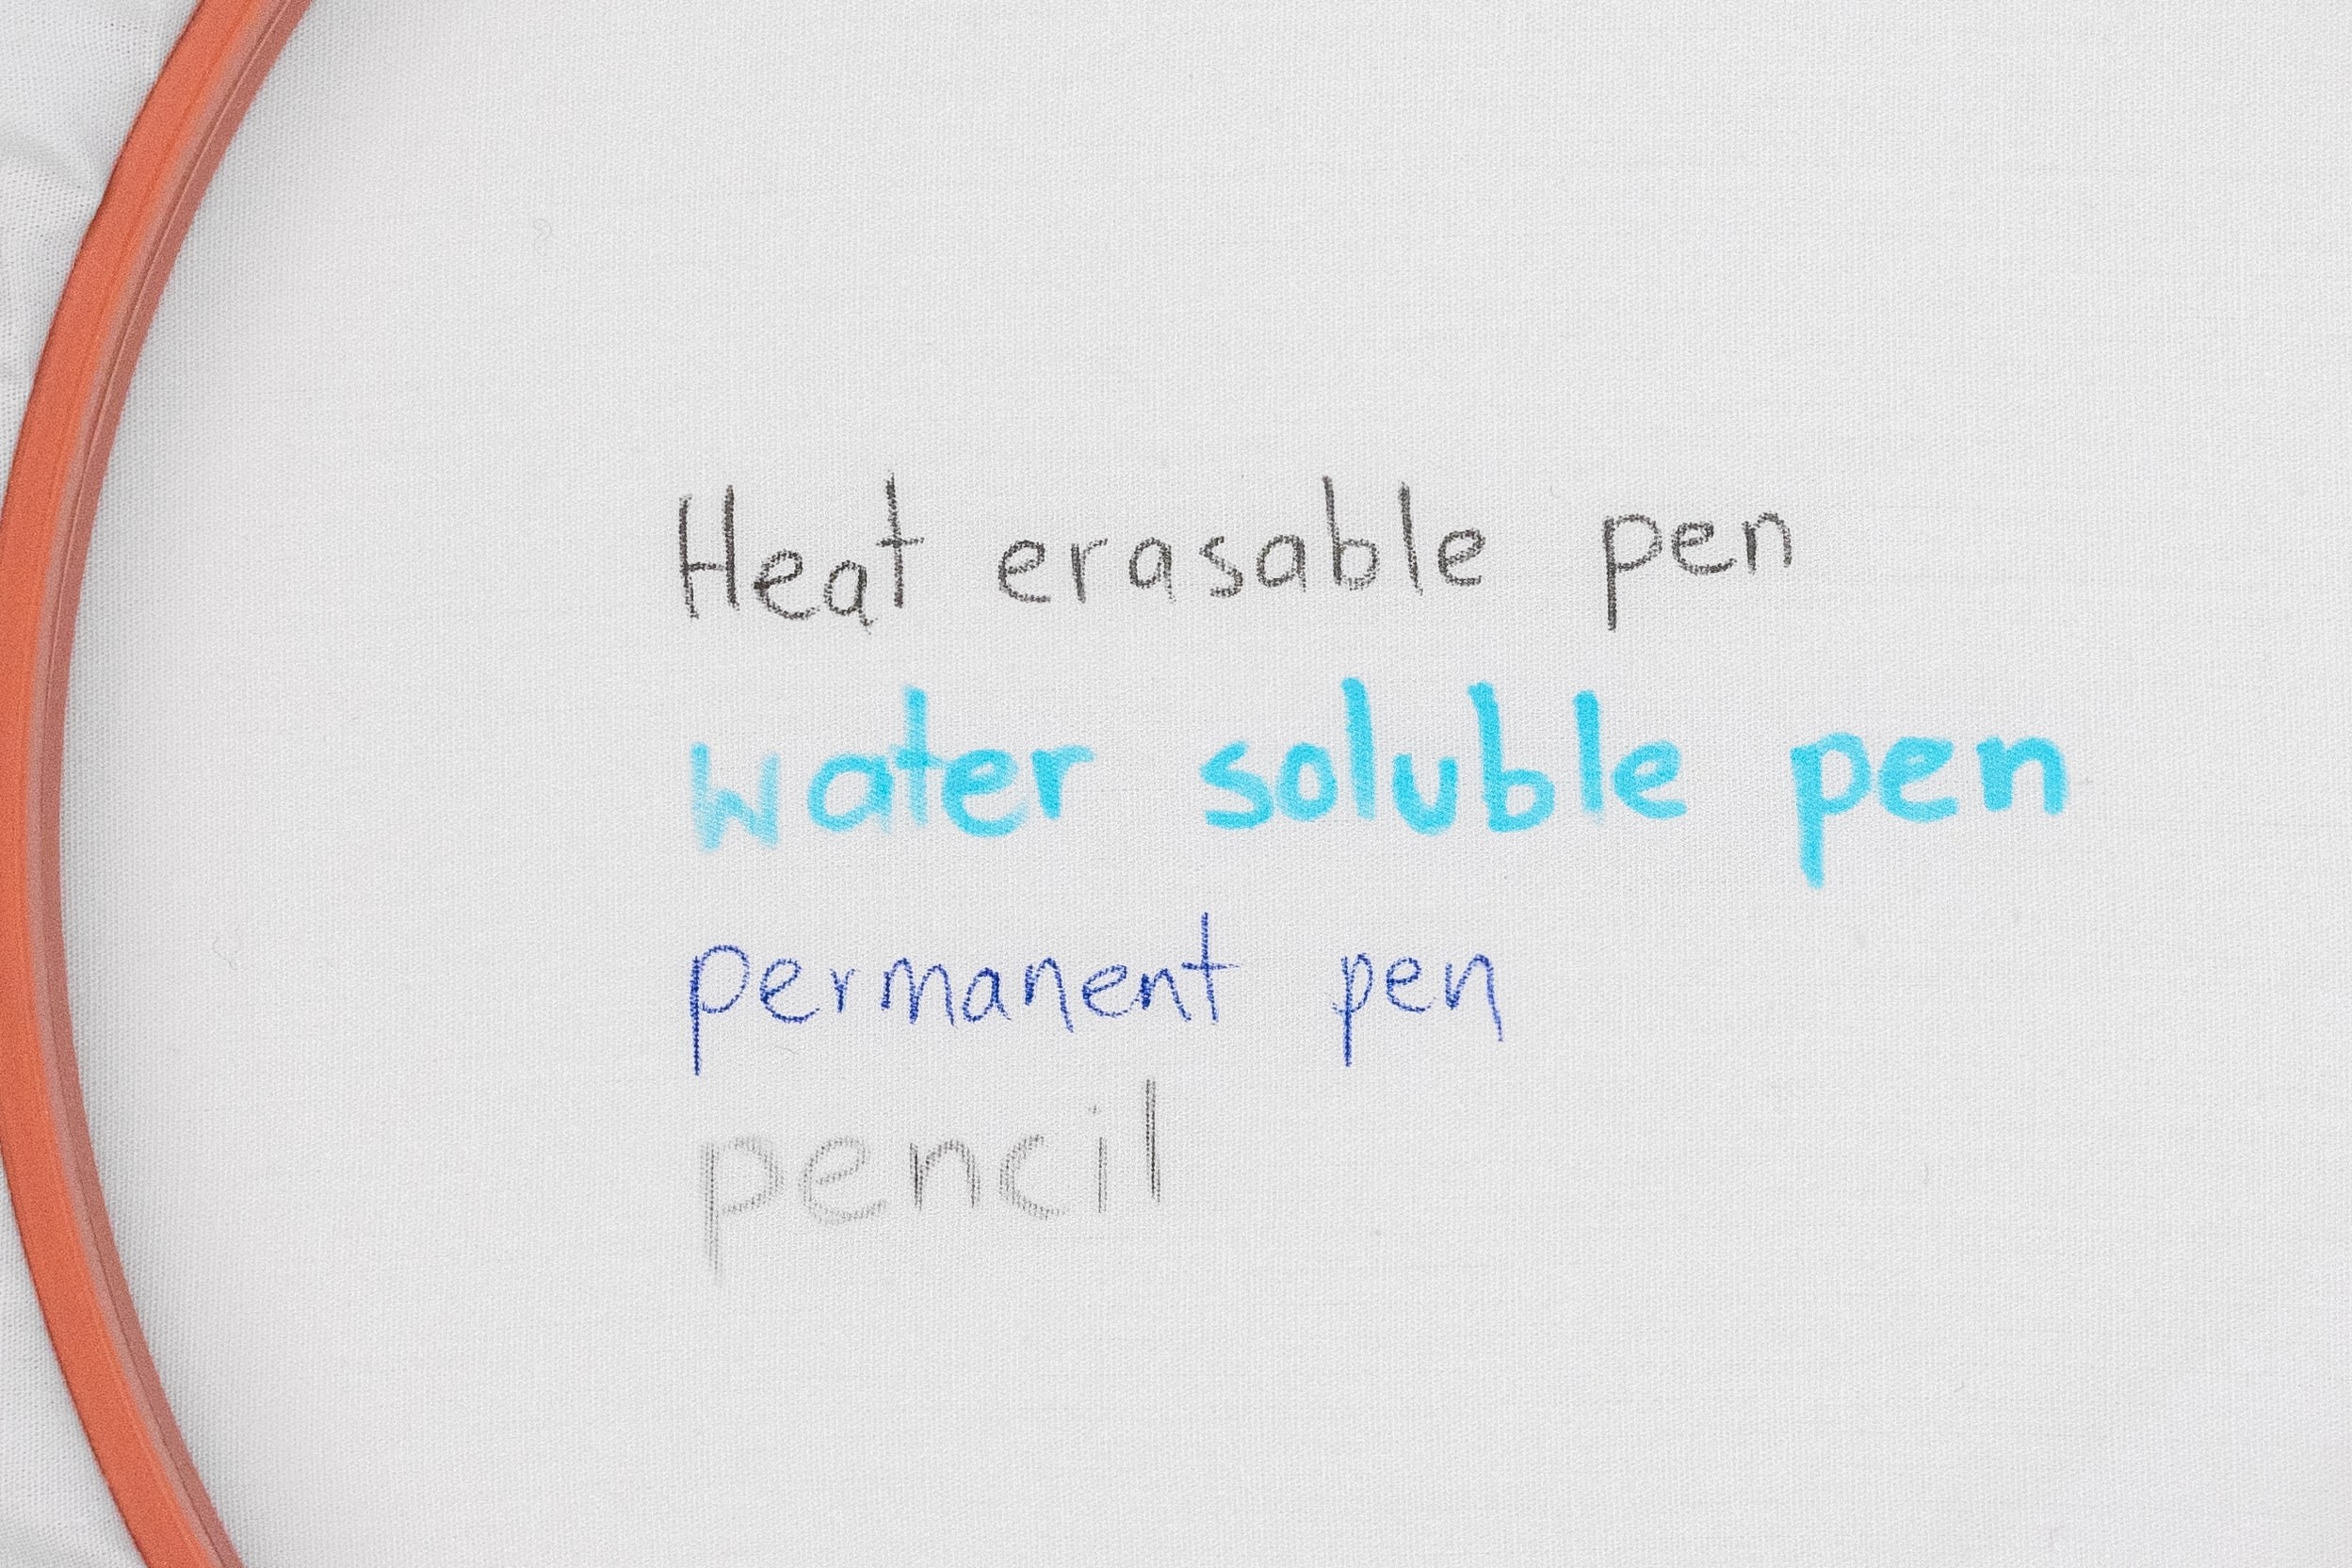
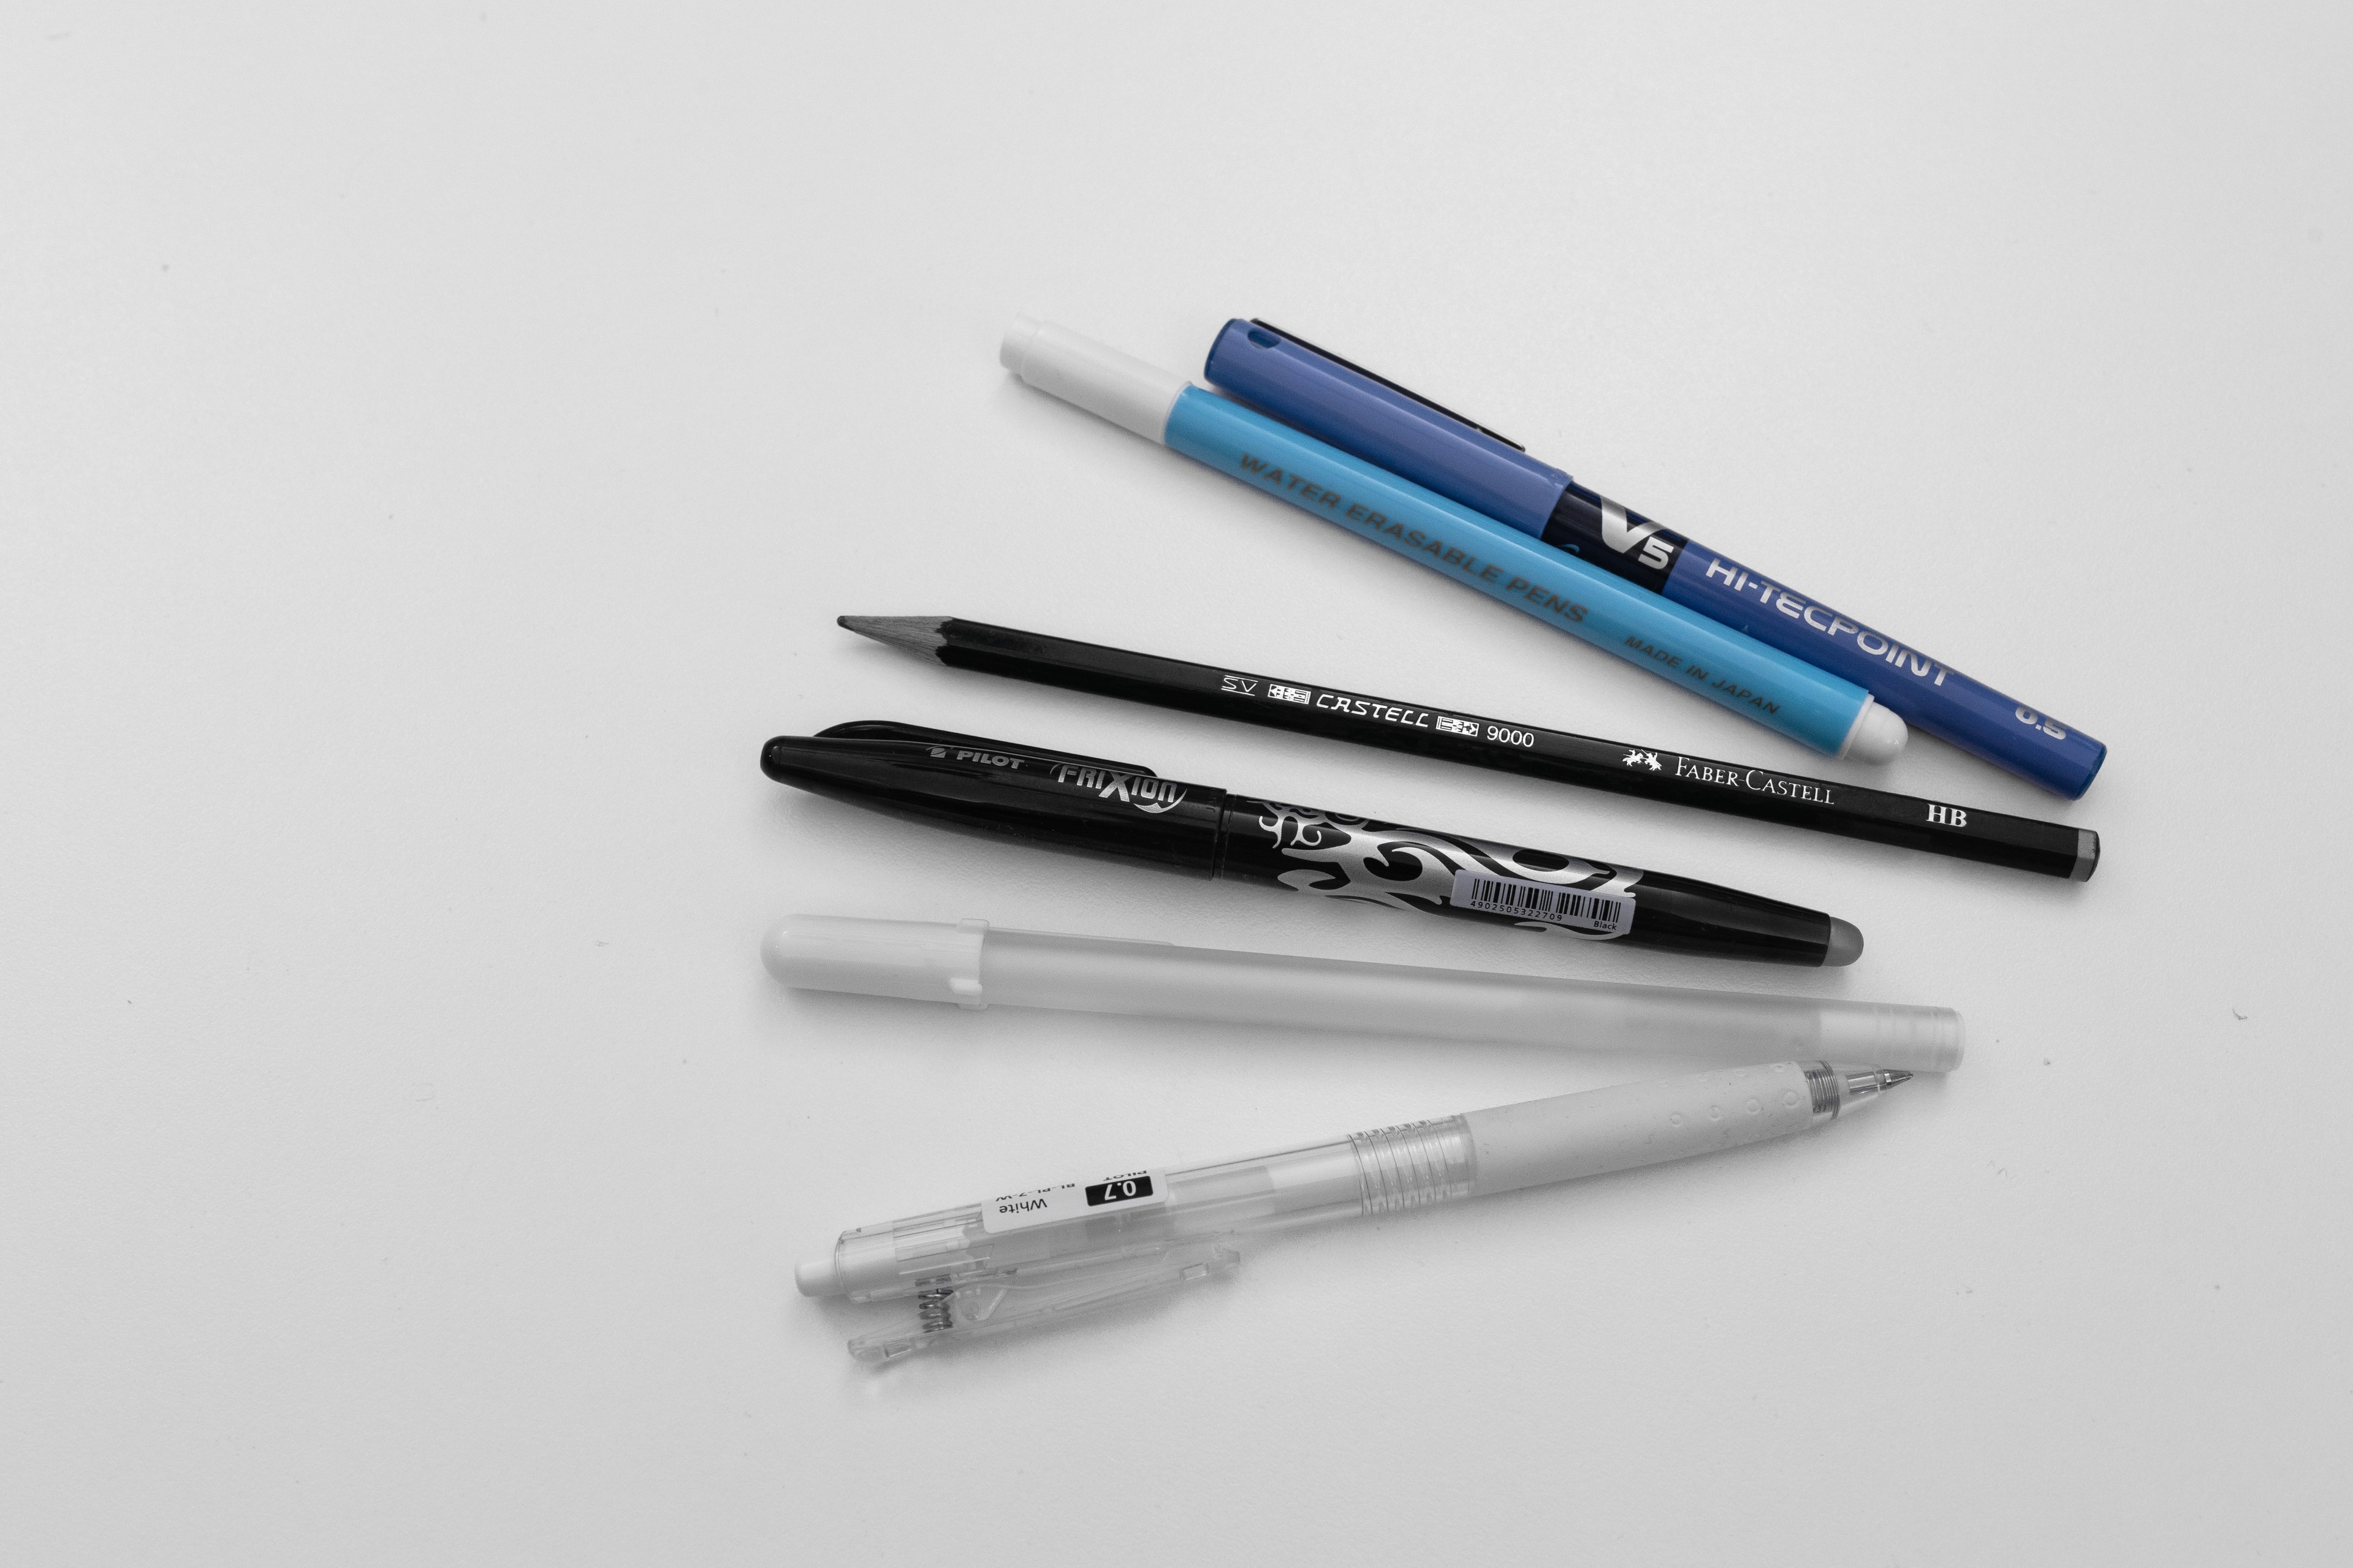
Let’s look at different types of transfer pens and how they work:
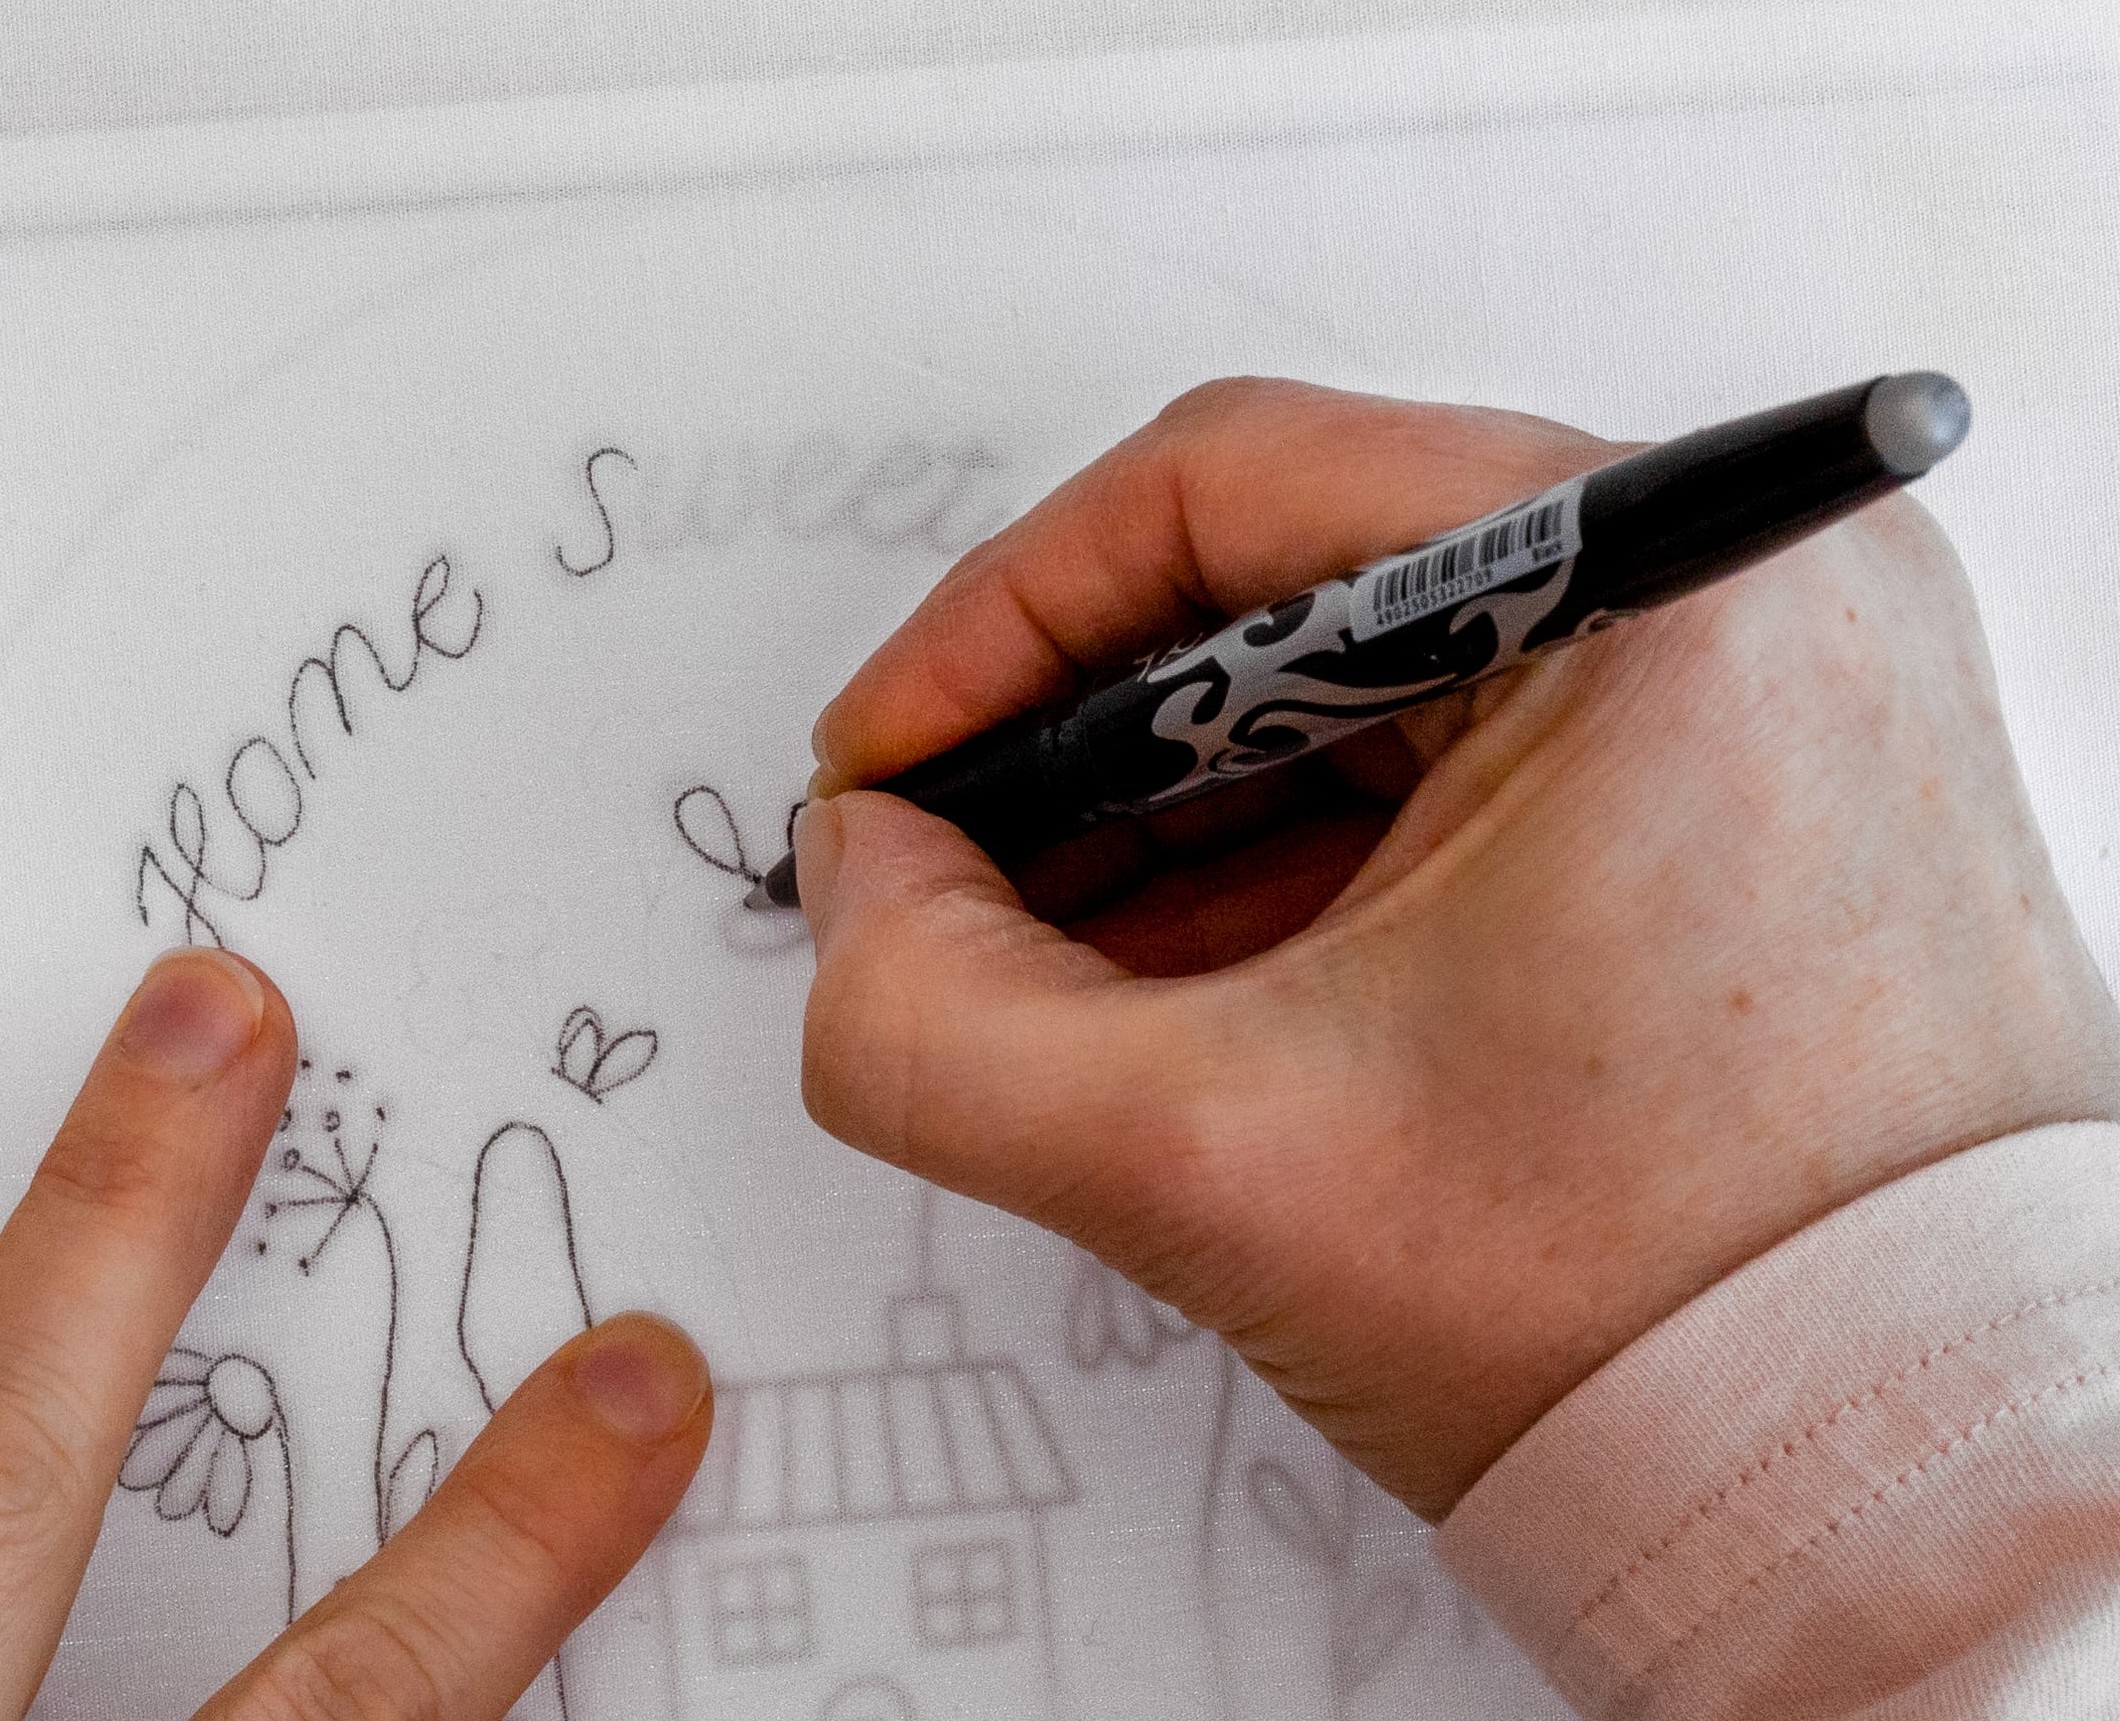
1. Heat erasable pens
I love these pens, because you when you’re finished stitching, just apply heat from a hair dryer or hot iron (taking care) and watch the lines disappear. You may need to go over each area 2-3 times until the pen actually disappears. If your stitching is delicate, you can aim at the underside of the fabric instead. And note that these pens can leave a residue or outline, even after heat removal (more noticeable on dark fabric). You can try steam removal if it’s bothering you. In terms of brands, there are lots on the market, but my fav for light coloured fabrics is the Pilot Frixion fine rollerball pen in black. You’ll be more likely to find this in a stationery store than a craft store (they are primarily used for writing on paper). For dark fabrics, I’d recommend a white pen that’s designed to be heat- erasable for dark fabric.
2. Water soluble pen
These pens are a great option too, and are relatively easy to remove. When you’re finished stitching, just run your entire piece under lukewarm running water, and watch the lines disappear. I suggest using this removal method rather than just dabbing the lines with a wet cloth because, in that case, lingering marks often reappear after the fabric dries. DMC has a water-soluble pen which is quite easy to draw with and creates a clear bold line.
TIP: There may be cases where you don’t want to wet your stitched work – e.g. if it’s really delicate or the threads/fabric aren’t colourfast. In that case, you’ll need to choose a different type of transfer pen.
3. Permanent pen or pencil
By all means, use these! I mean, it’s not the end of the world if some marks are visible at the end, especially if you’re learning and just want to get started before you invest in specialist supplies. You can minimise pen-marks by doing dots for Lazy Daisies (e.g. instead of drawing the full curve, just do a dot at each end of the stitch). And try to draw your outline as faint as you can so that it’s not too obvious.
4. White pen
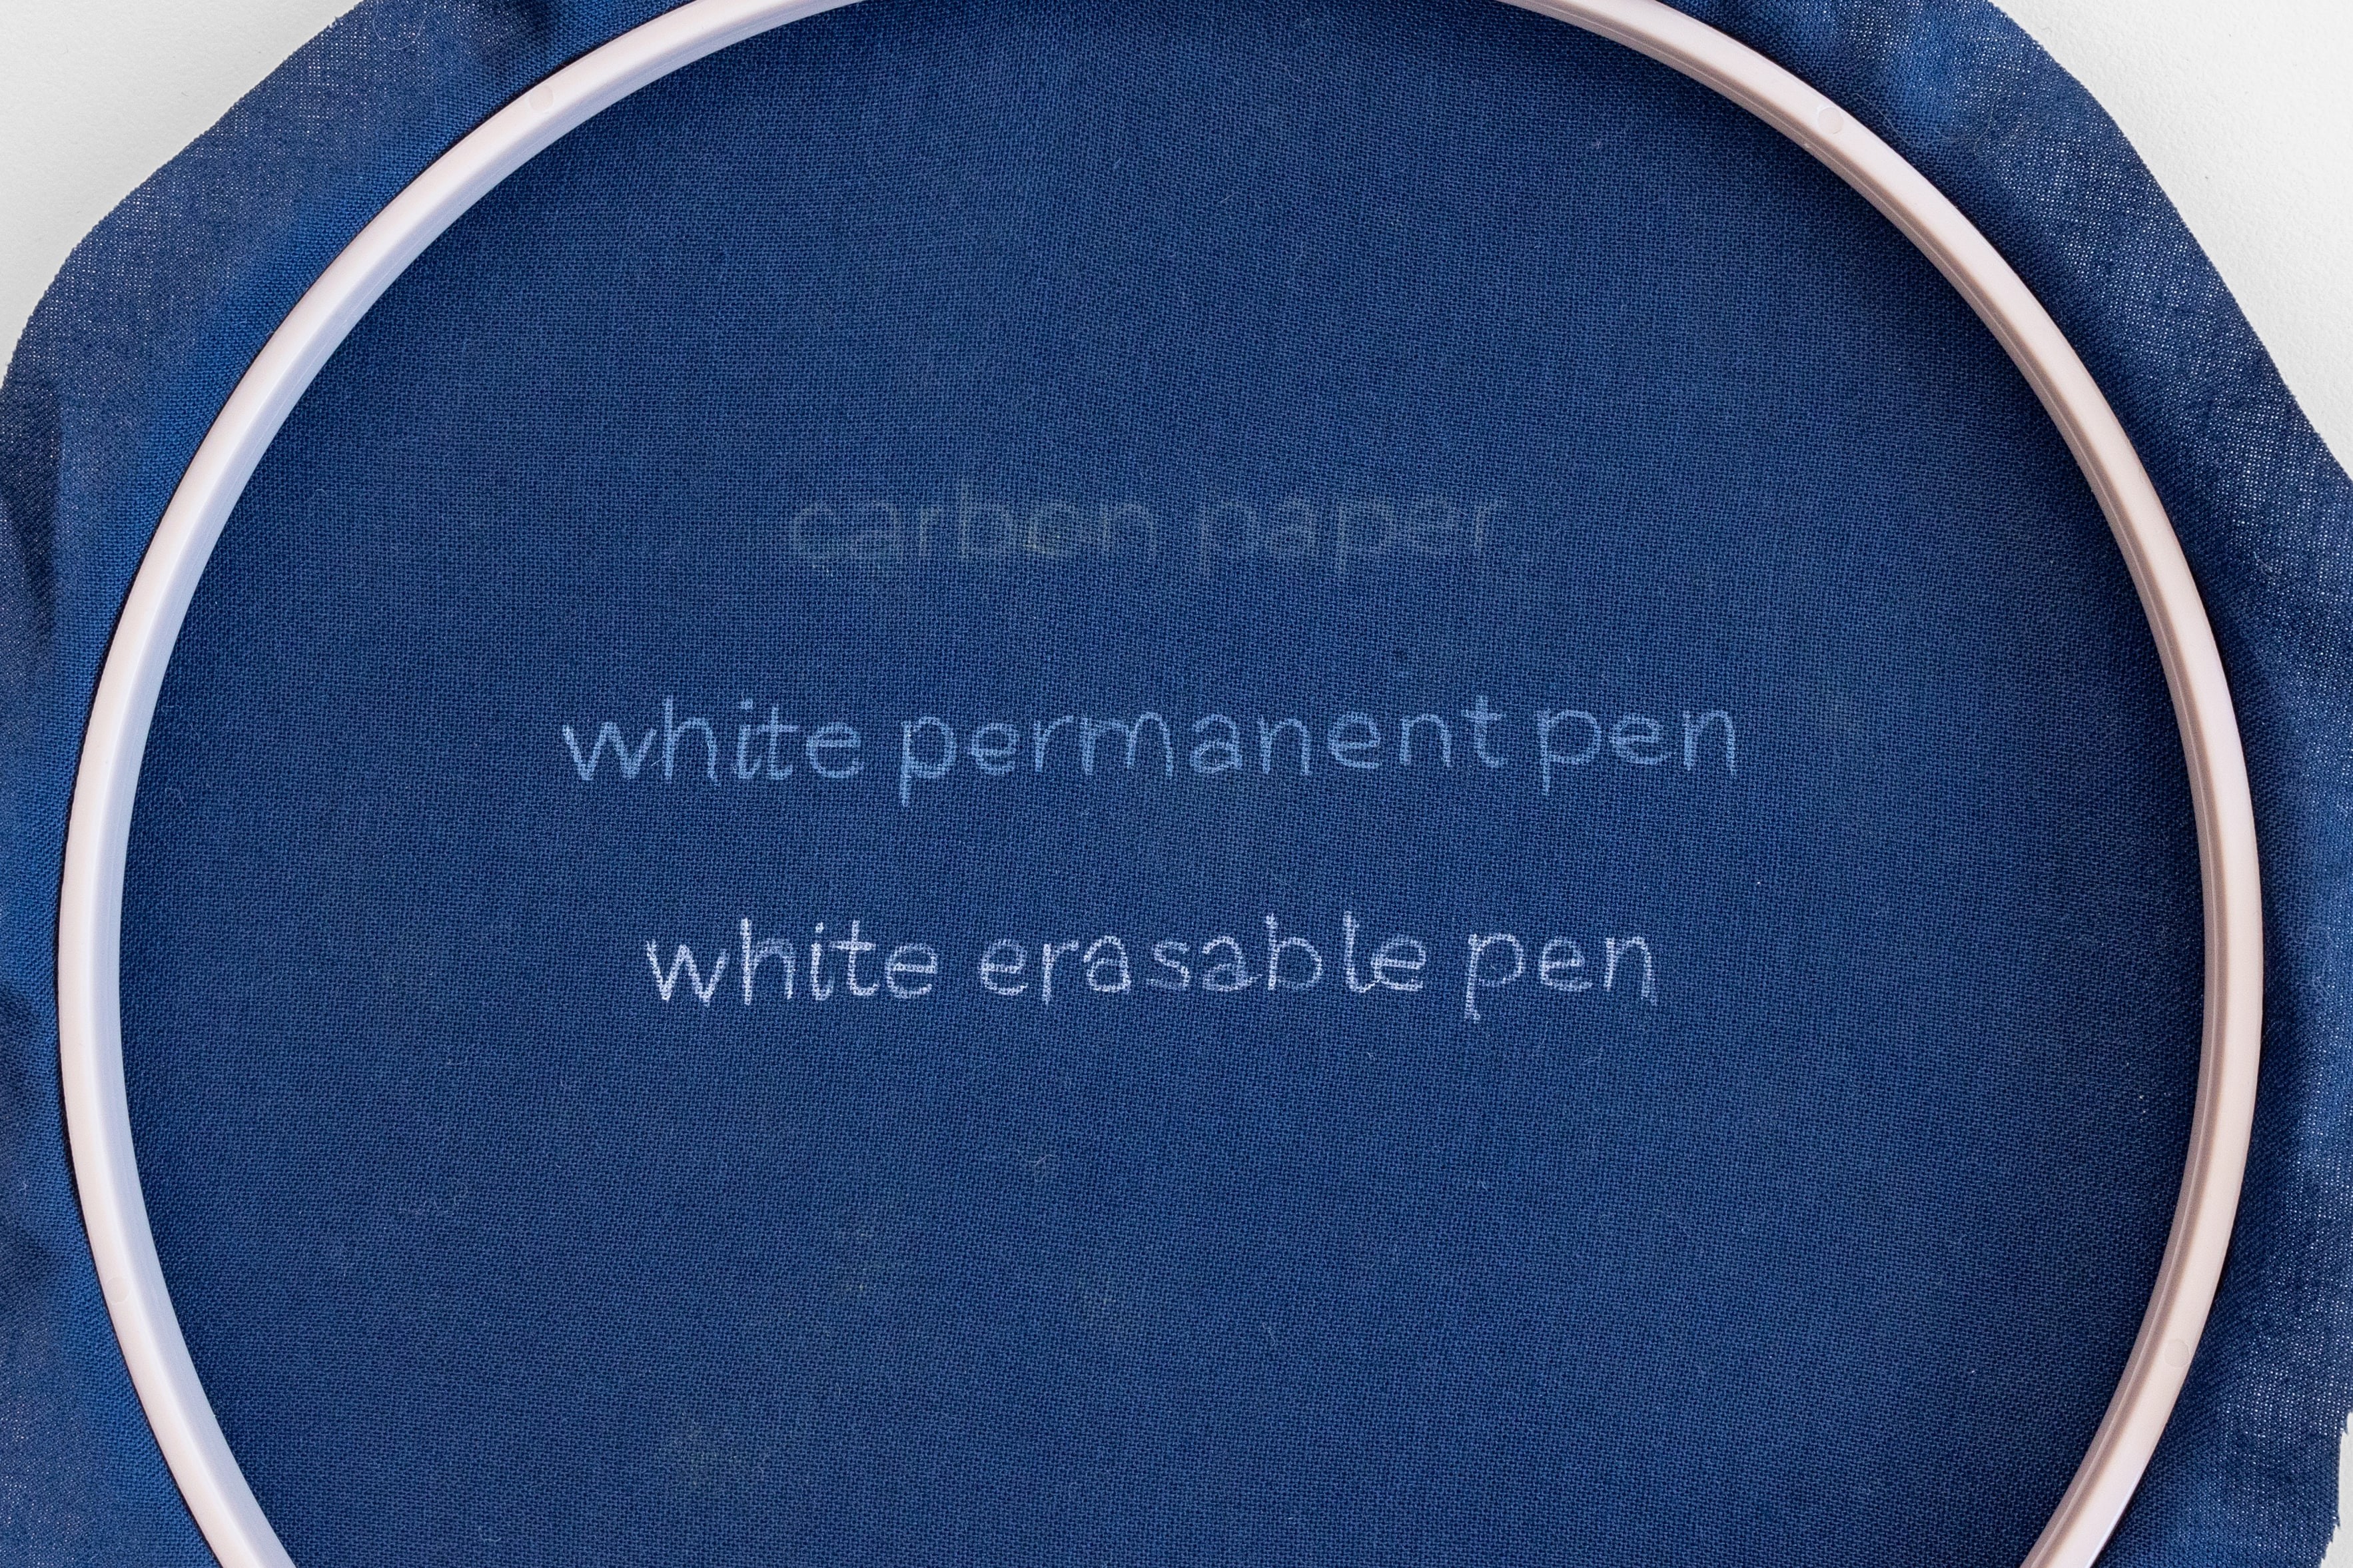
In terms of creating visible lines on dark fabric, you may need to switch to a white pen. Great news is that you can get some great erasable white pens! But they may be a bit trickier to source, or pricier than their dark counterparts. If you find a good one, you can draw onto dark fabric and the lines will be nice and clear – although note that there is sometimes a delay before they actually show up on the fabric (so just be patient). In terms of brands, I’ve used a white Clover pen and found it worked well, and I’ve been told that the Panda Pencil by Helen Godden and the Gelly Roll are fantastic. I’ve also heard white mechanical pencils are excellent. You can also get white gel pens which show up really well against dark fabric, and are often easier to source and more affordable from a stationery store. But take note – they are NOT removable, so all of your template lines need to be covered with stitches.
1. Tracing with a Mobile Phone Flashlight
Pros:
-
Quick and easy
-
Works on light or see-through fabrics
-
Pen lines removable
-
Pen lines clear and visible
-
Works day + night
-
Supplies easy to find
-
No need to stitch through an extra layer
Cons:
-
Doesn’t work on dark or thick fabrics
-
Drawing skills required
Let’s start with my favourite method for transferring embroidery patterns to fabric, which I’ve taught successfully to thousands of beginners. It’s great for light-coloured fabrics which you can see through to trace.
IN A NUTSHELL: Print your template and tape it to the underside of your dressed hoop. Trace the design using a heat erasable pen, using the torch on your mobile phone asa light source.
Step by Step Guide:
You will need:
How to:
Step 1
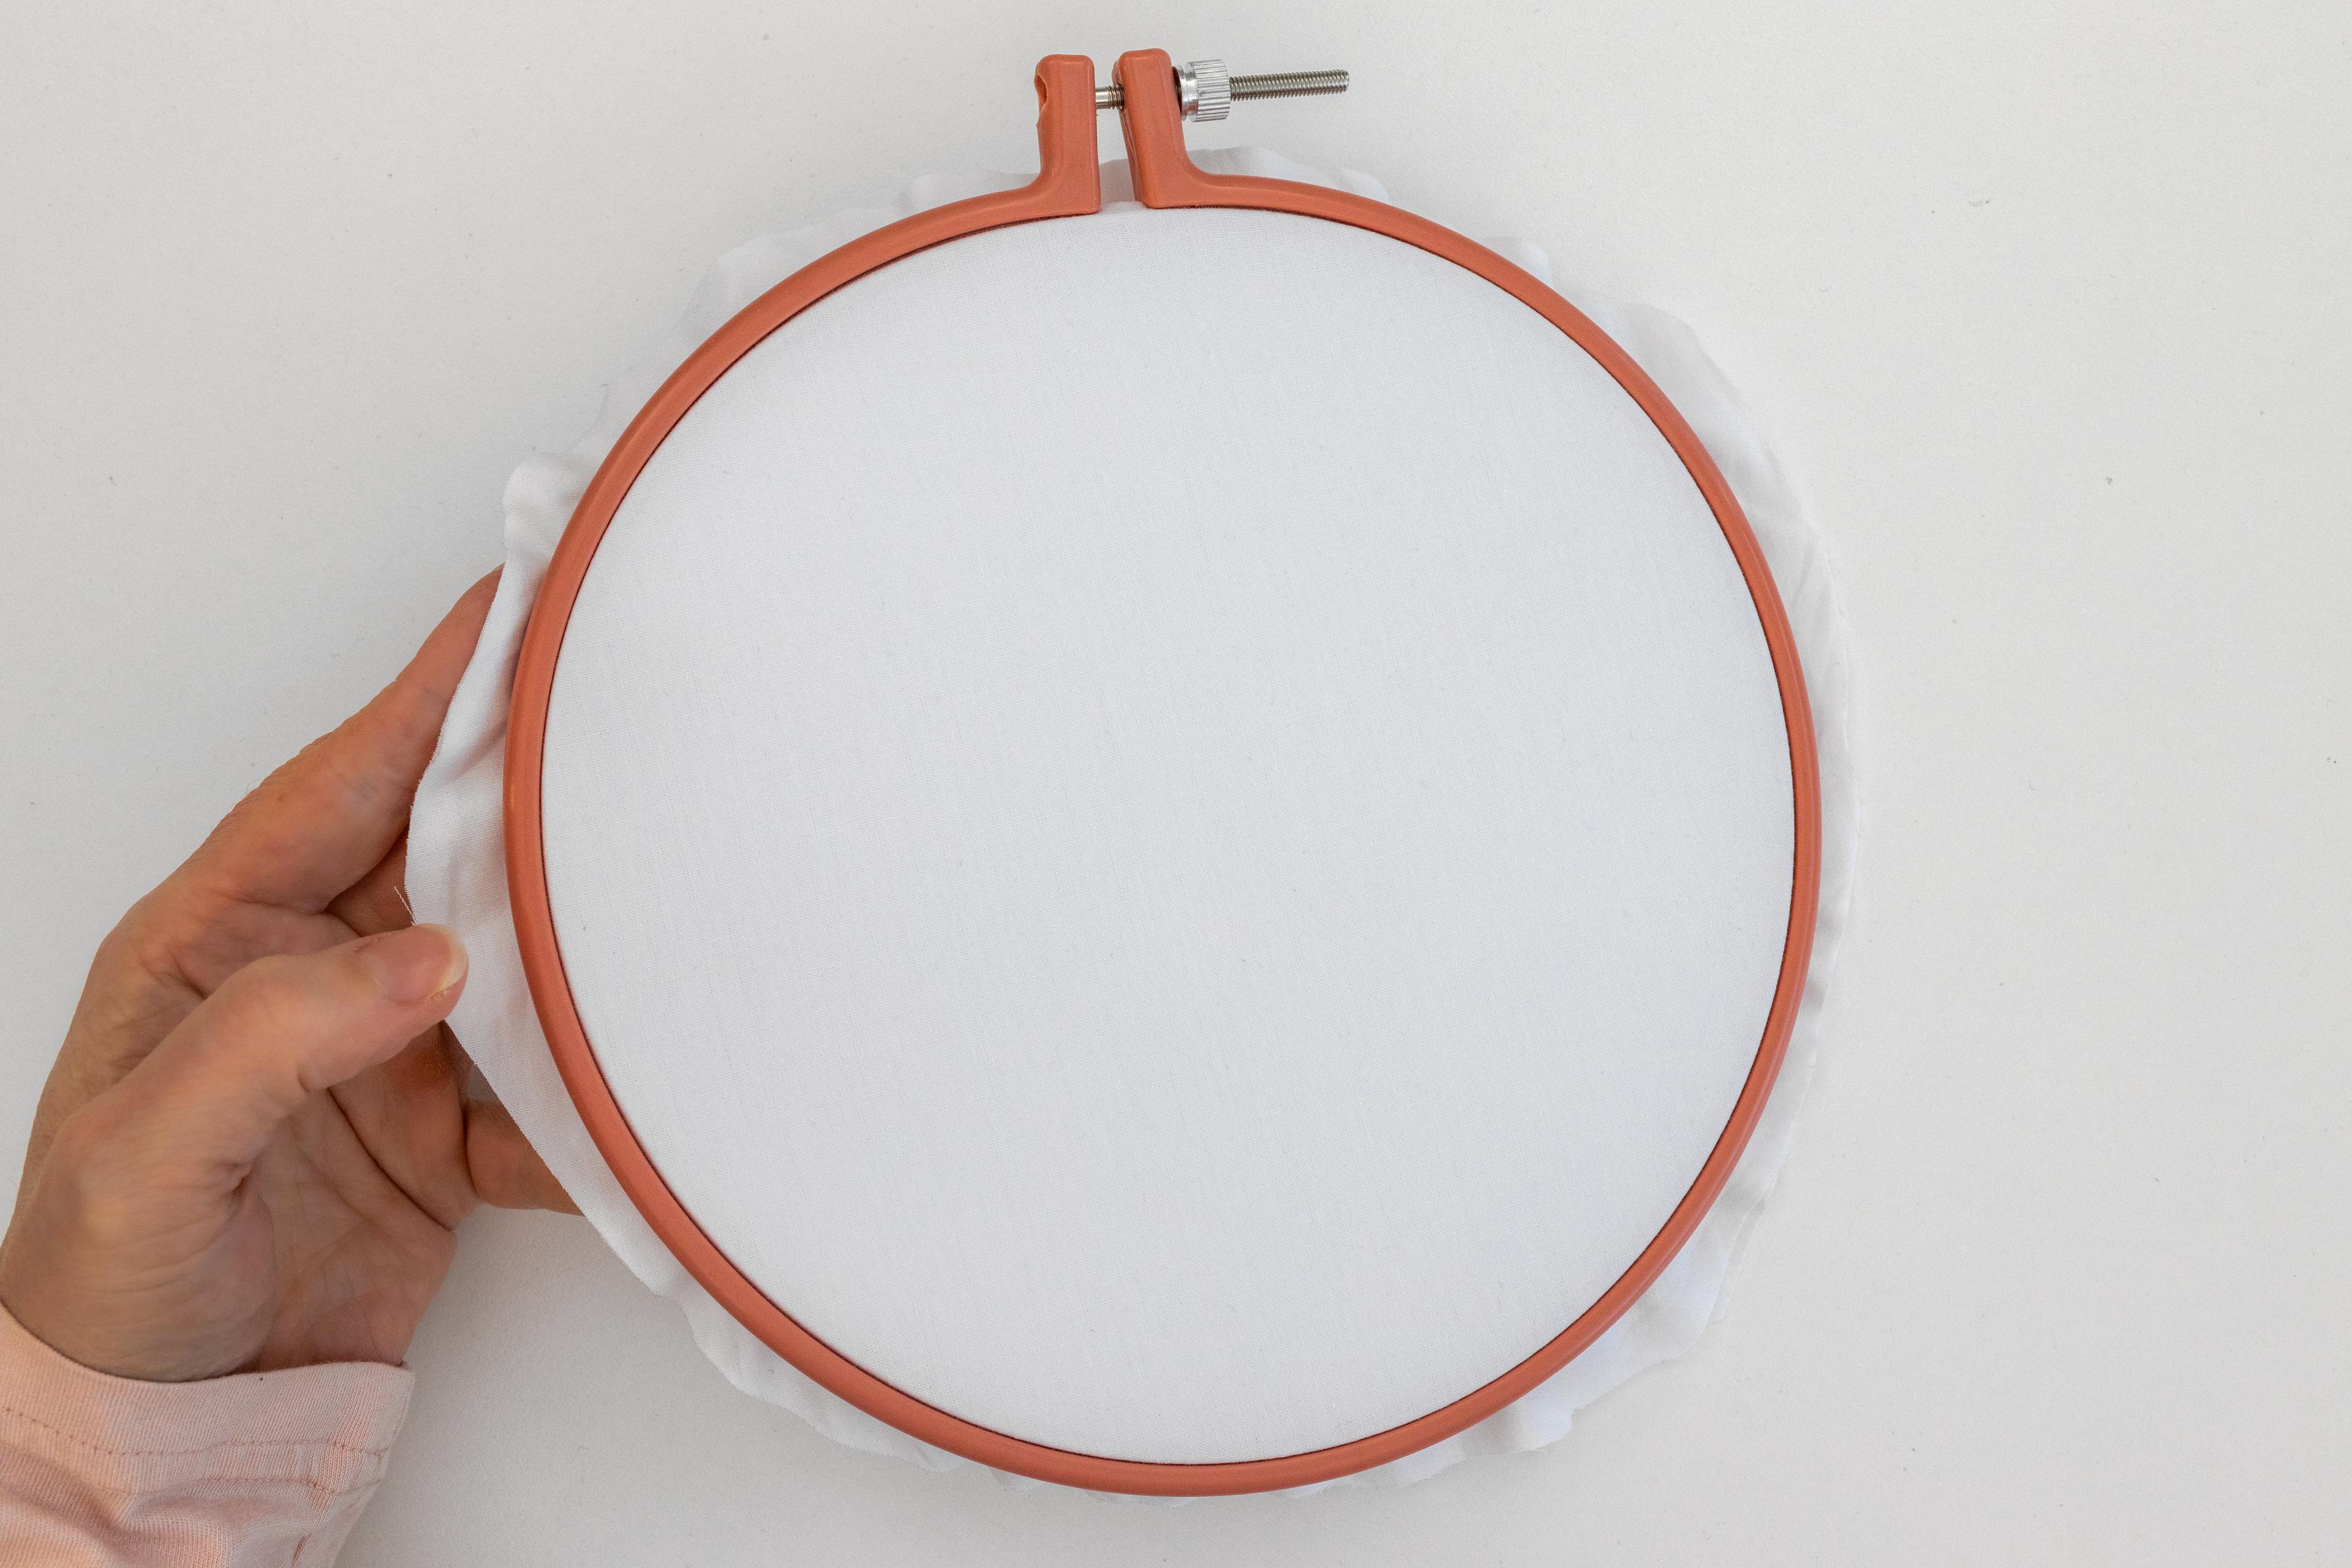
Dress your hoop: I think it’s easier to trace your design template on fabric that is already mounted nice and tight in your hoop. So go ahead and do that step first. Here’s a quick recap: separate the 2 sides of your hoop and place the inner hoop on a flat surface. Centre your fabric on top, fit the outer hoop over it, and tighten. Pull the excess fabric taut, twist the closure, and trim any excess fabric (an overlap of about 2 inches or 5cm works well).
Tip if you're using two pieces of fabric:
If you can easily see through both layers, then you can hoop both layers now. If not, re-hoop after the transfer step to add the second layer.
Step 2
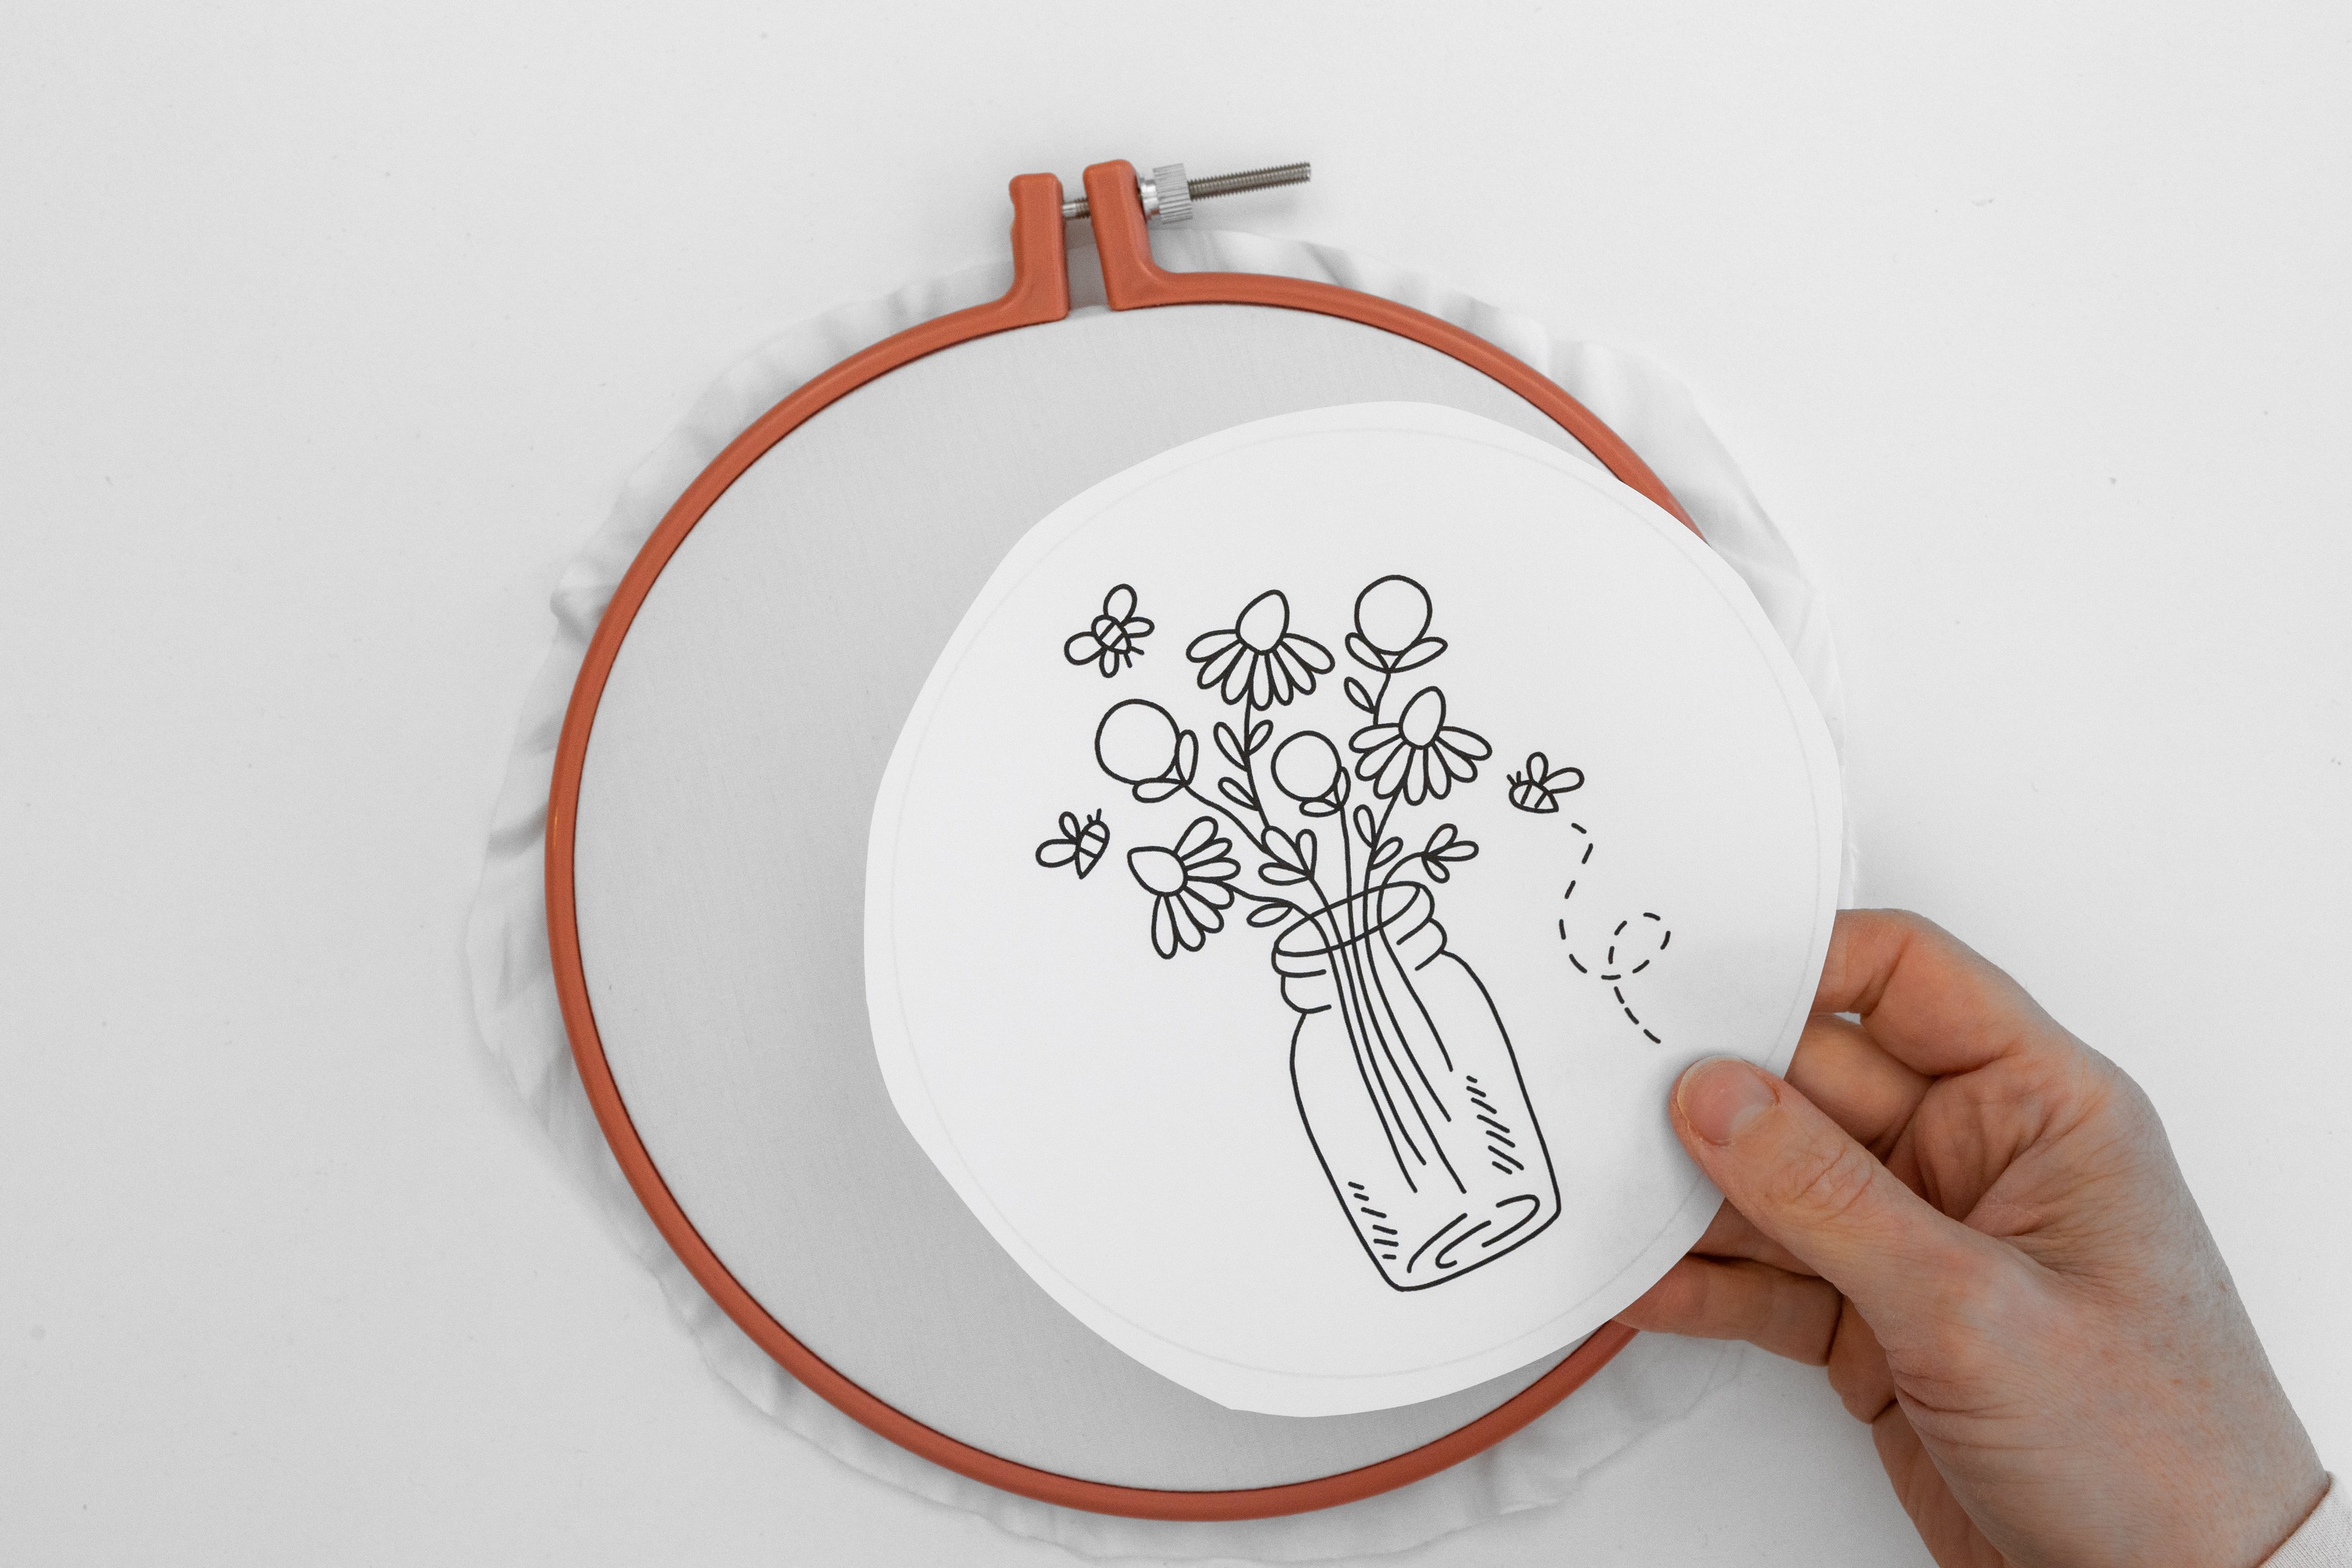
Prep template: Cut out the design template, so that it's a round piece which will fit inside your hoop.
Step 3
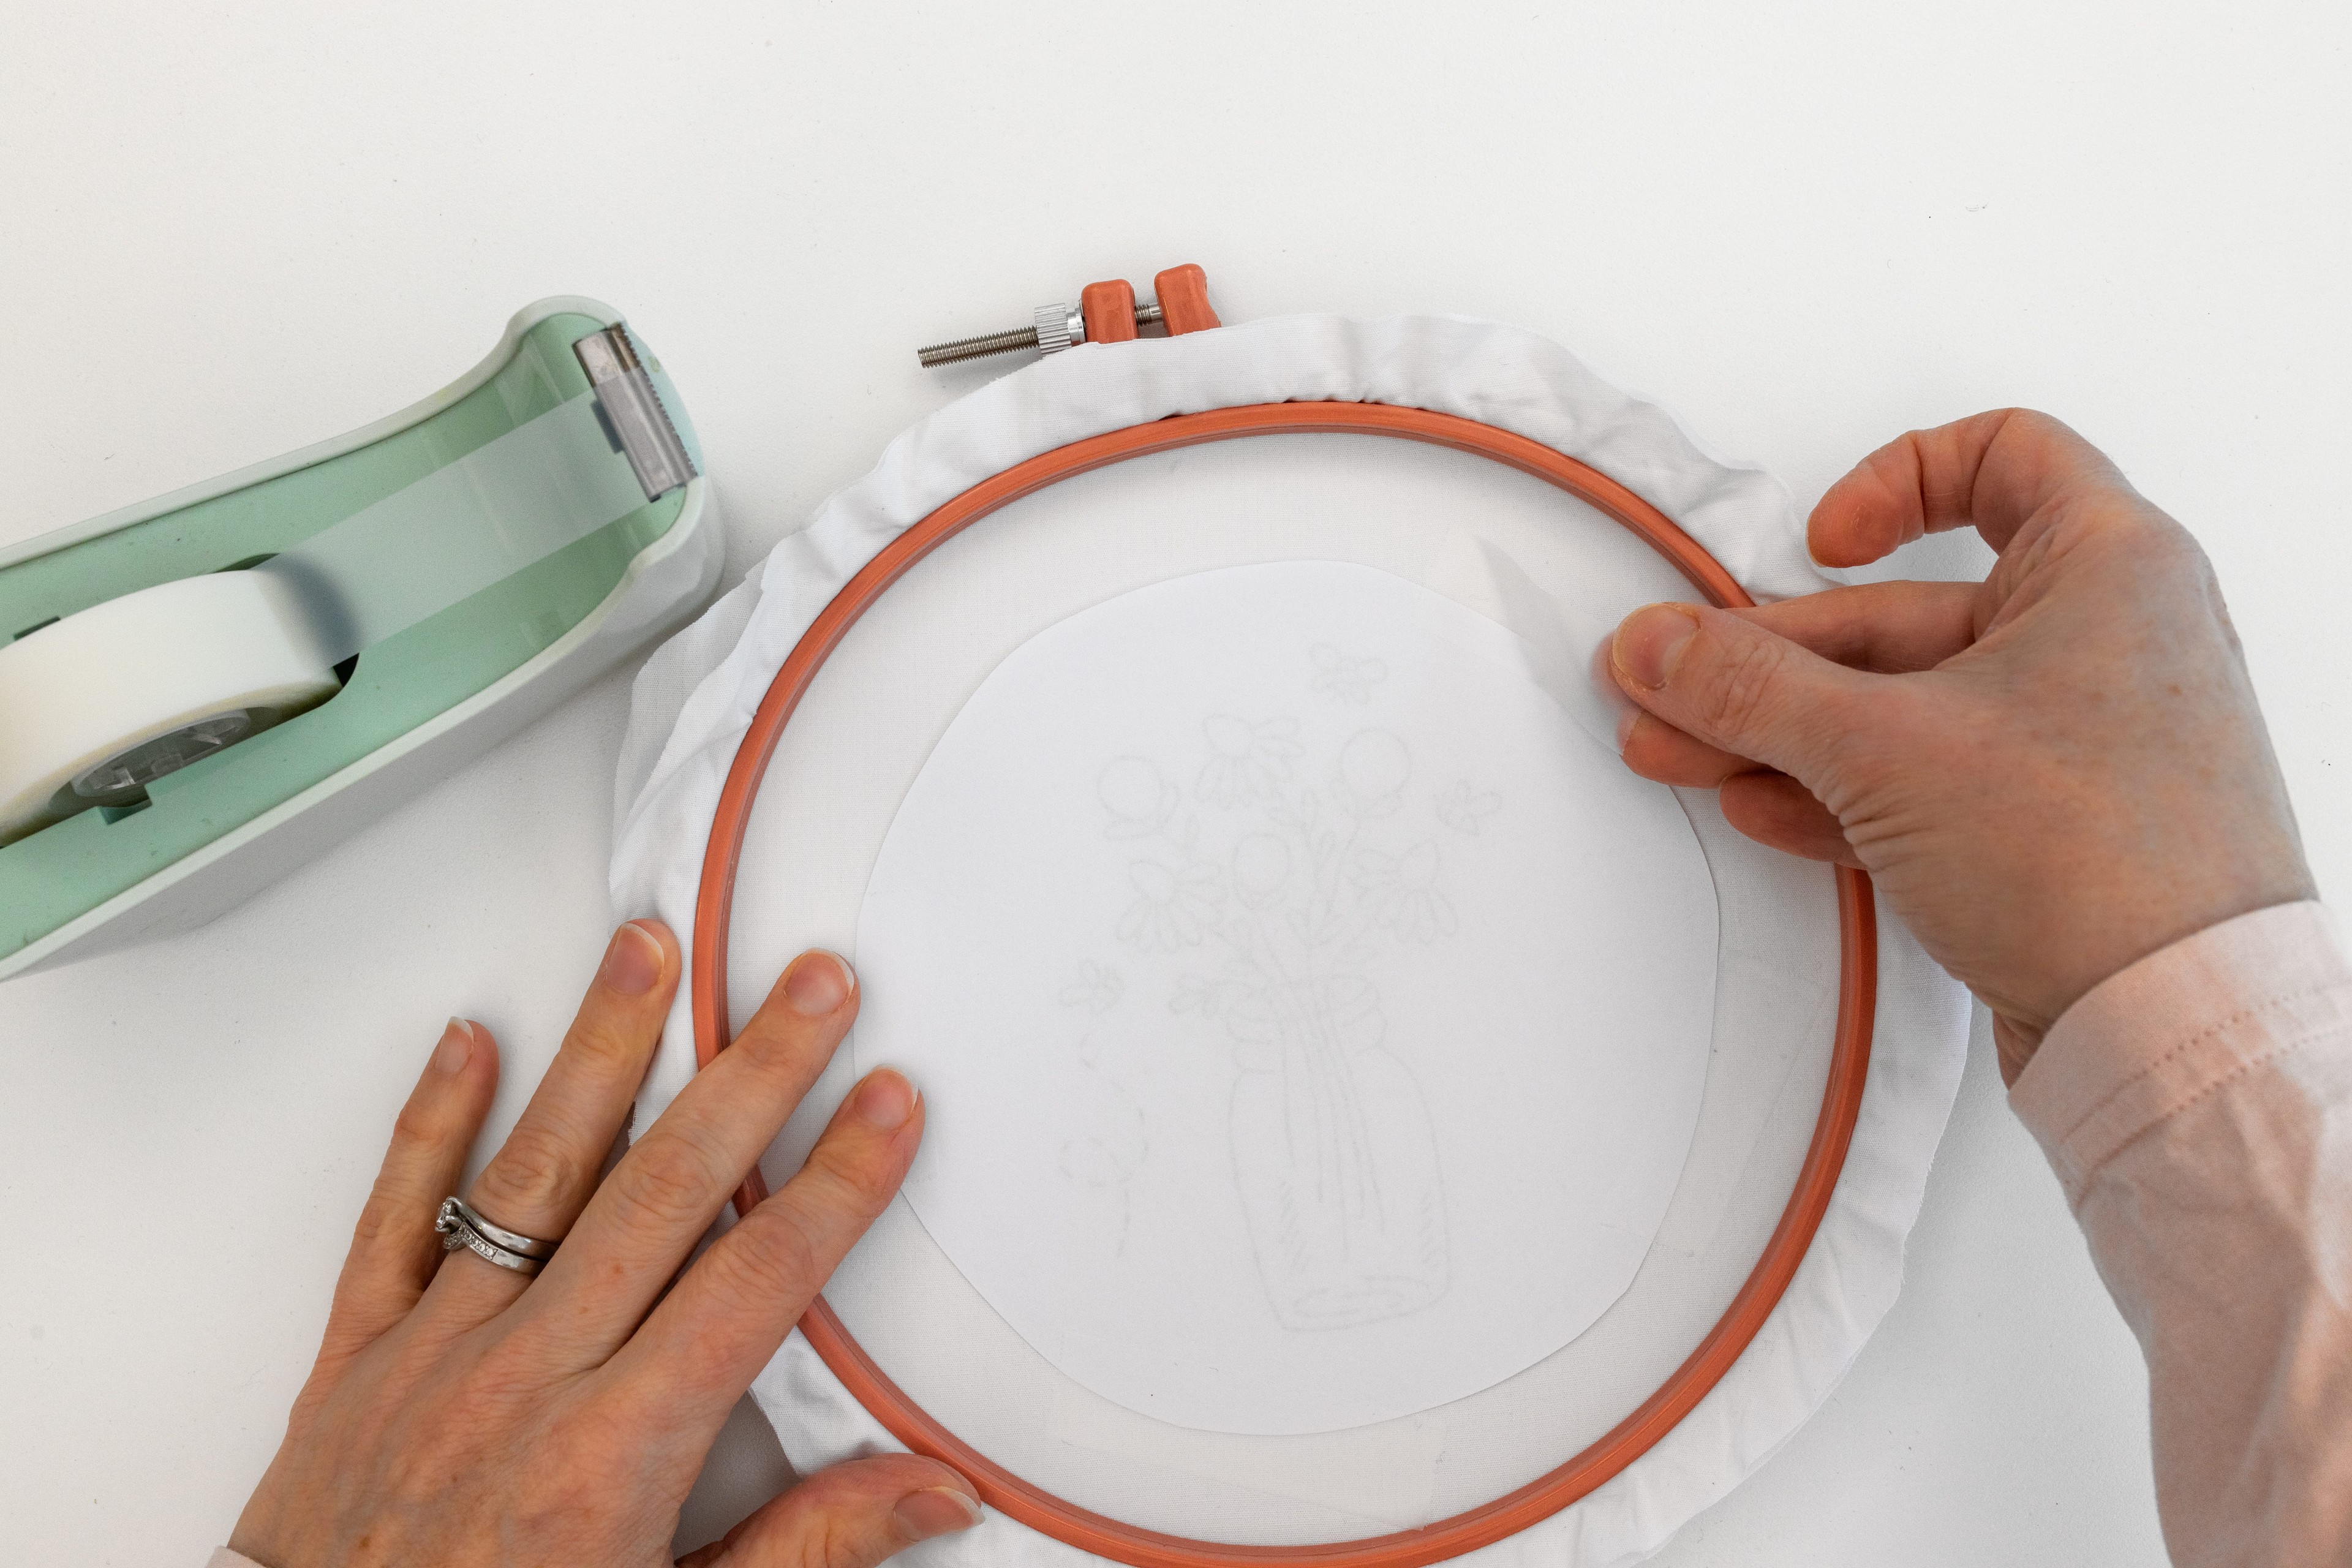
Stick template to fabric: Flip your hoop your template face-down on the fabric, and position the design wherever you want it on the fabric(usually this would be in the centre). Secure it in place using clear sticky tape or pins. Now your template is nicely secured to your fabric and you don’t have to worry about it moving around when you trace it.
Step 4
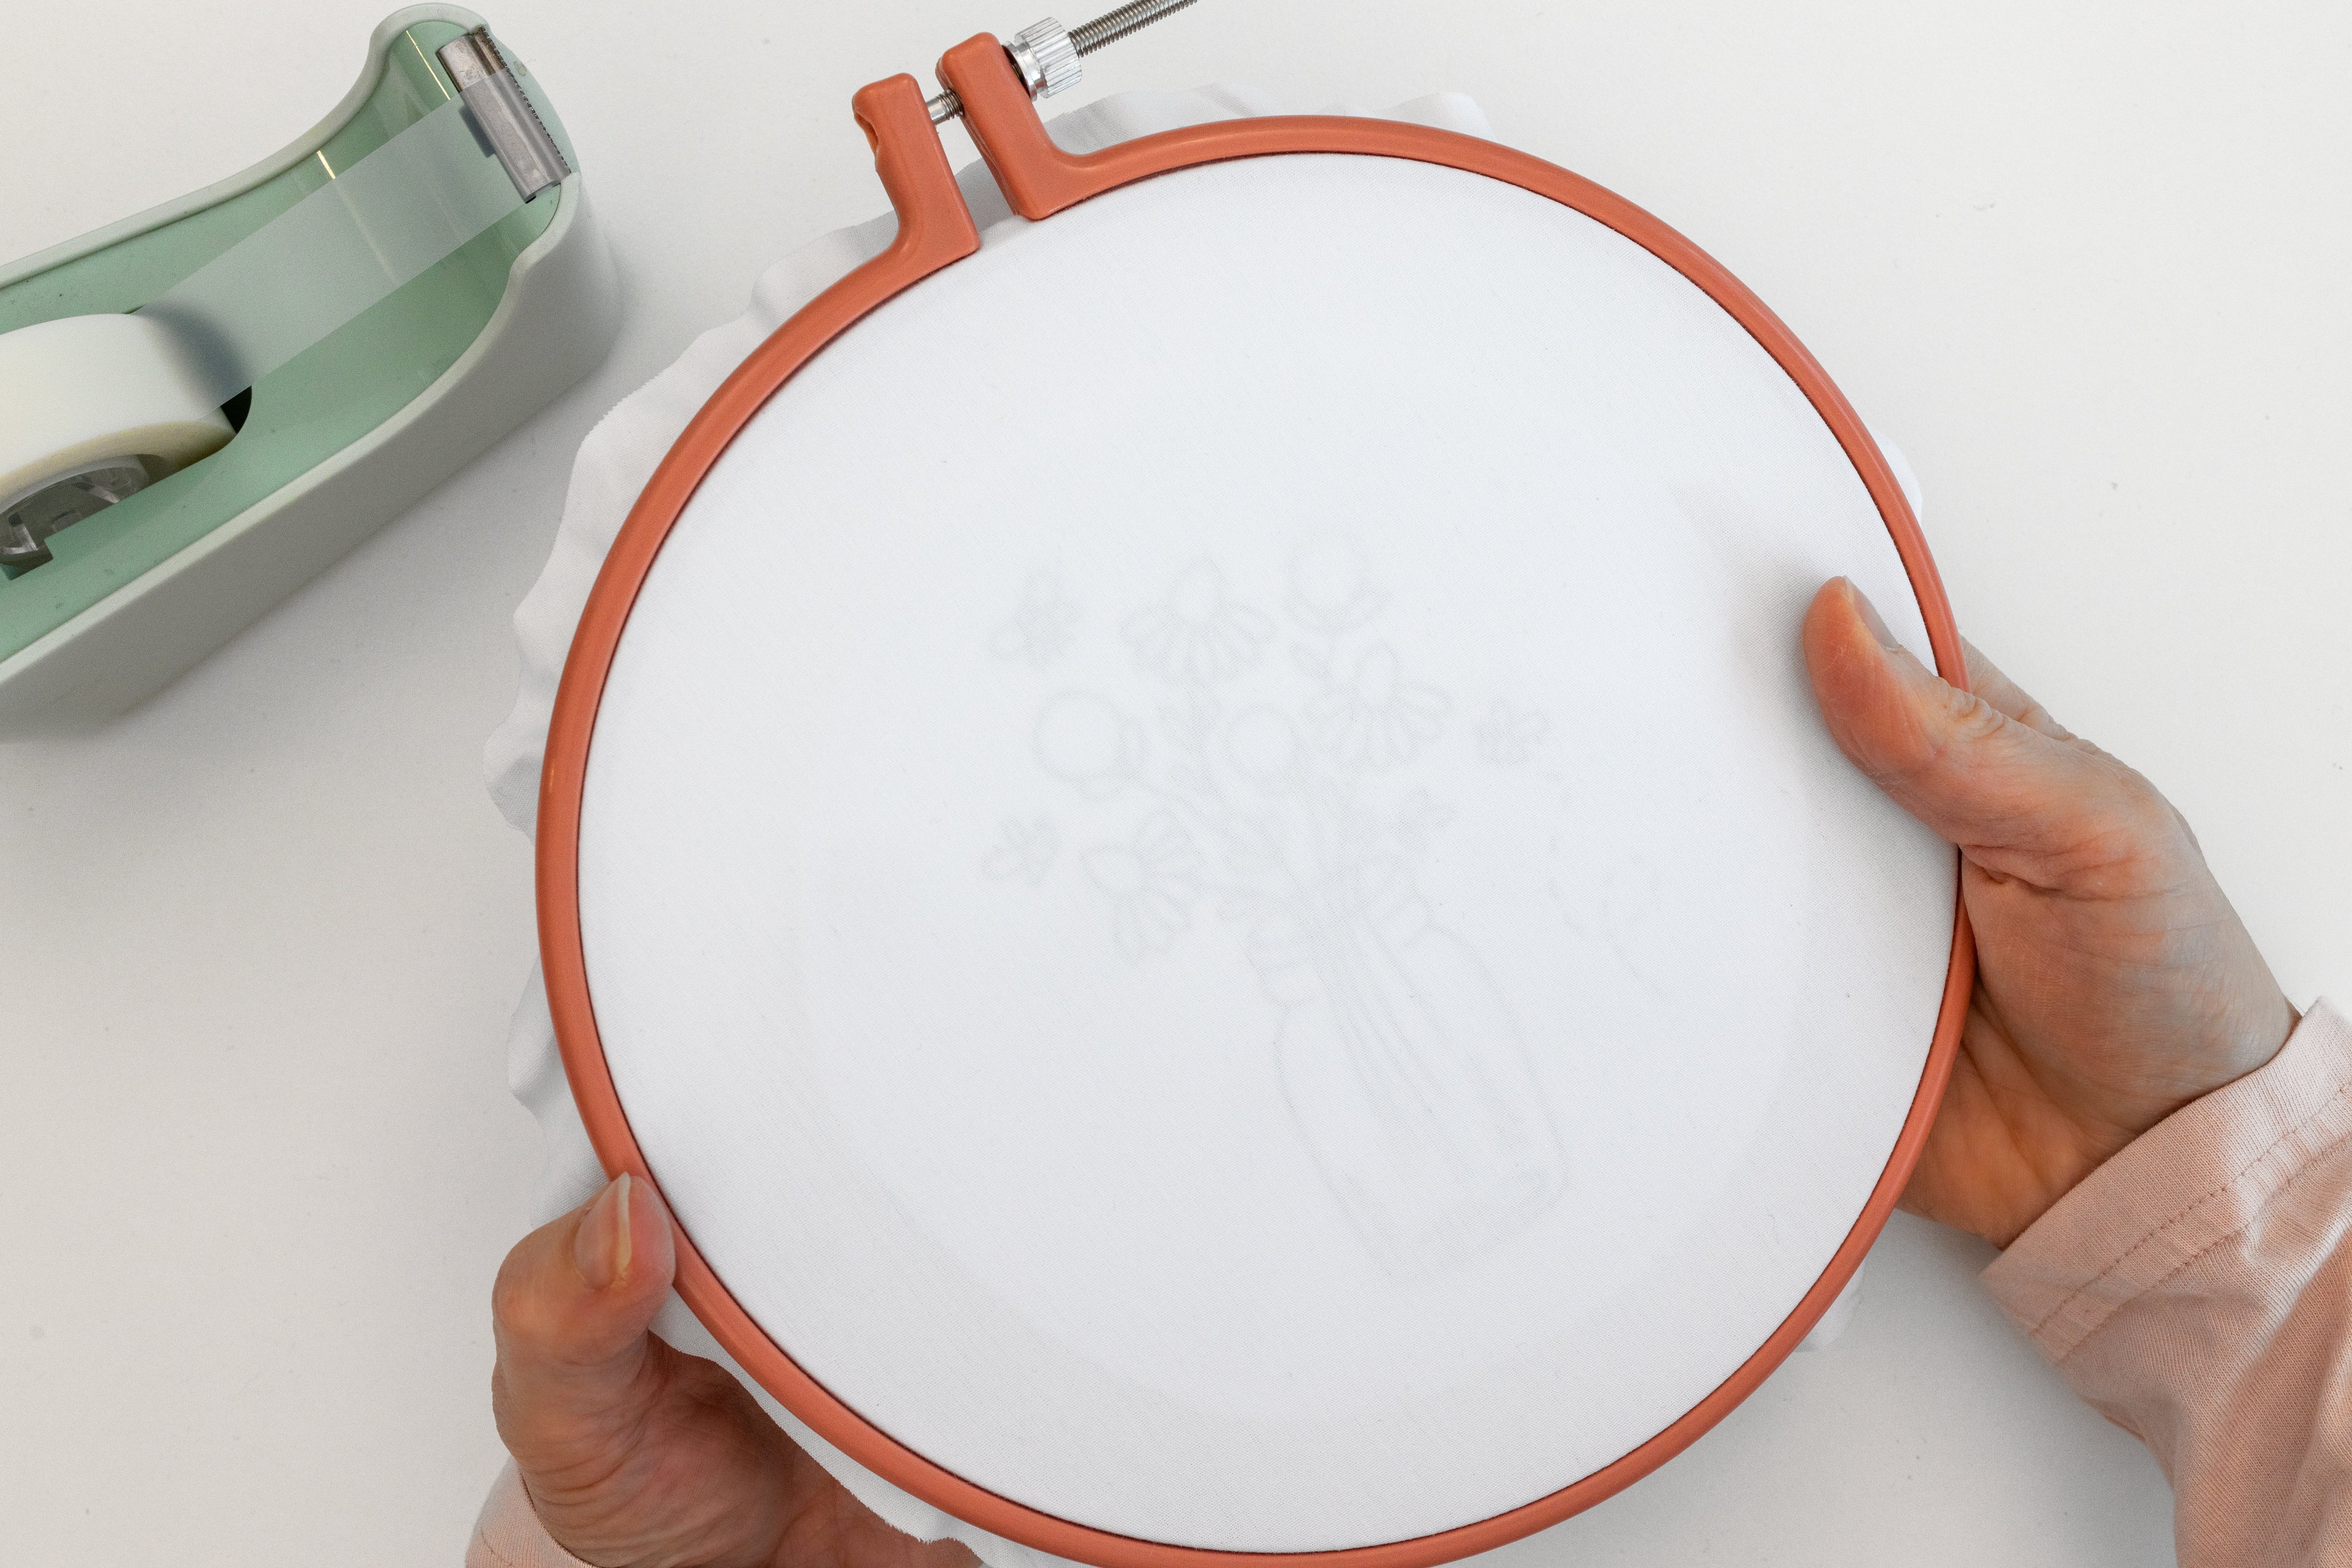
Check transparency: Flip your hoop over, and take a look – can you easily see the template through the fabric? Is it visible enough for you to trace over? If it’s nice and clear, then jump straight to step 6 below. Or, if your design template is a bit tricky to see, then go to step 5.
Step 5
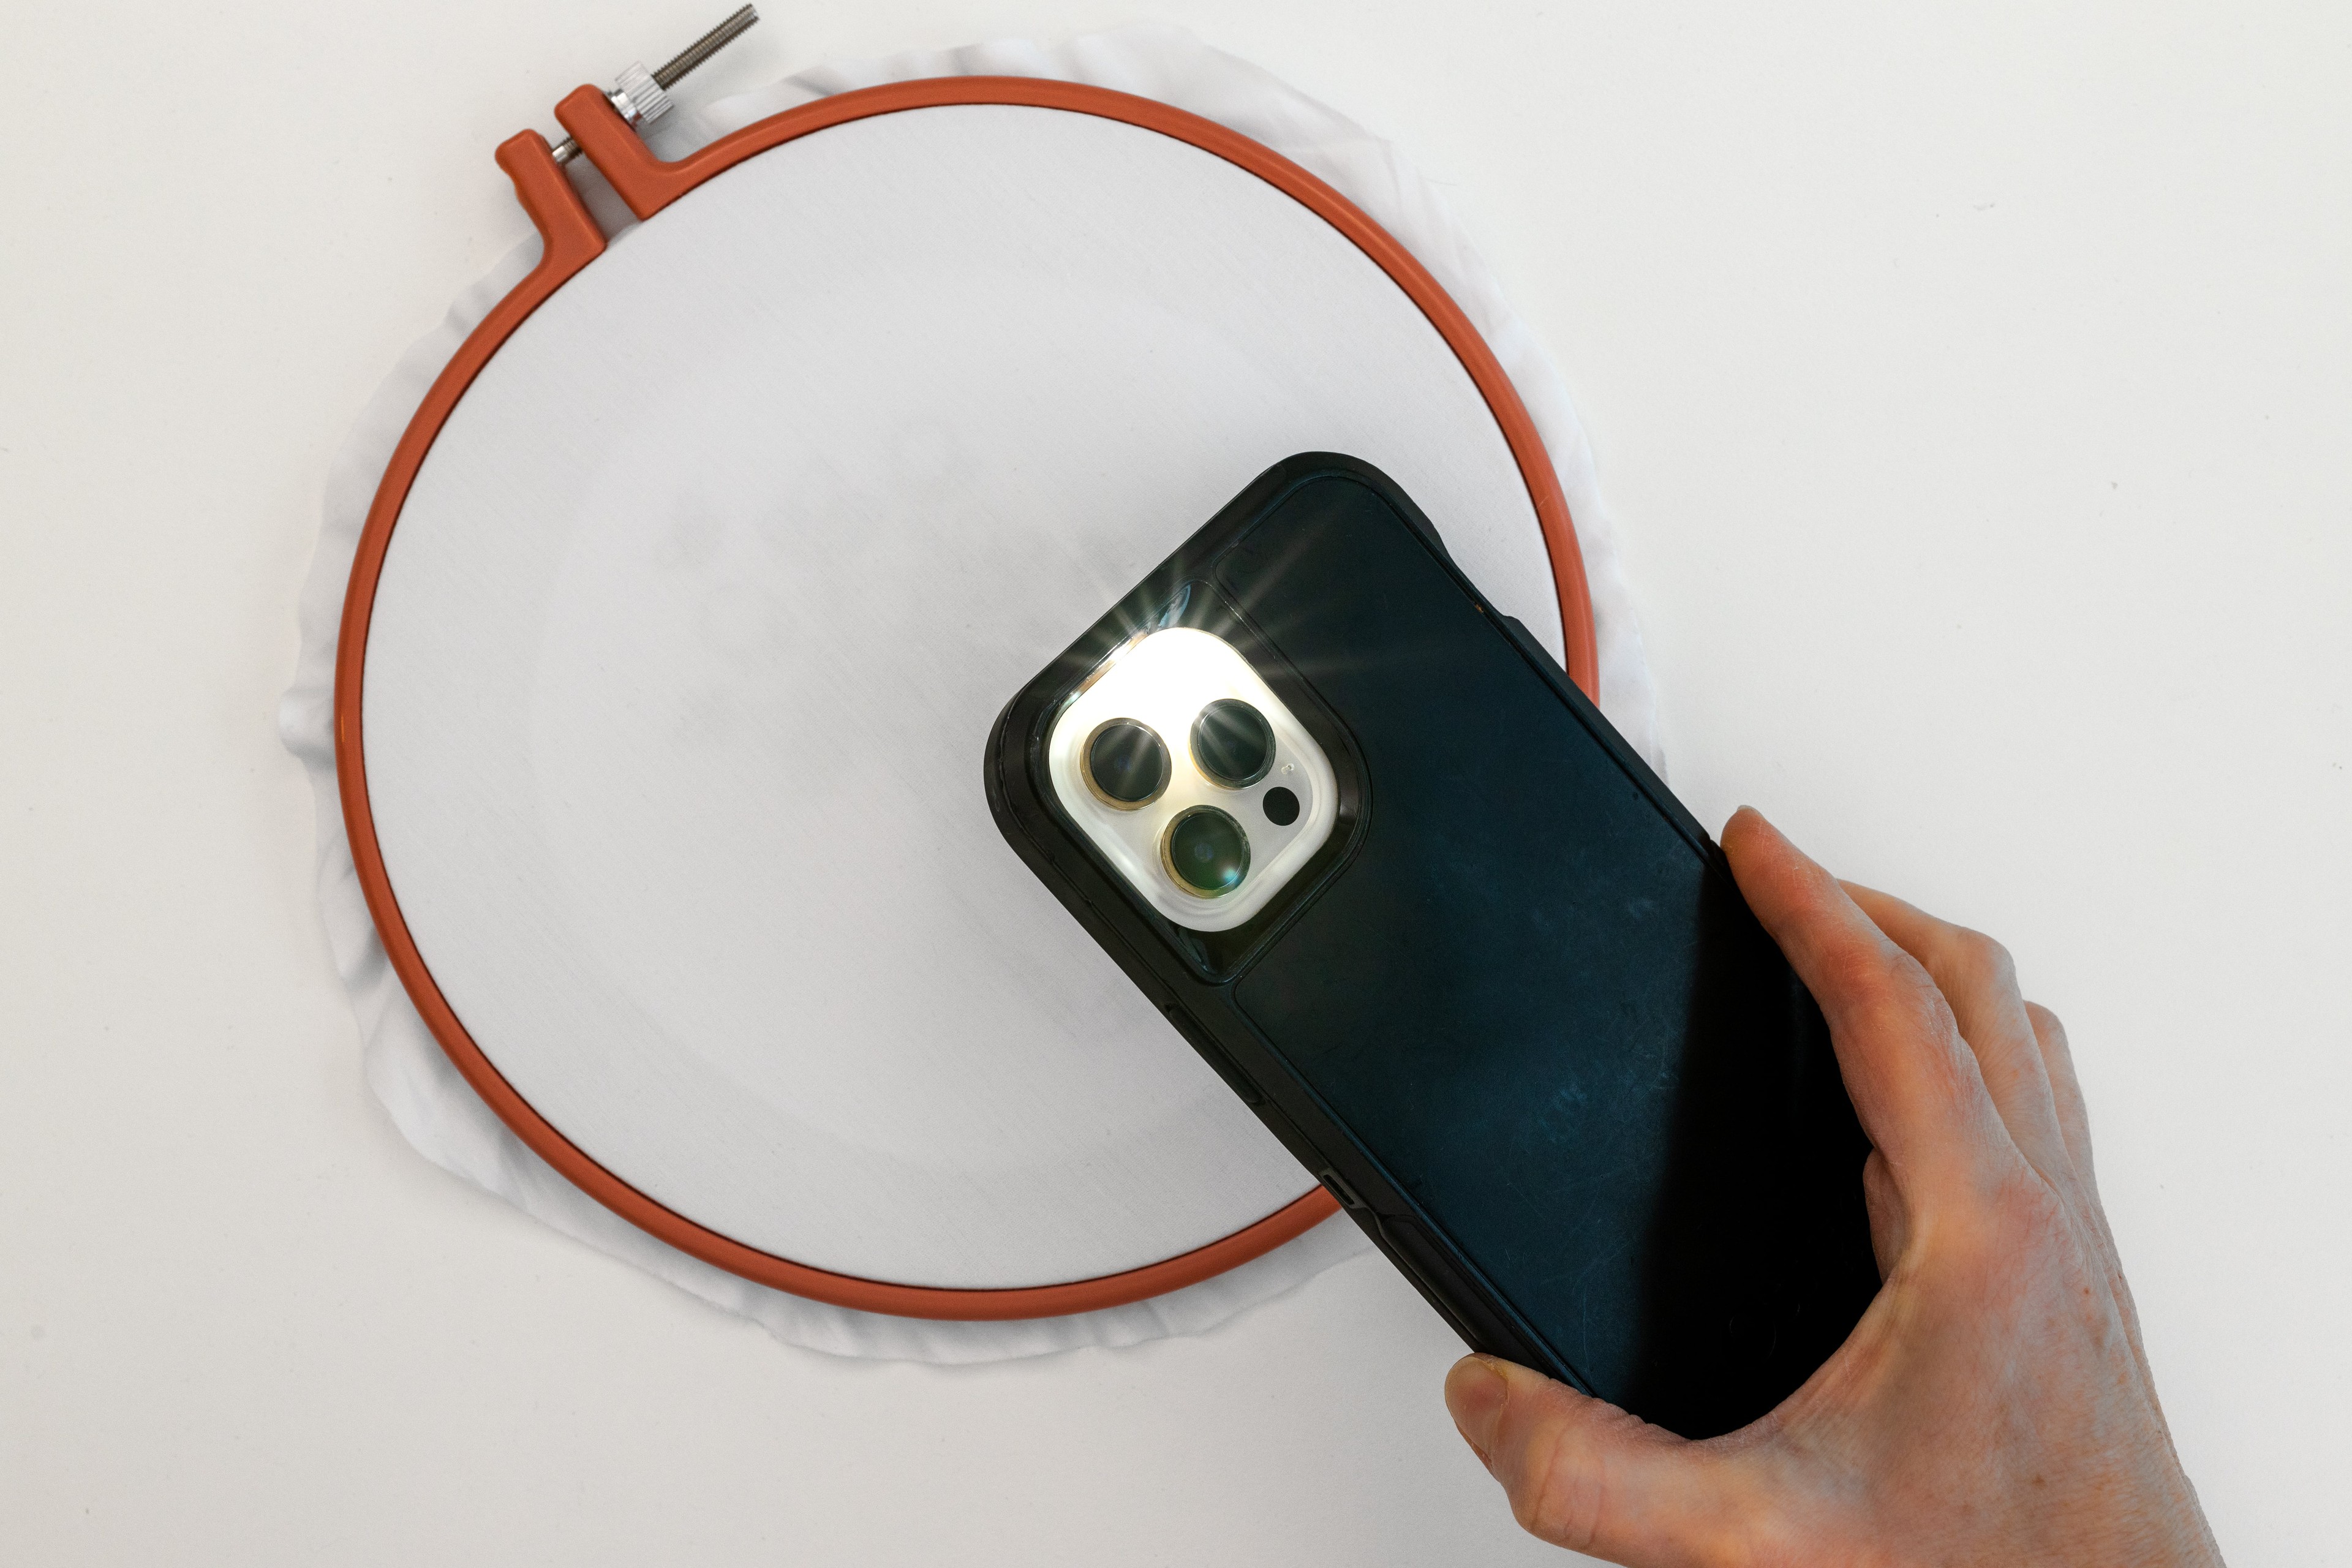
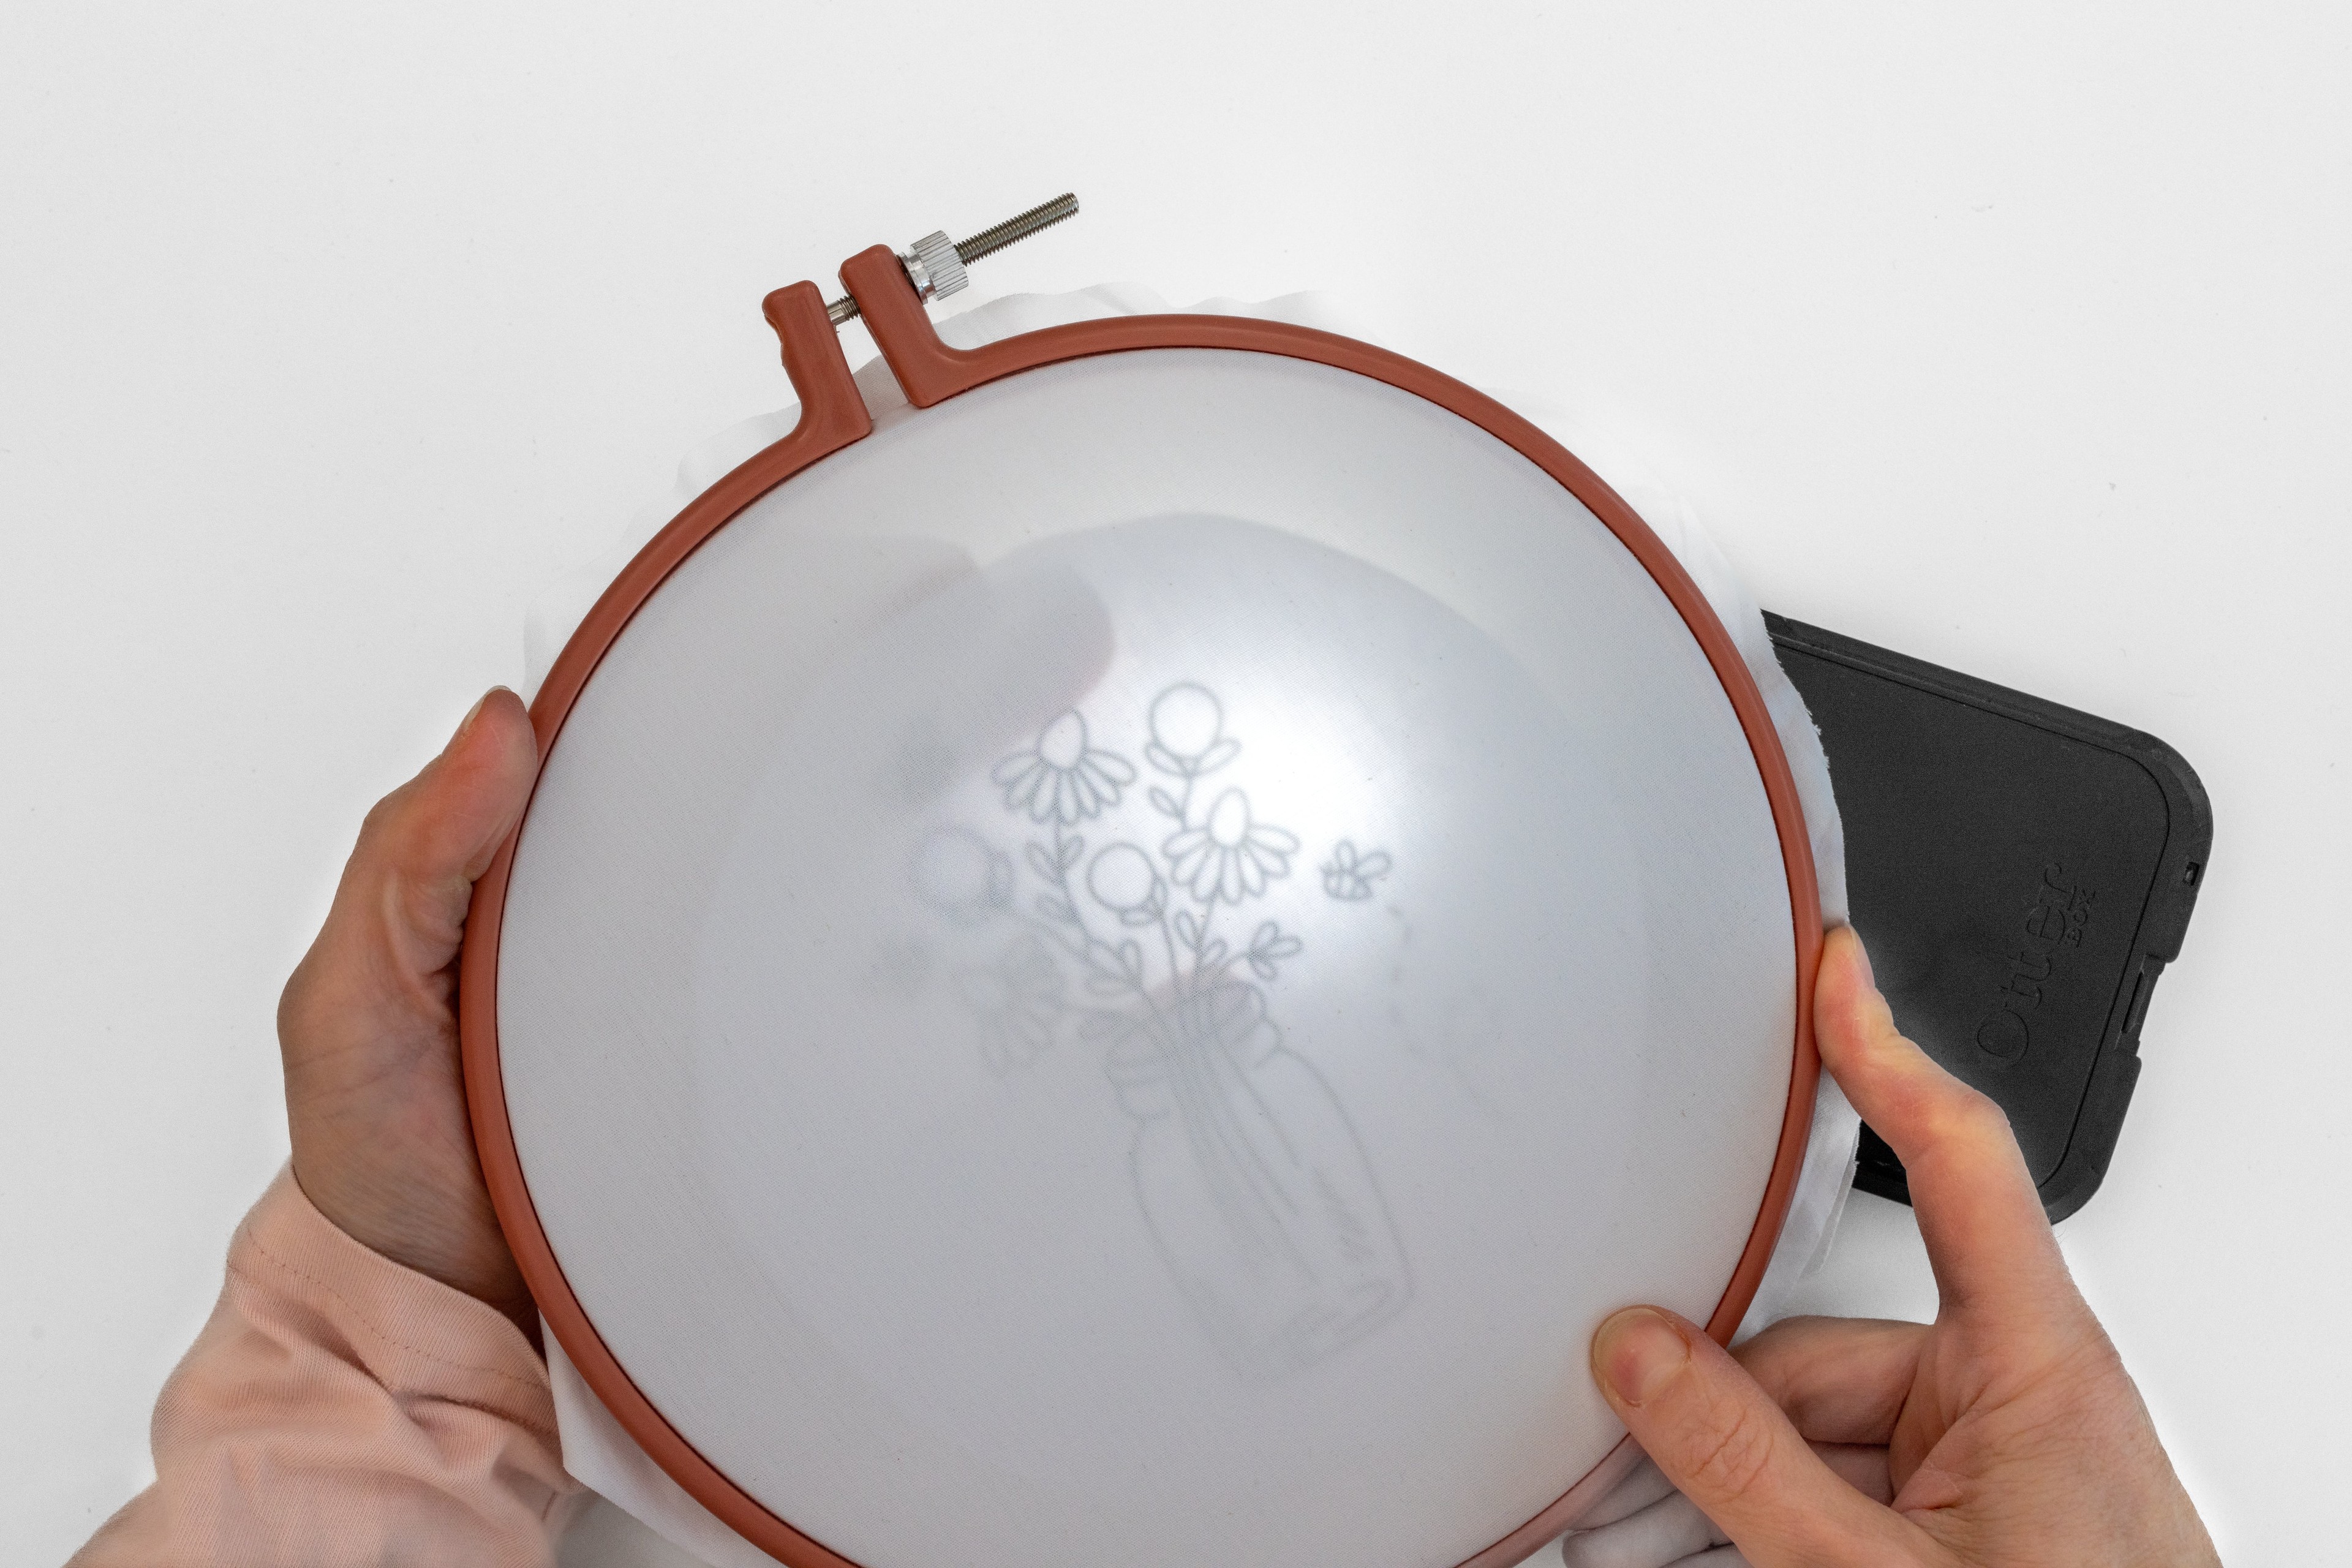
Get your make-shift flashlight ready: Turn on your mobile phone’s flashlight function, then lay your mobile on a flat surface with the light beaming upwards. Position your hoop over the top, so that the fabric is facing up. See how this makes the template much easier to see on the front side of your fabric? Now we’re talking!
Tip to use window light instead:
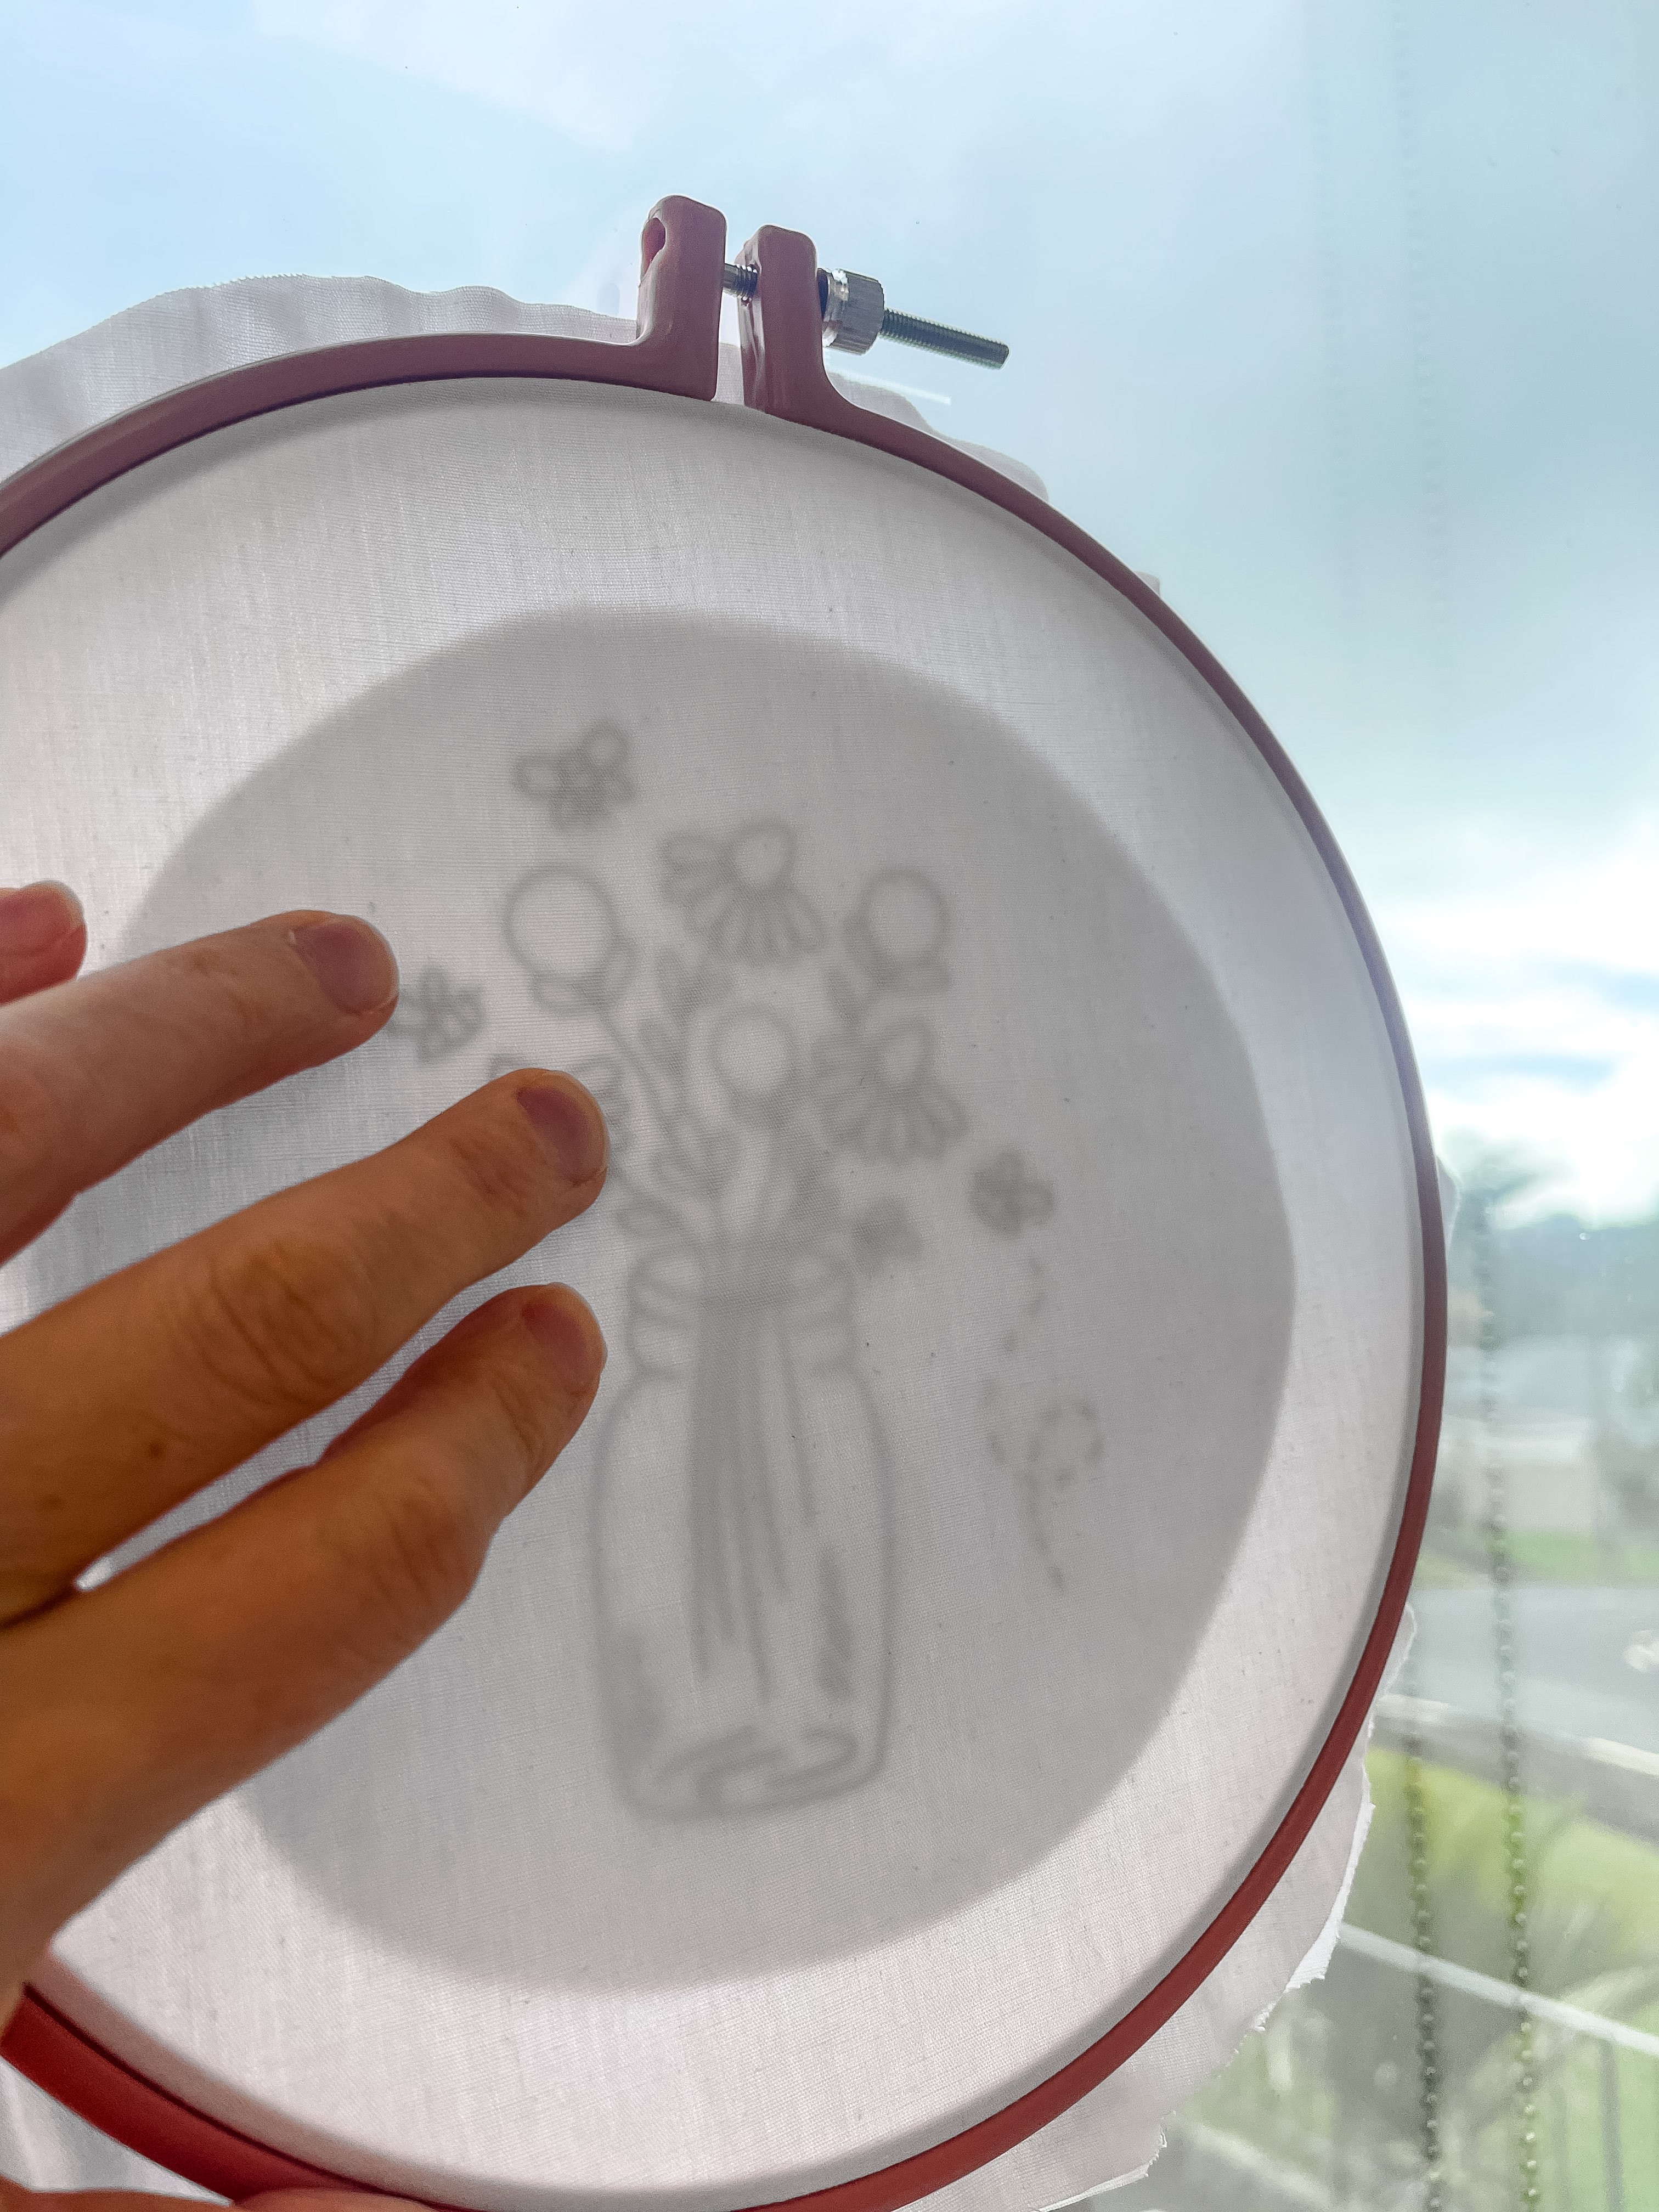
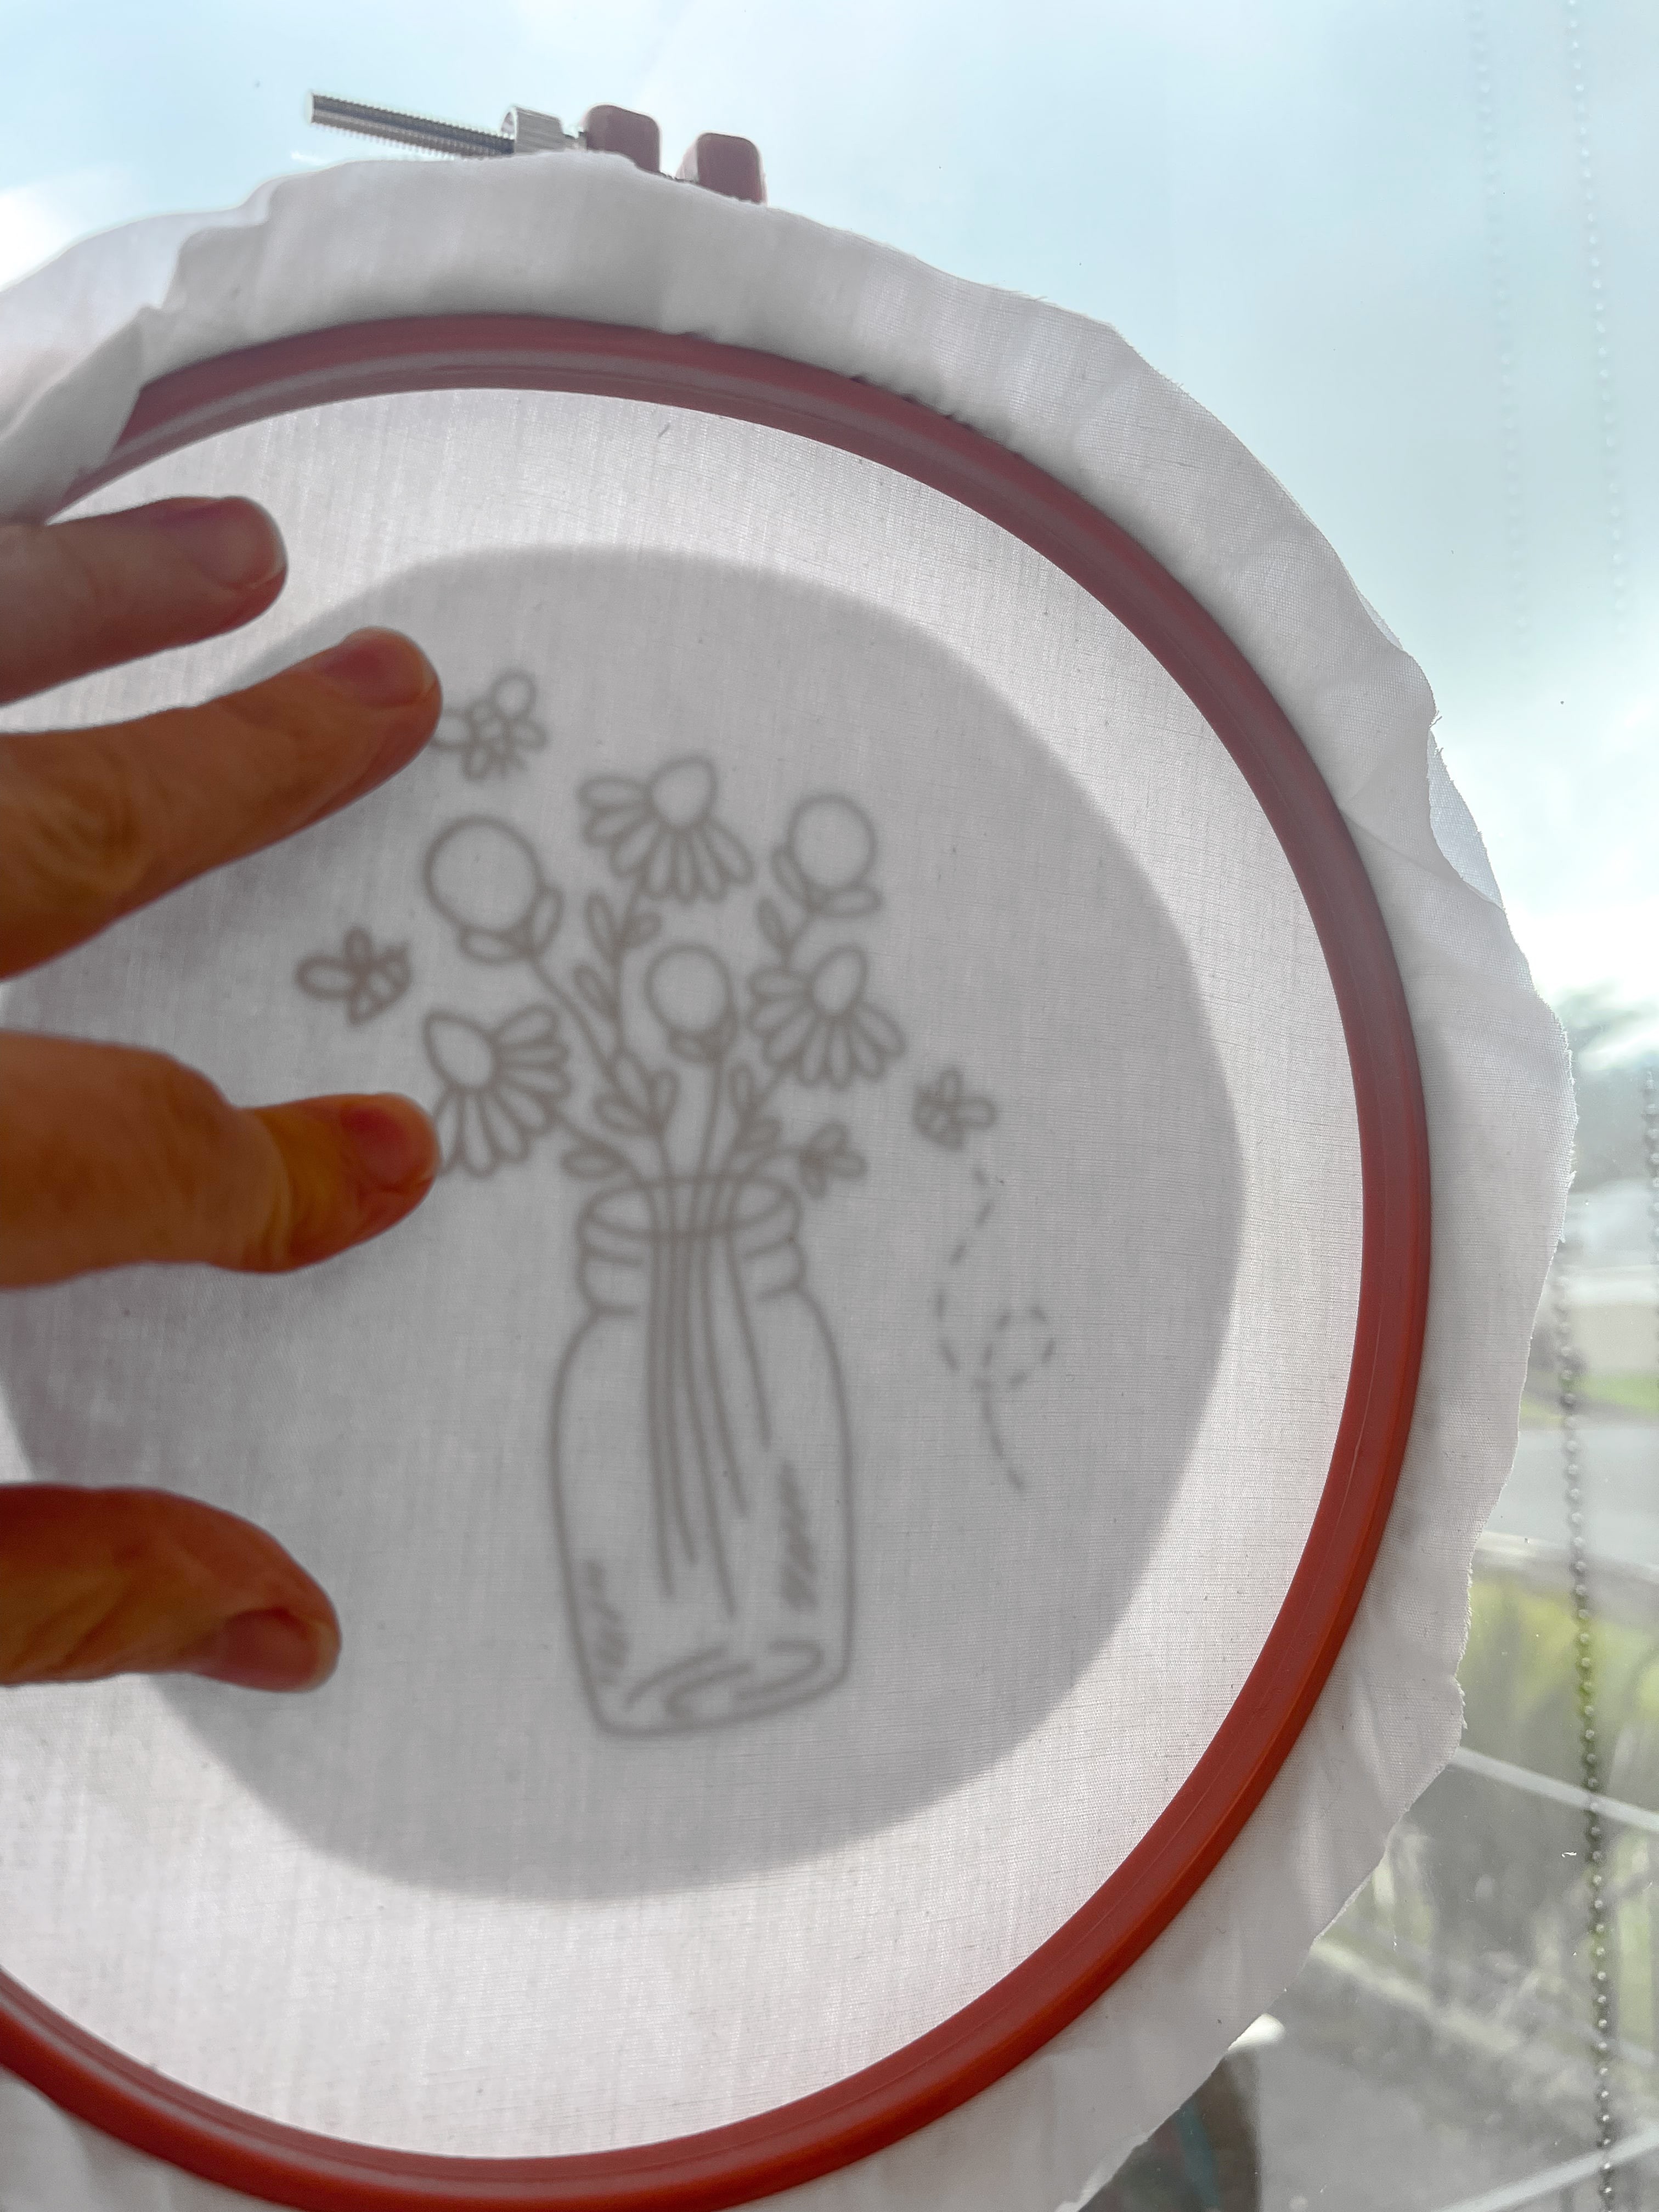
If you prefer, you can totally use a window as your light source (instead of your mobile phone’s flashlight). In fact, I often switch between the two, depending on where I am and the time of day. To do this, simply hold your hoop up to a well-lit window (you can rest the rim against the pane), and it will allow you to see the template through to the front side of your fabric. You can flip your set-up so that you trace onto the underside instead, which enables you to rest the pattern flat against the window – more on this topic later.
Step 6
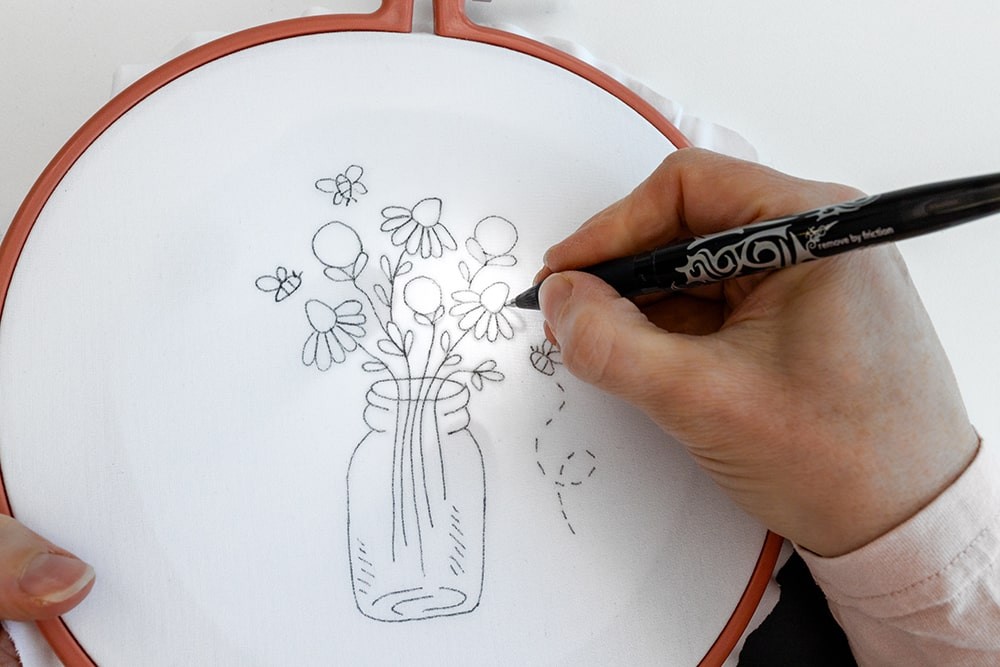
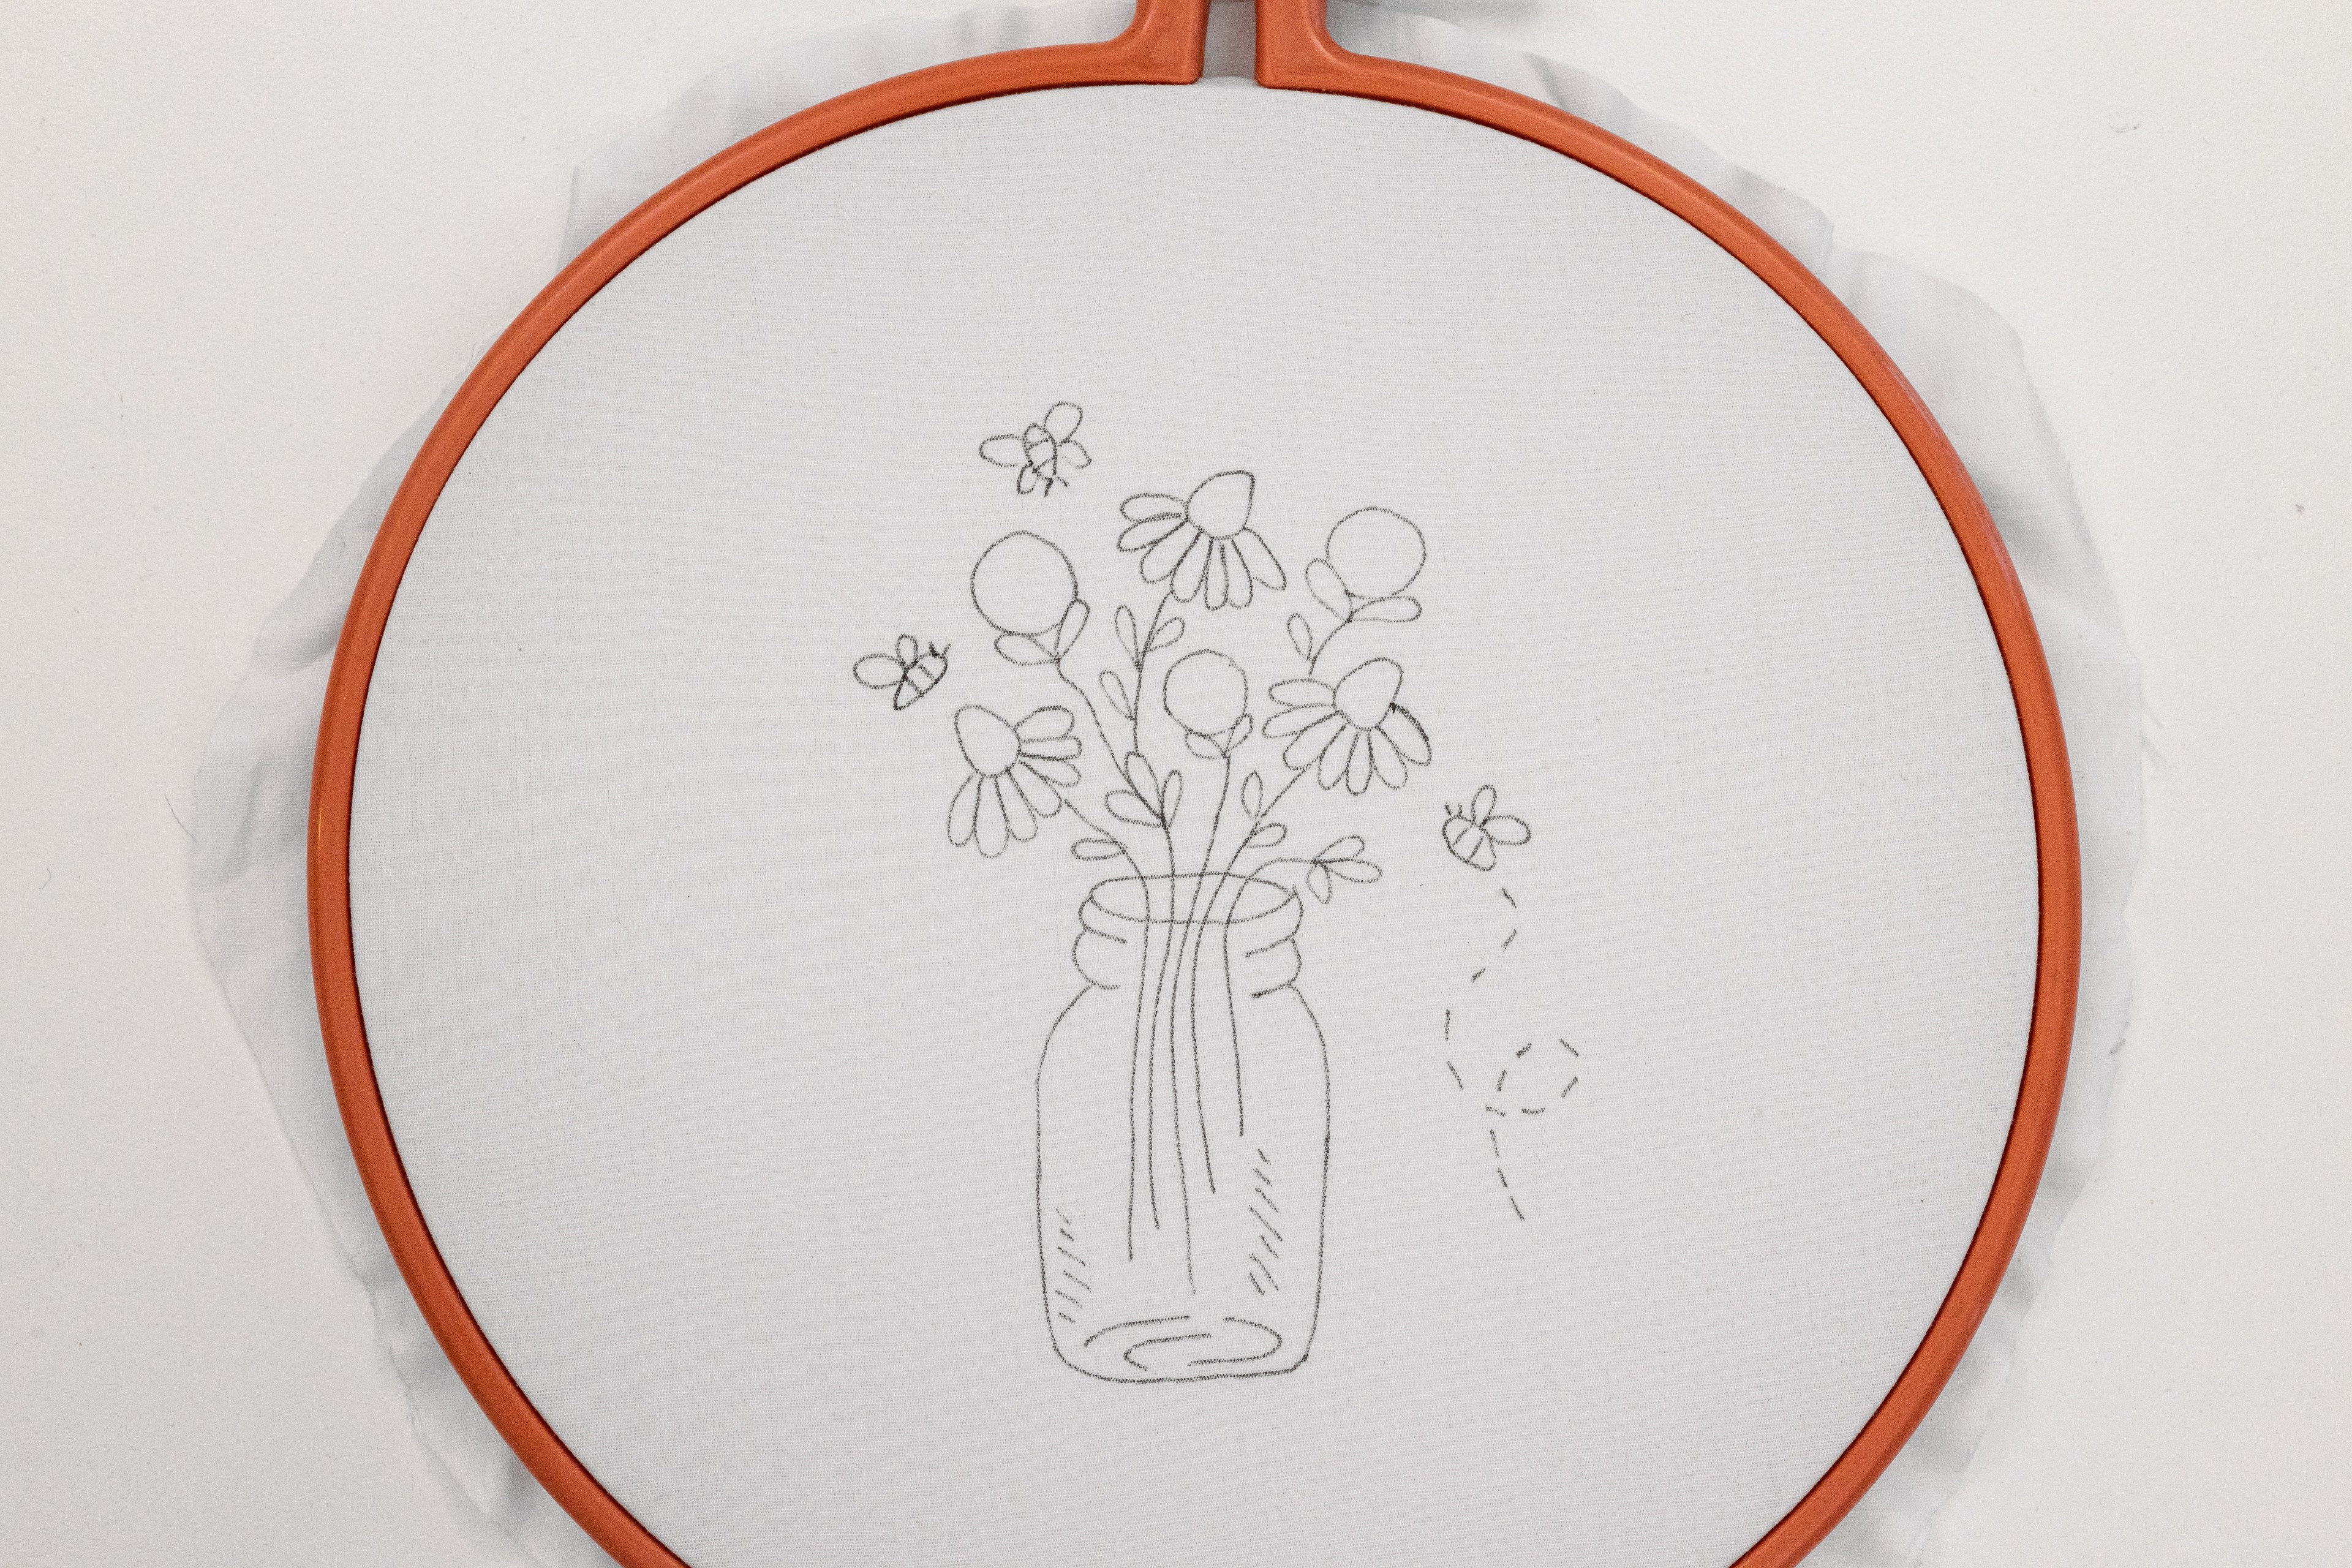
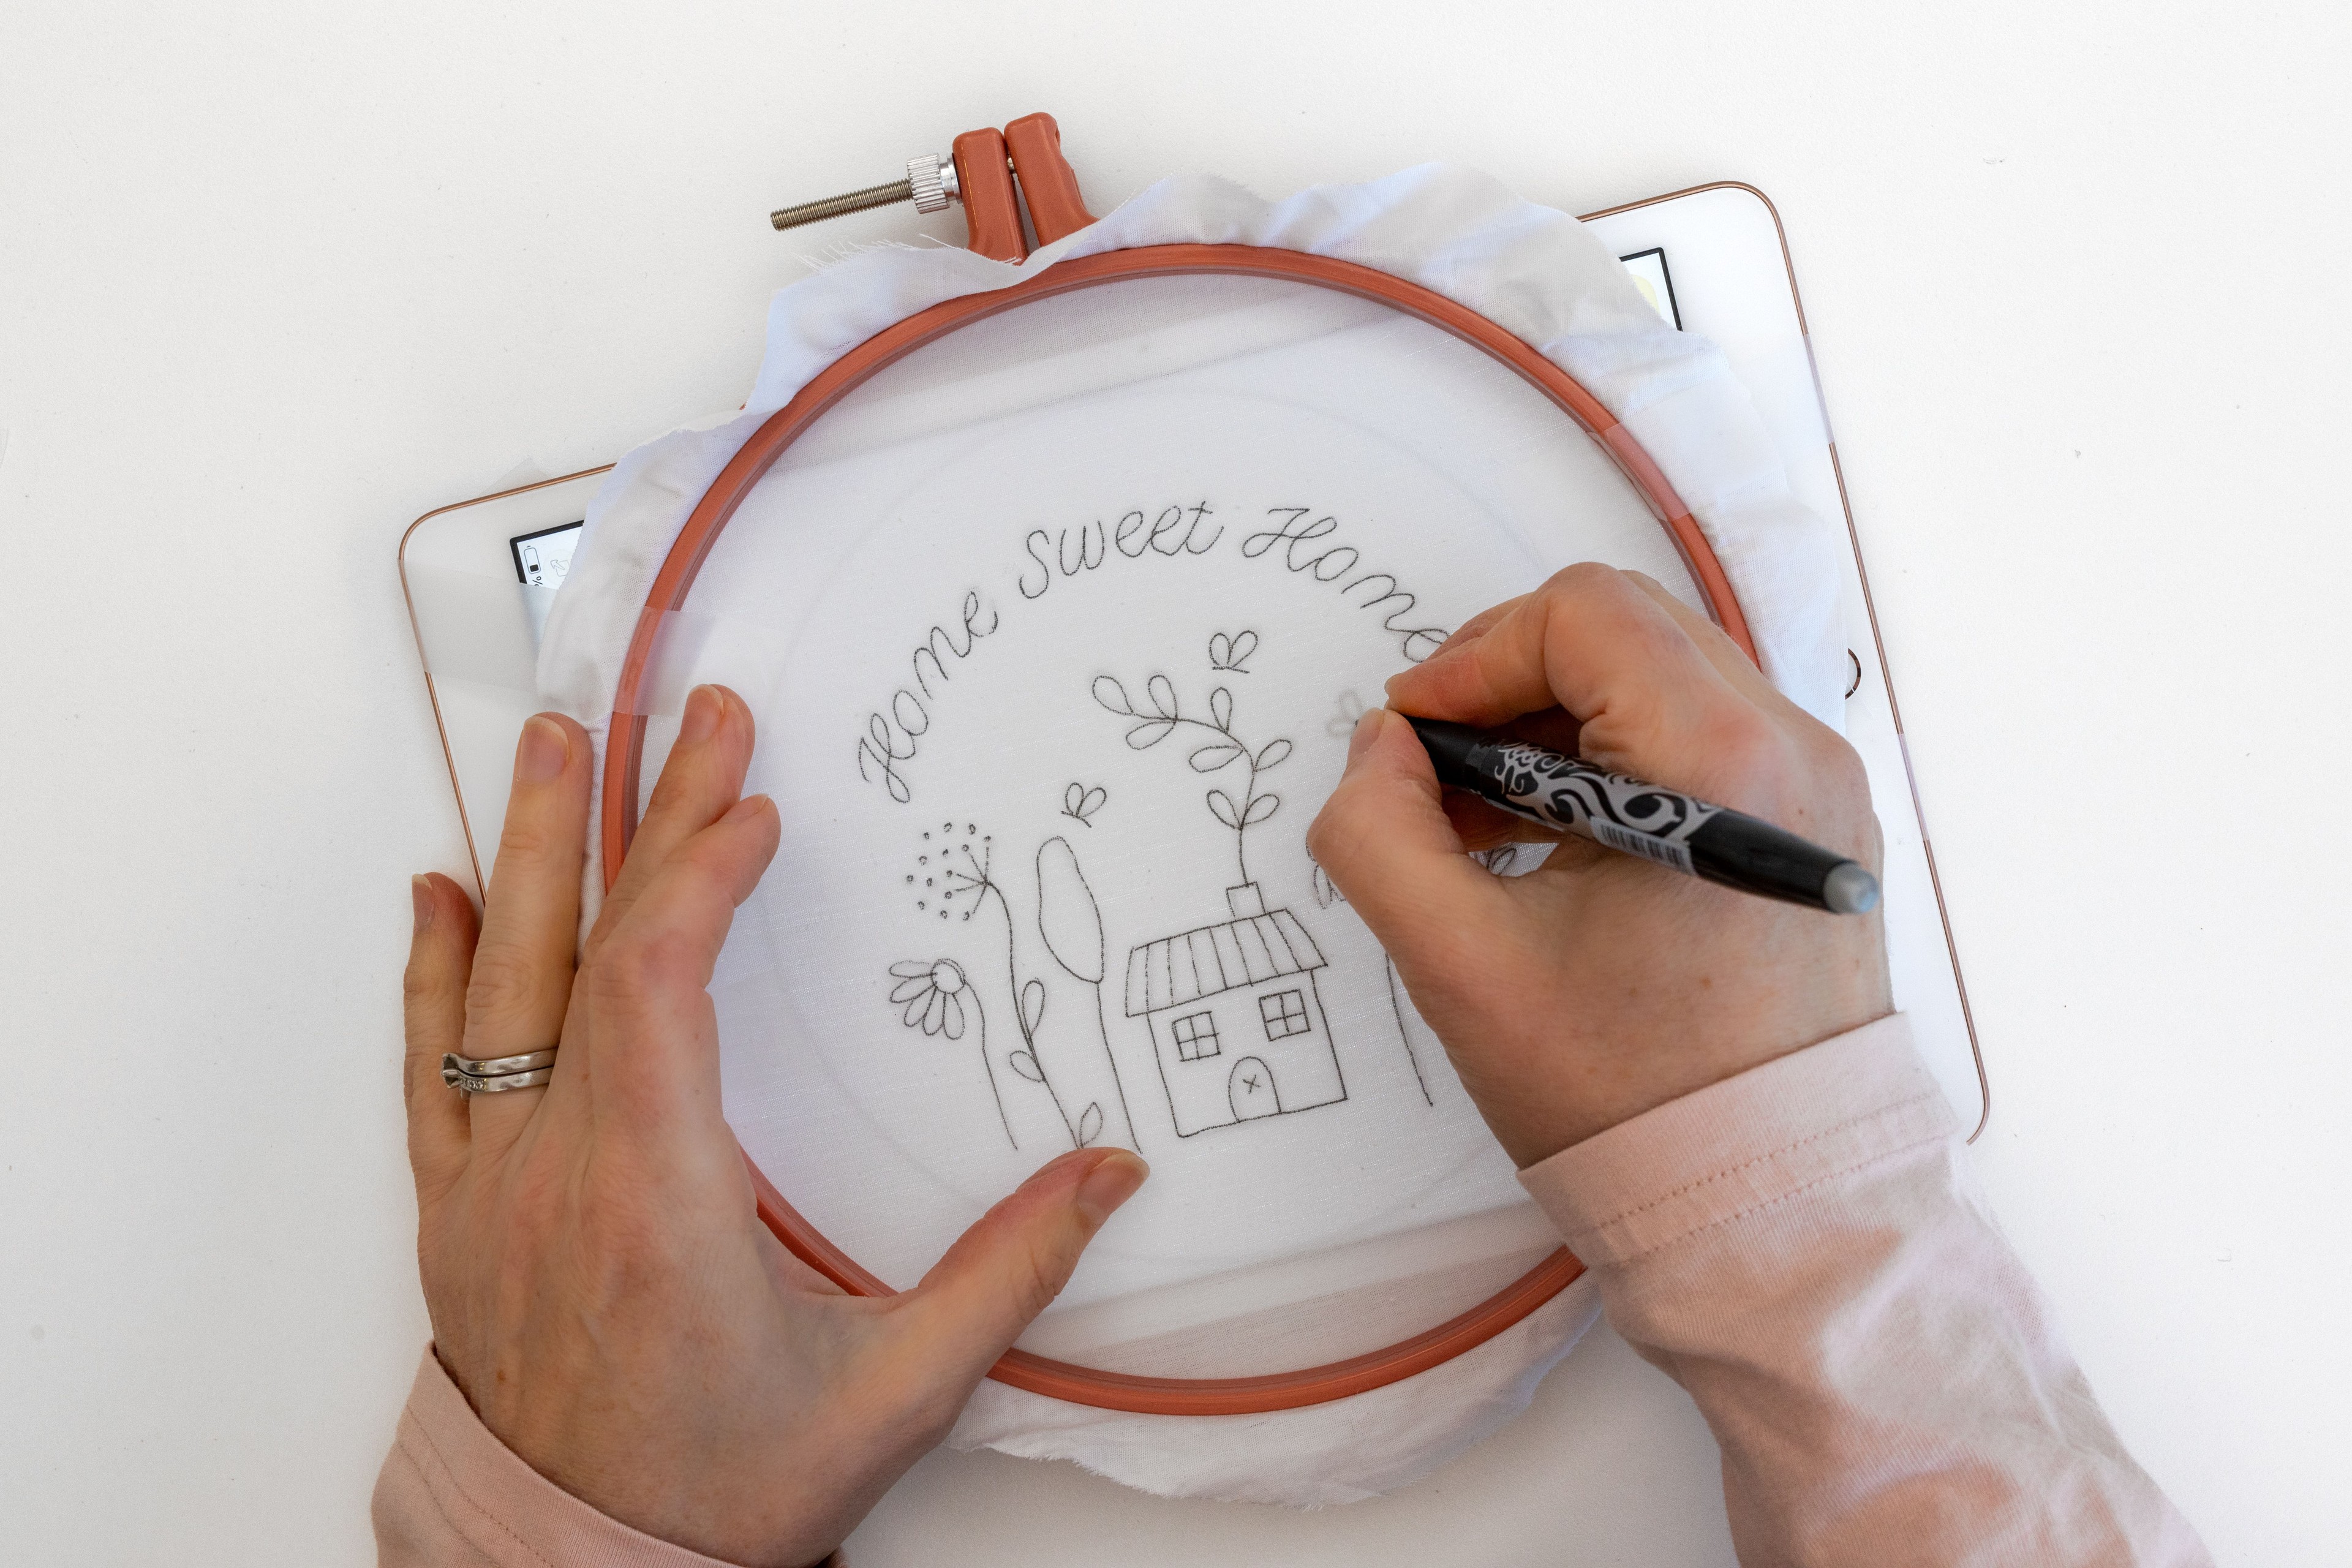
Trace: Now go ahead and trace your template onto the front of the fabric. As you go around the template, move the hoop to position the part you’re drawing right above the flashlight - doing this maximizes the light, making the template stand out as much as possible. Another tip is to press the paper template hard up against the fabric, right where you are drawing. Take it slow, and go over all of the template lines with your transfer pen. You don’t need to press super hard or do a thick line – just a clear fine line works well. And don’t worry it doesn’t need to be perfect, especially when you’re a beginner! Just keep adjusting your position and pushing the template against the fabric, until you’ve traced over the entire template. Amazing job!
Step 7
Remove Template: Now you can flip over your hoop and remove the paper template (plus any sticky tape or pins). I often keep this printed copy of the template (it’s sometimes helpful to refer to later as you stitch the pattern).
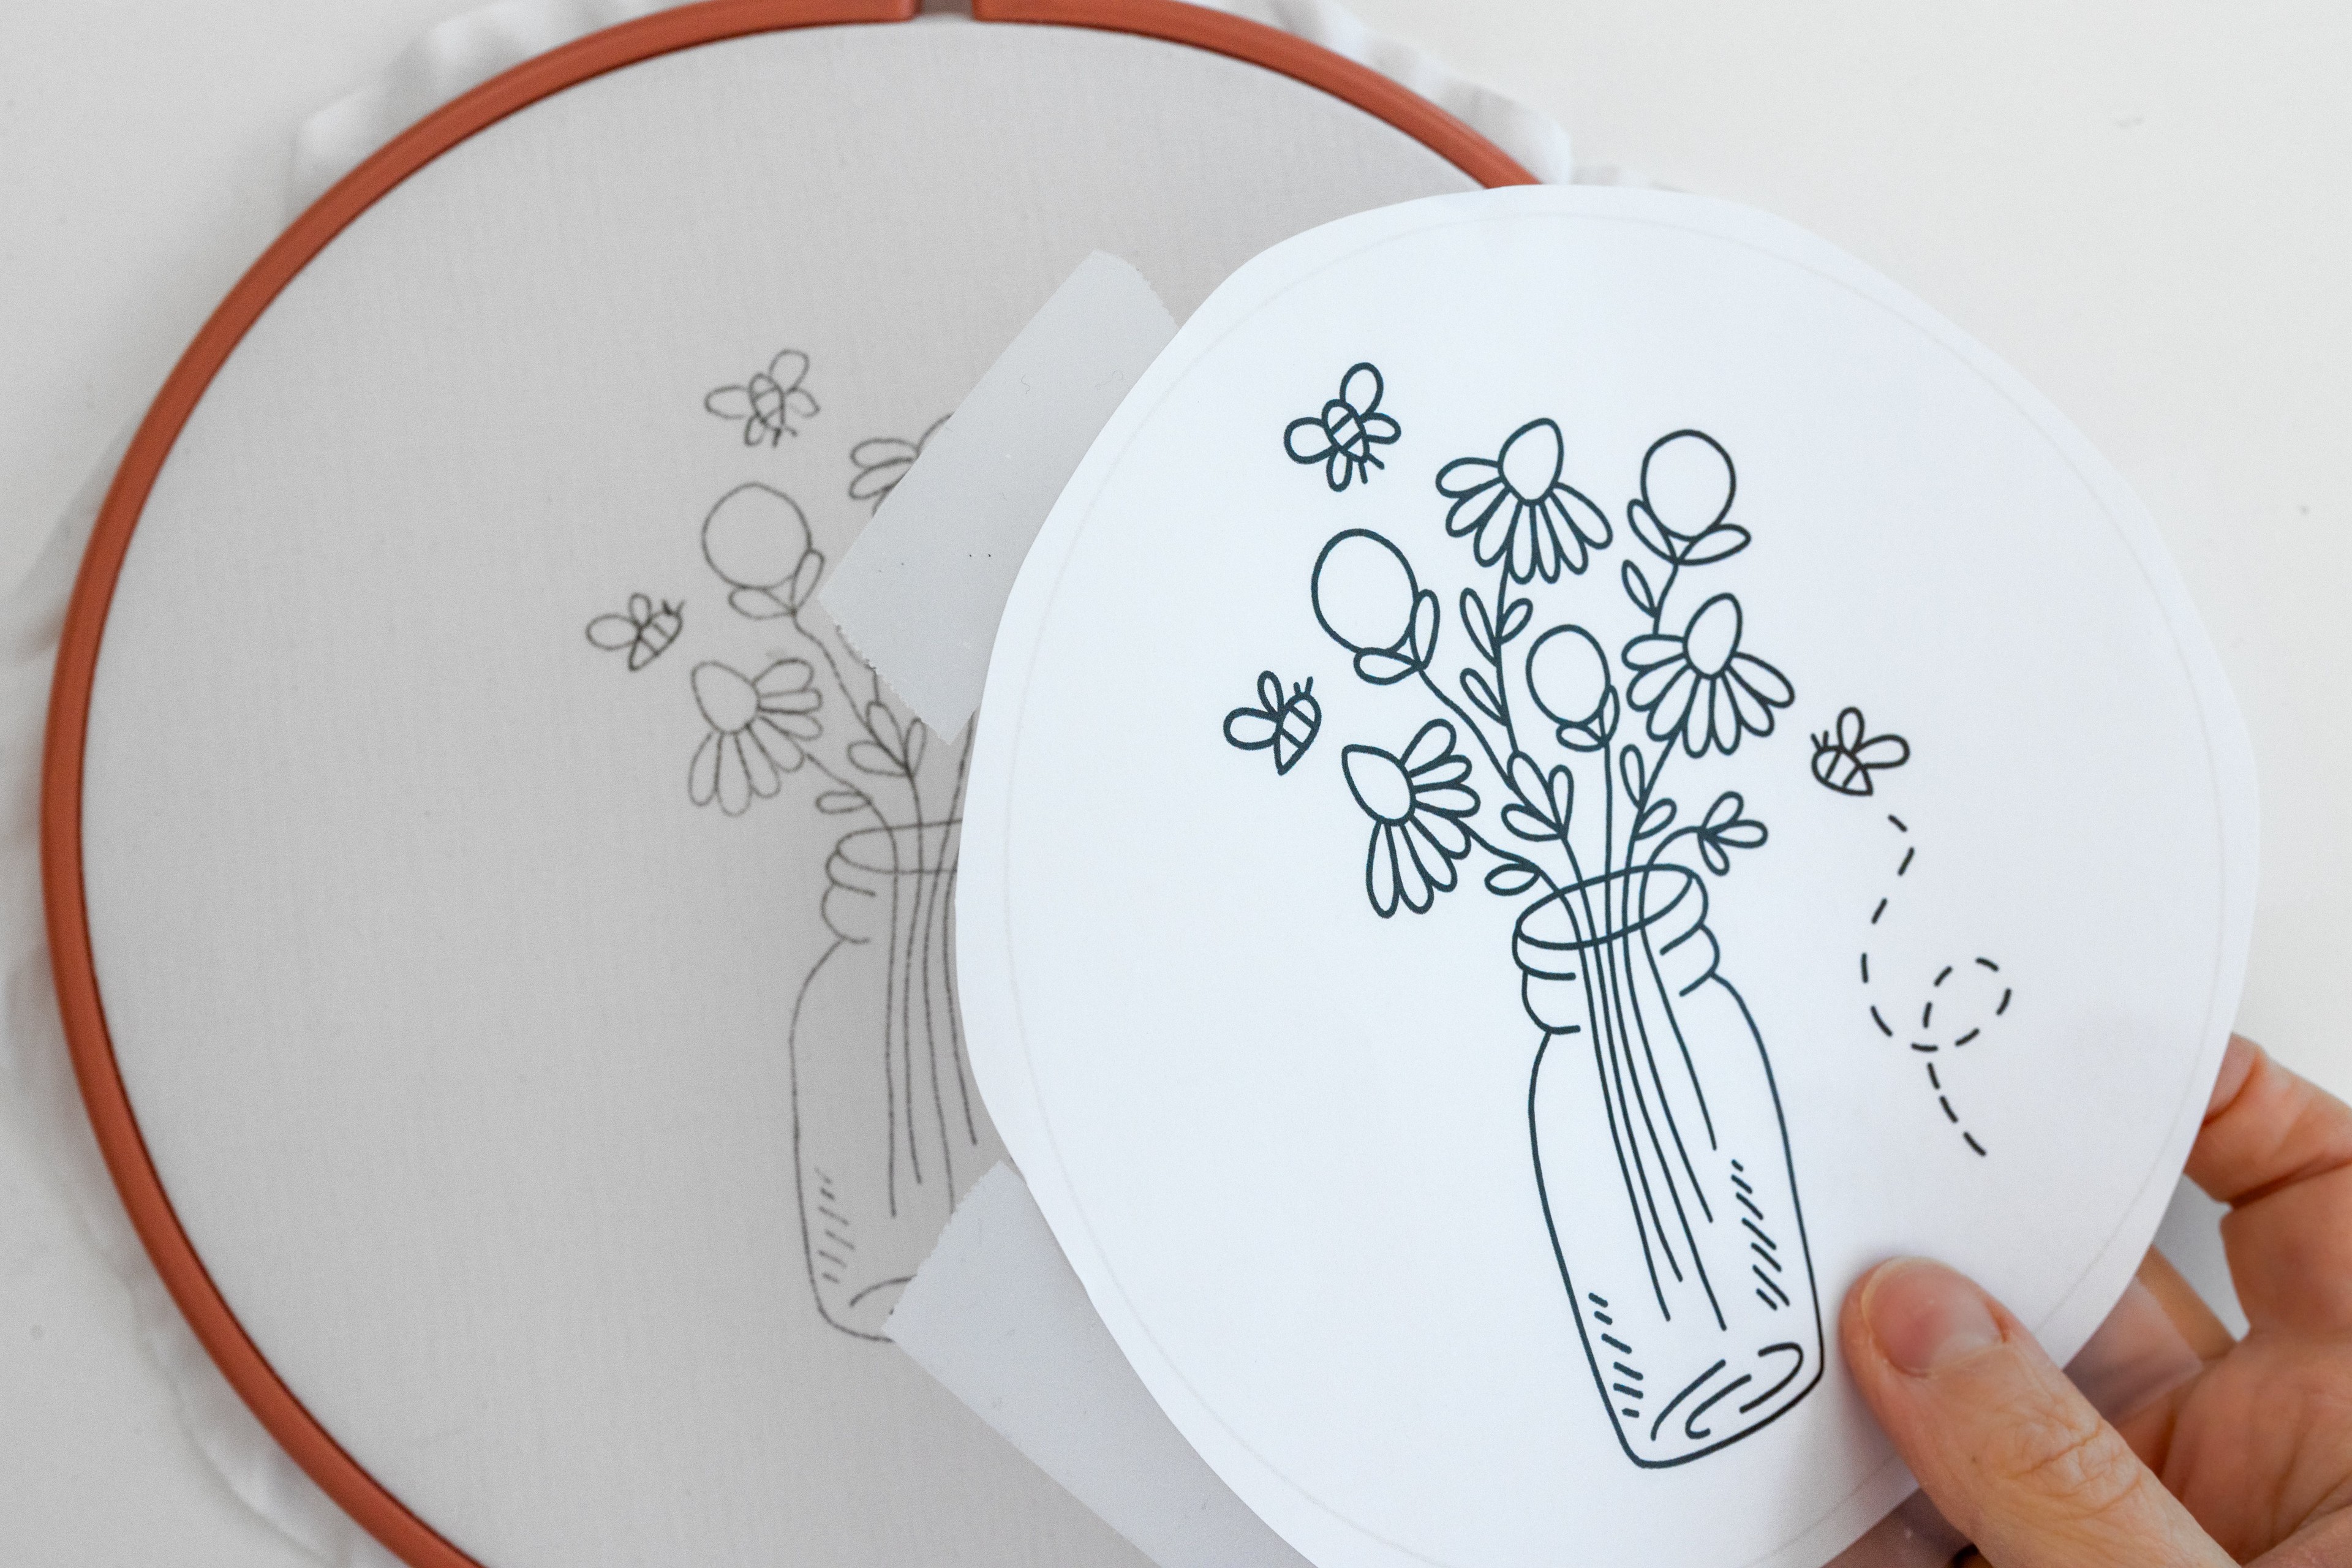
Now your template has been transferred to your pattern and you can move to the next step of making your pattern, woo hoo! You’ll find more info soon about transfer pens and how to remove any visible pen marks at the end.
Q & A
Can I trace on the underside of my dressed hoop?
Many people prefer to trace their design onto the underside of the hoop (unlike the top-side as I’ve shown in the first method). This allows you to rest your design flat on a surface (e.g. a window or screen), making it easier to draw the template lines. So, feel free to do this if you prefer! Then once your design is traced, you can either flip your fabric and re-hoop it the other way up, or leave it in the hoop and stitch on the underside—whatever works best for you.
Can I transfer on loose fabric or re-hoop my fabric AFTER the transfer step?
Yes, you sure can! When tracing onto loose fabric, it helps to stick both the template and fabric to the tracing surface (e.g., window or light box). This will keep both layers nice and still while you trace the design. Personally, I prefer dressing the fabric in the hoop before transferring the design - it’s easier to draw on taut fabric that doesn’t move.Also, sometimes when you stretch out the fabric after transferring it can distort the design – but hey, that usually this isn’t a problem (especially if you’re using non-stretch fabric). So feel free to do whichever method you prefer.


2. Tracing with a Lightbox
Pros:
-
Quick and easy
-
Works on light or see-through fabrics
-
Pen lines removable
-
Works day + night
-
Pen lines clear and visible
-
No need to stitch through an extra layer
Cons:
-
Doesn’t work on dark or thick fabrics
-
Drawing skills required
-
Additional cost of lightbox
-
Power source required (usually)
There are some fantastic and affordable lightboxes on the market, which you can use for pattern transfer. They are also called a lightboard or lightpad. This method great for light coloured fabrics which you can see through to trace.
IN A NUTSHELL: Tape your printed design template to the lightbox, lay your fabric over top and secure that in place, then trace over the design.
You will need:
-
Lightbox
-
Printed copy of design template
-
Dressed hoop or loose fabric
-
Transfer pen (my fav is a Pilot Frixion fine rollerball)
How to:
Step 1
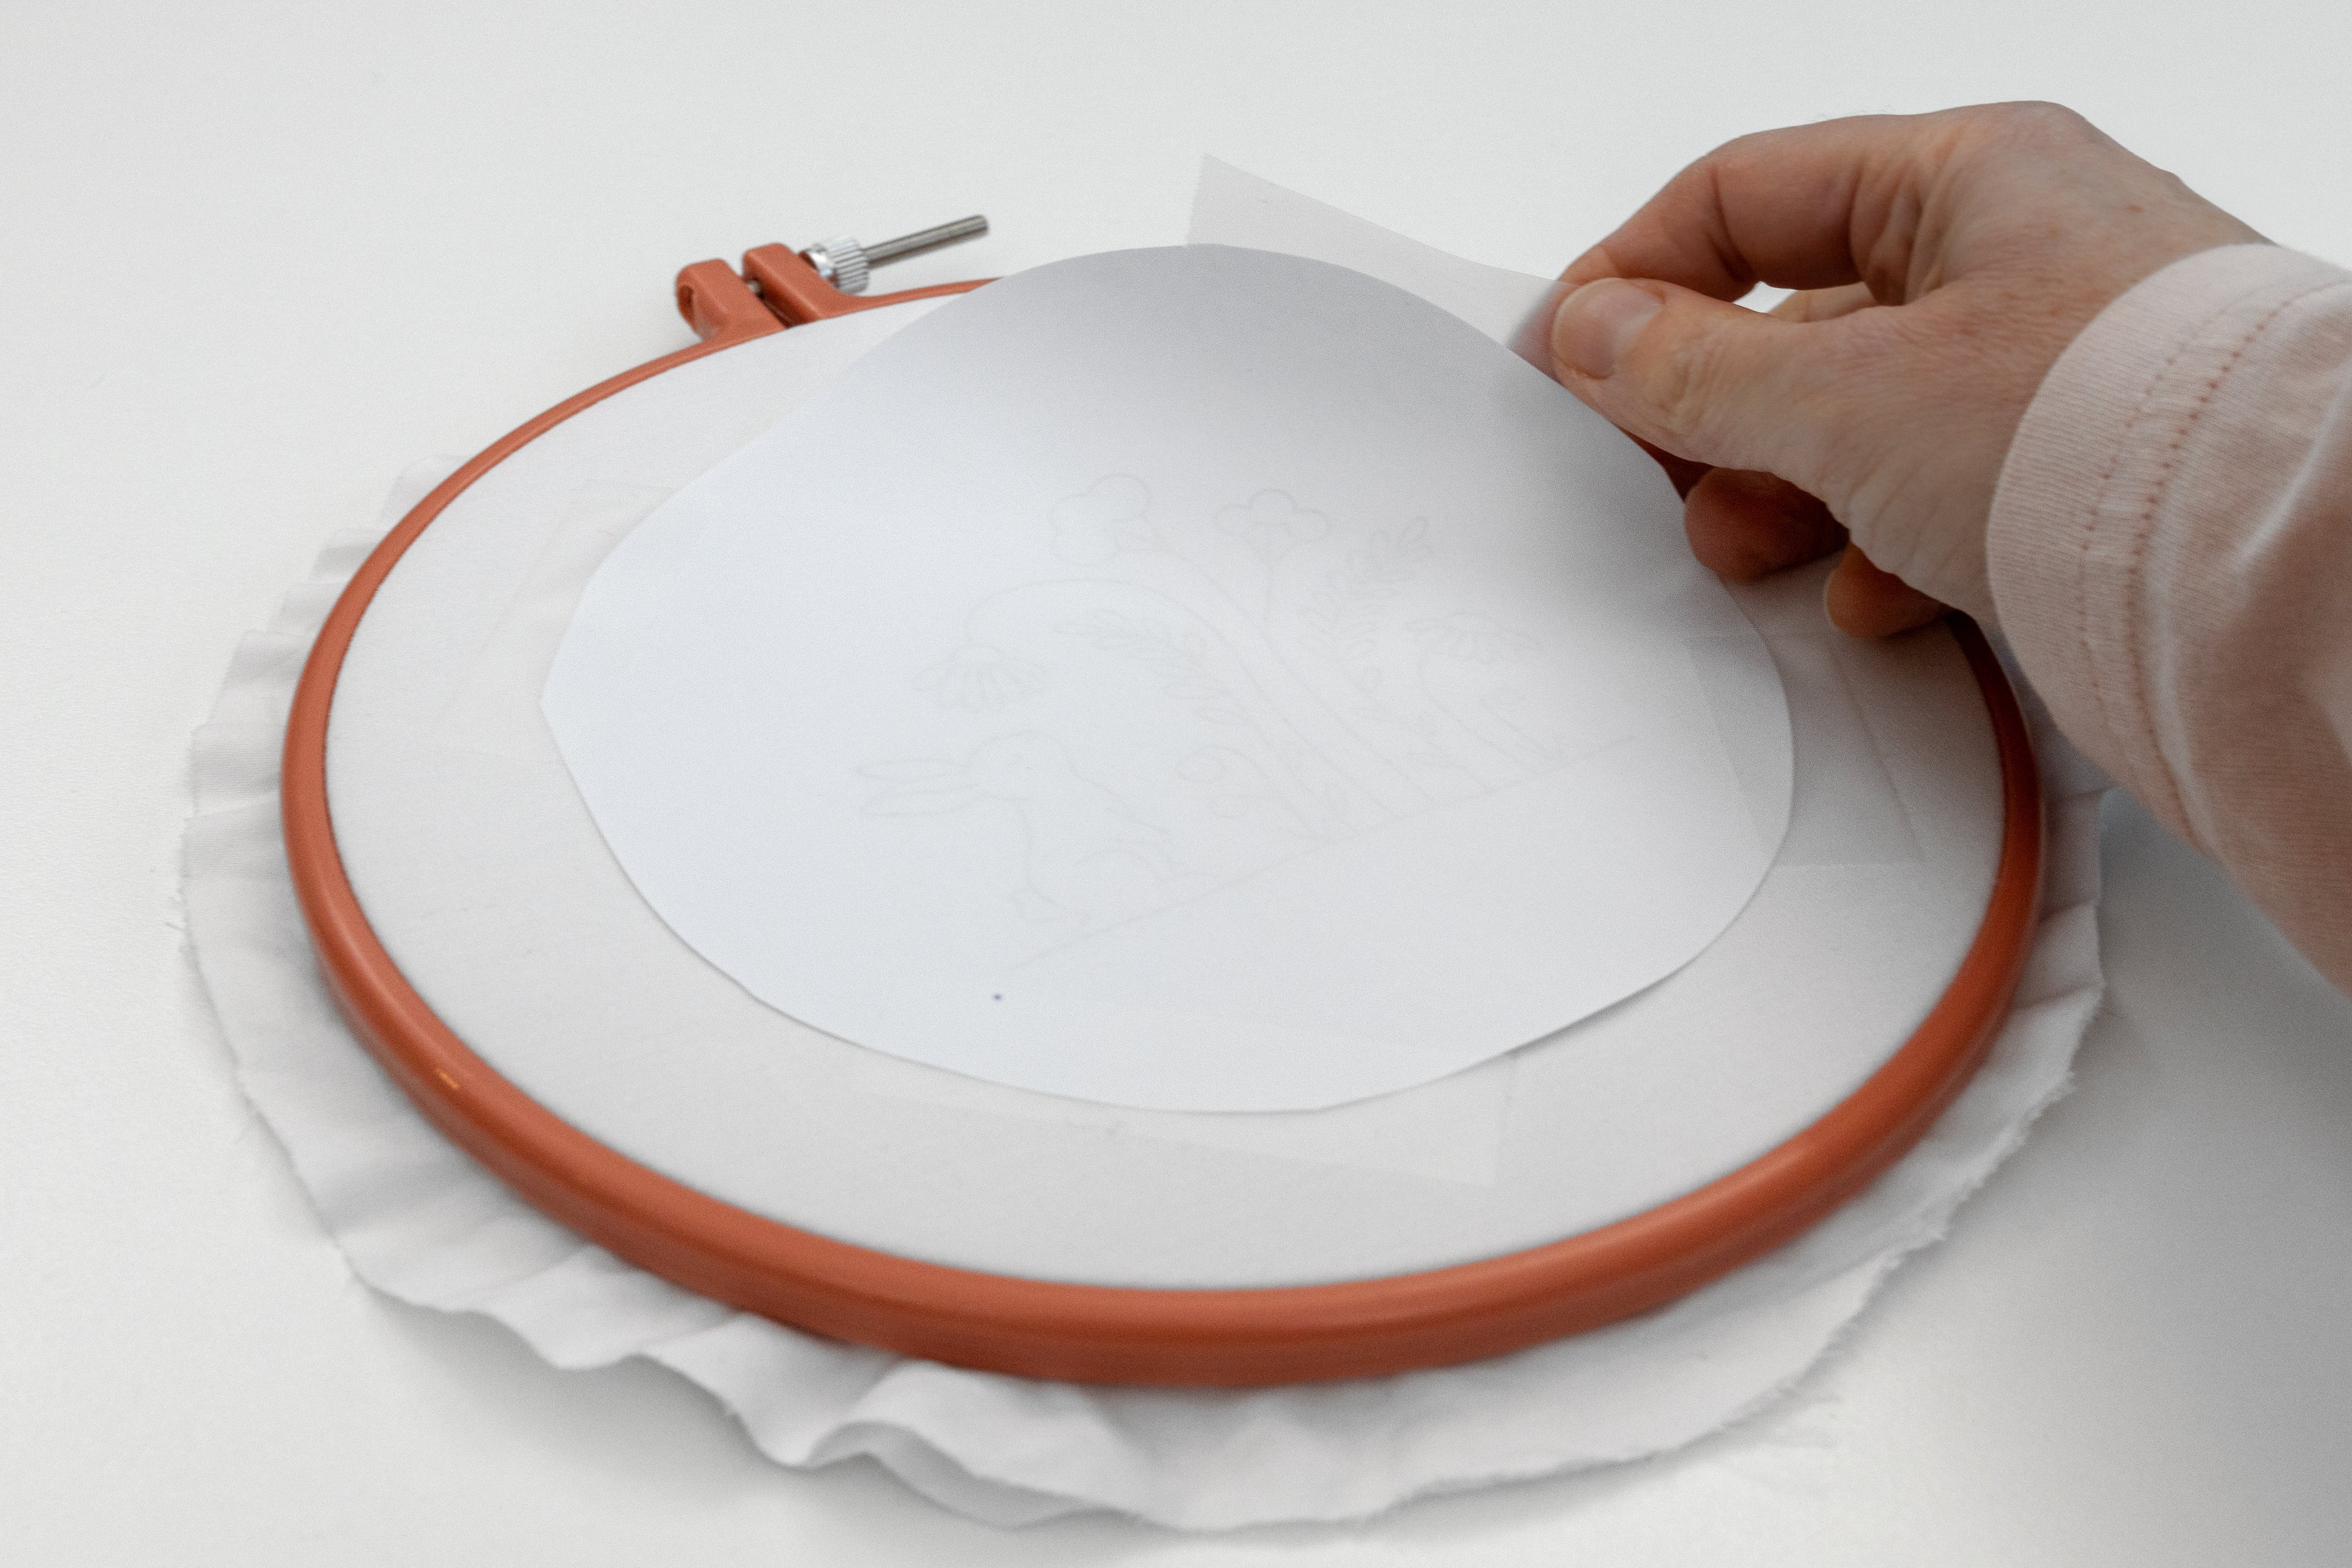
Attach template to dressed hoop: Dress your hoop (i.e. mount your fabric tightly in the hoop and trim away any excess fabric), then cut out your template to size. Place your template face-down, on the top-side of your hoop, in your desired position (usually this would be the centre). Then secure it into place with clear sticky tape. Now your template is nicely secured to your fabric and you don’t have to worry about it moving around when you trace it.
Step 2
Position hoop on lightbox: Turn on the lightbox and position your hoop on top of it, facing down.
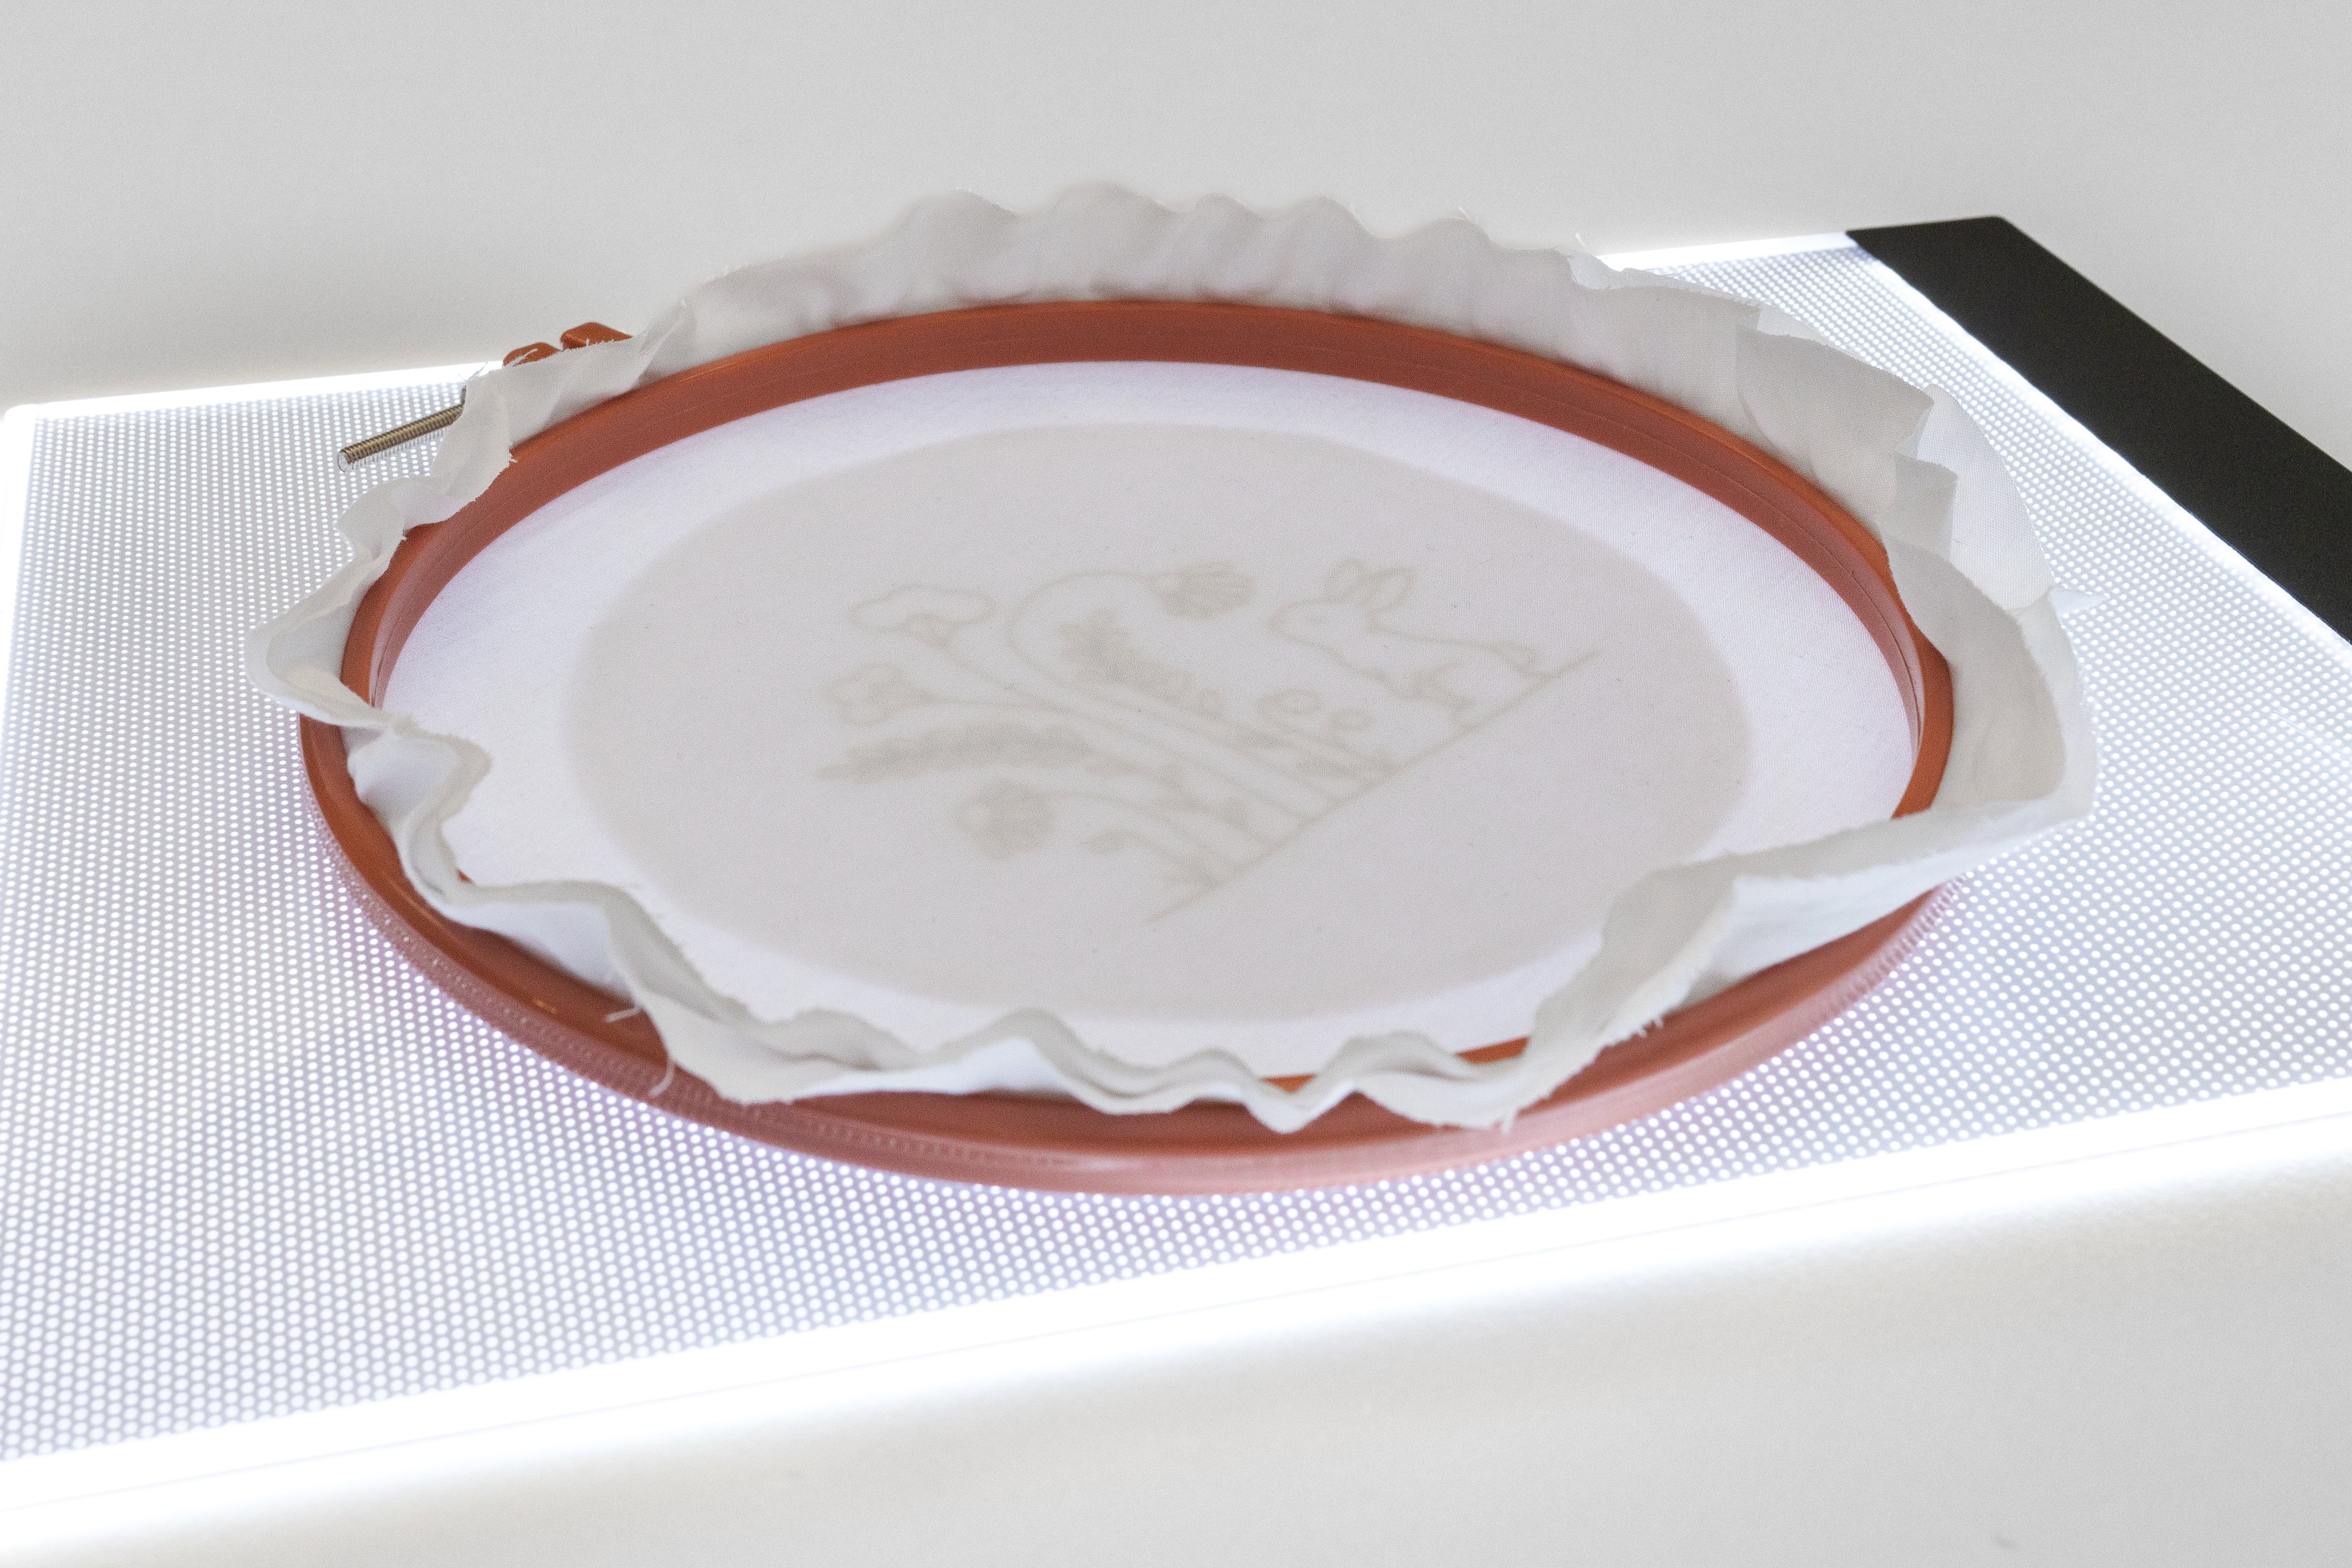
Tip to trace onto loose fabric instead: If you prefer, you can dress your hoop after the tracing step. In this case, you would place your paper template on the lightbox, lay your fabric over, and secure them both into place with clear tape, then do the tracing step. Personally, I find it easier to trace onto stretched fabric rather than loose fabric, even if it’s taped down.
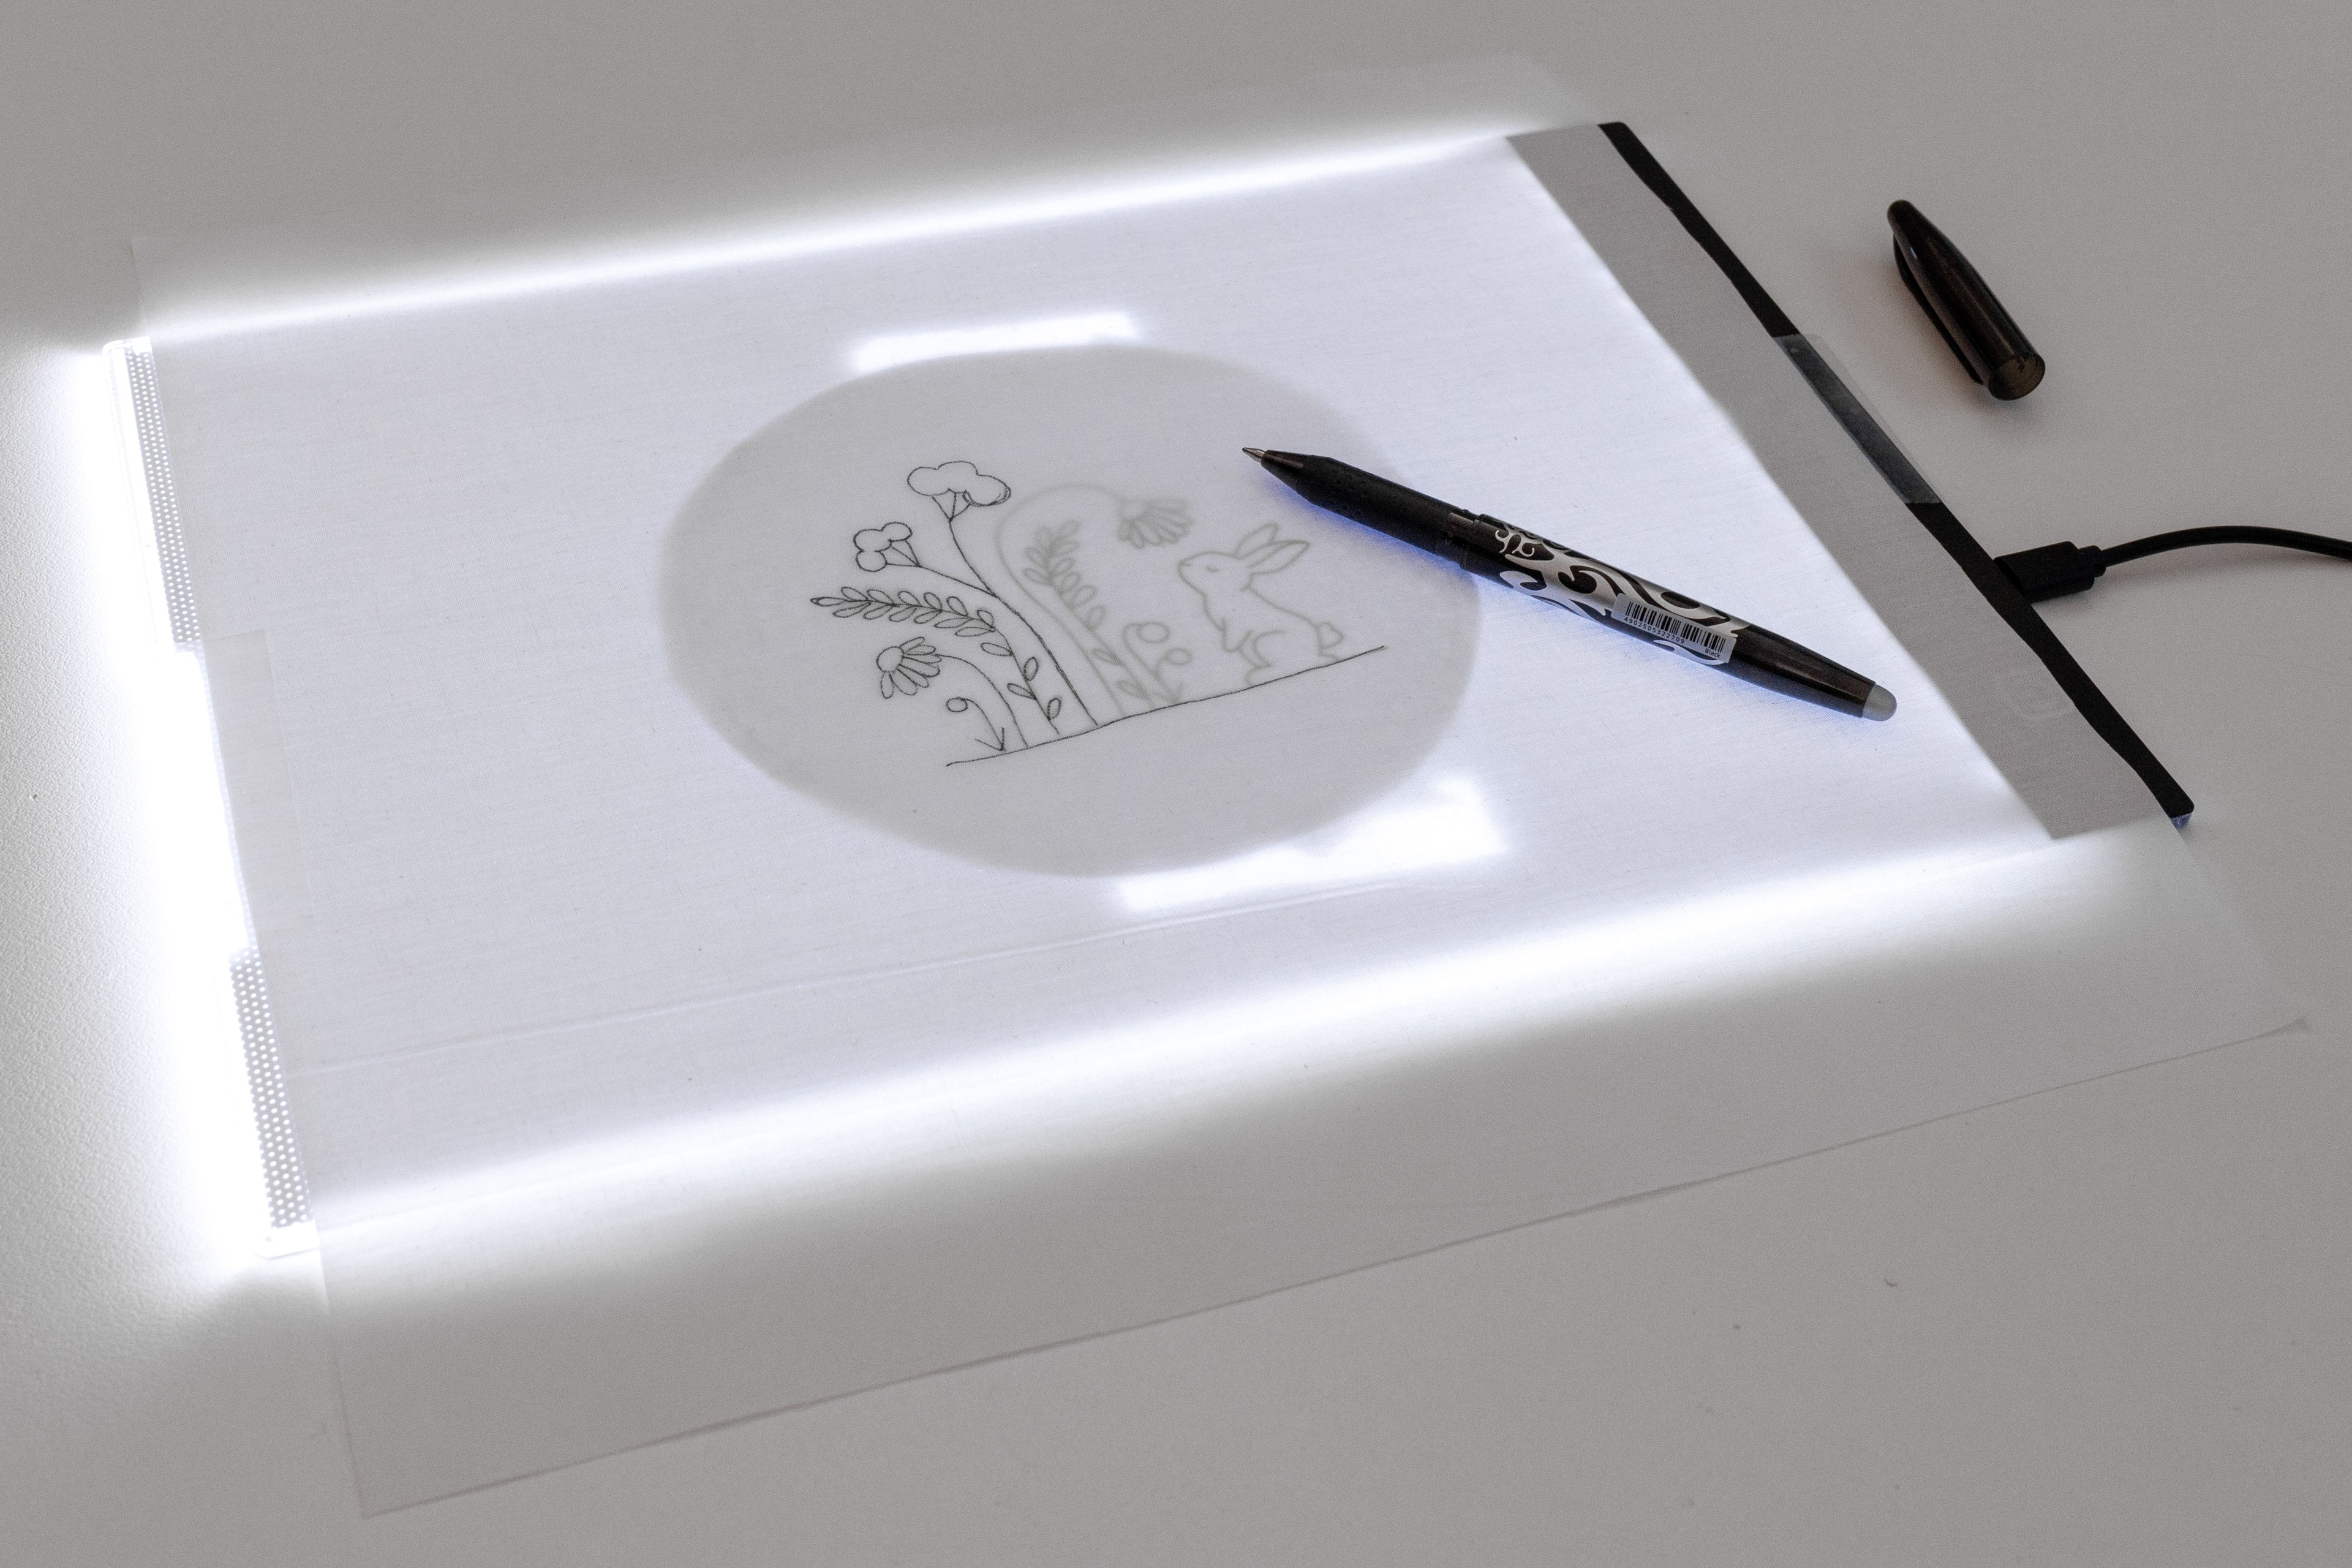
Step 3
Trace: With the light shining up through the template, you should be able to easily see the design clearly on your fabric. So go ahead a trace the template onto the underside of your fabric.
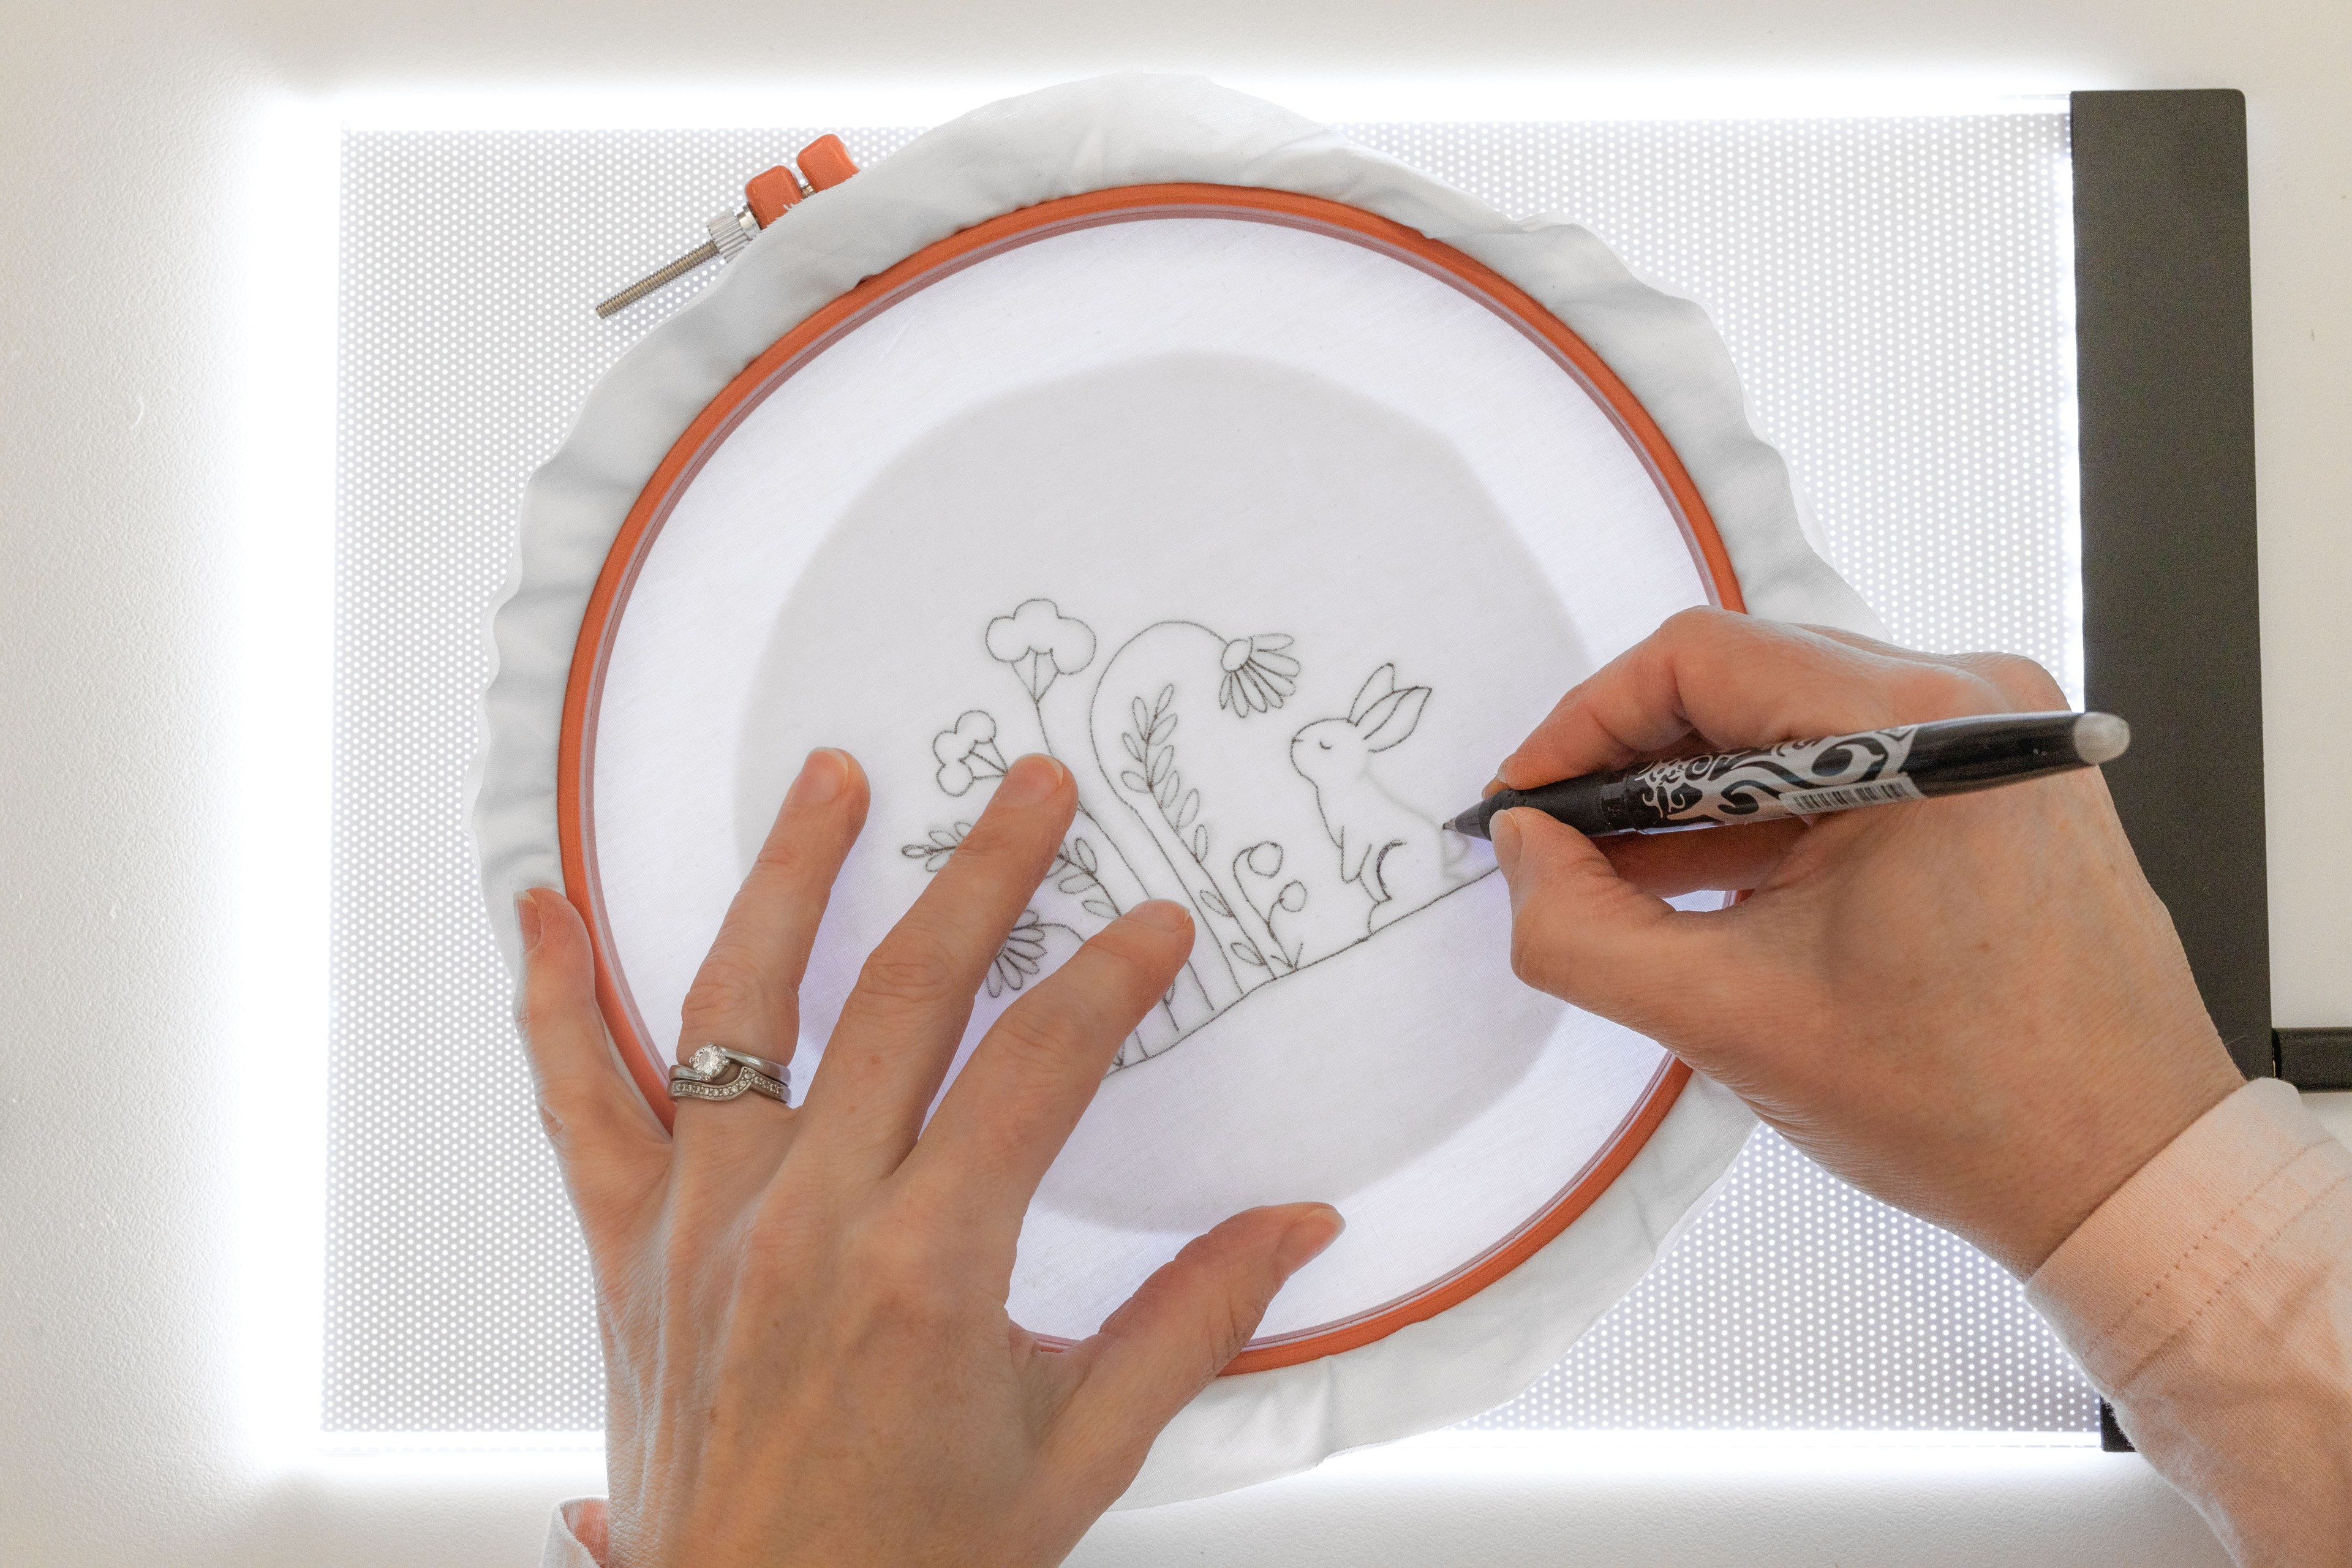
Step 4
Remove Template: Once you’ve traced the entire design, you can remove the paper template from your fabric.
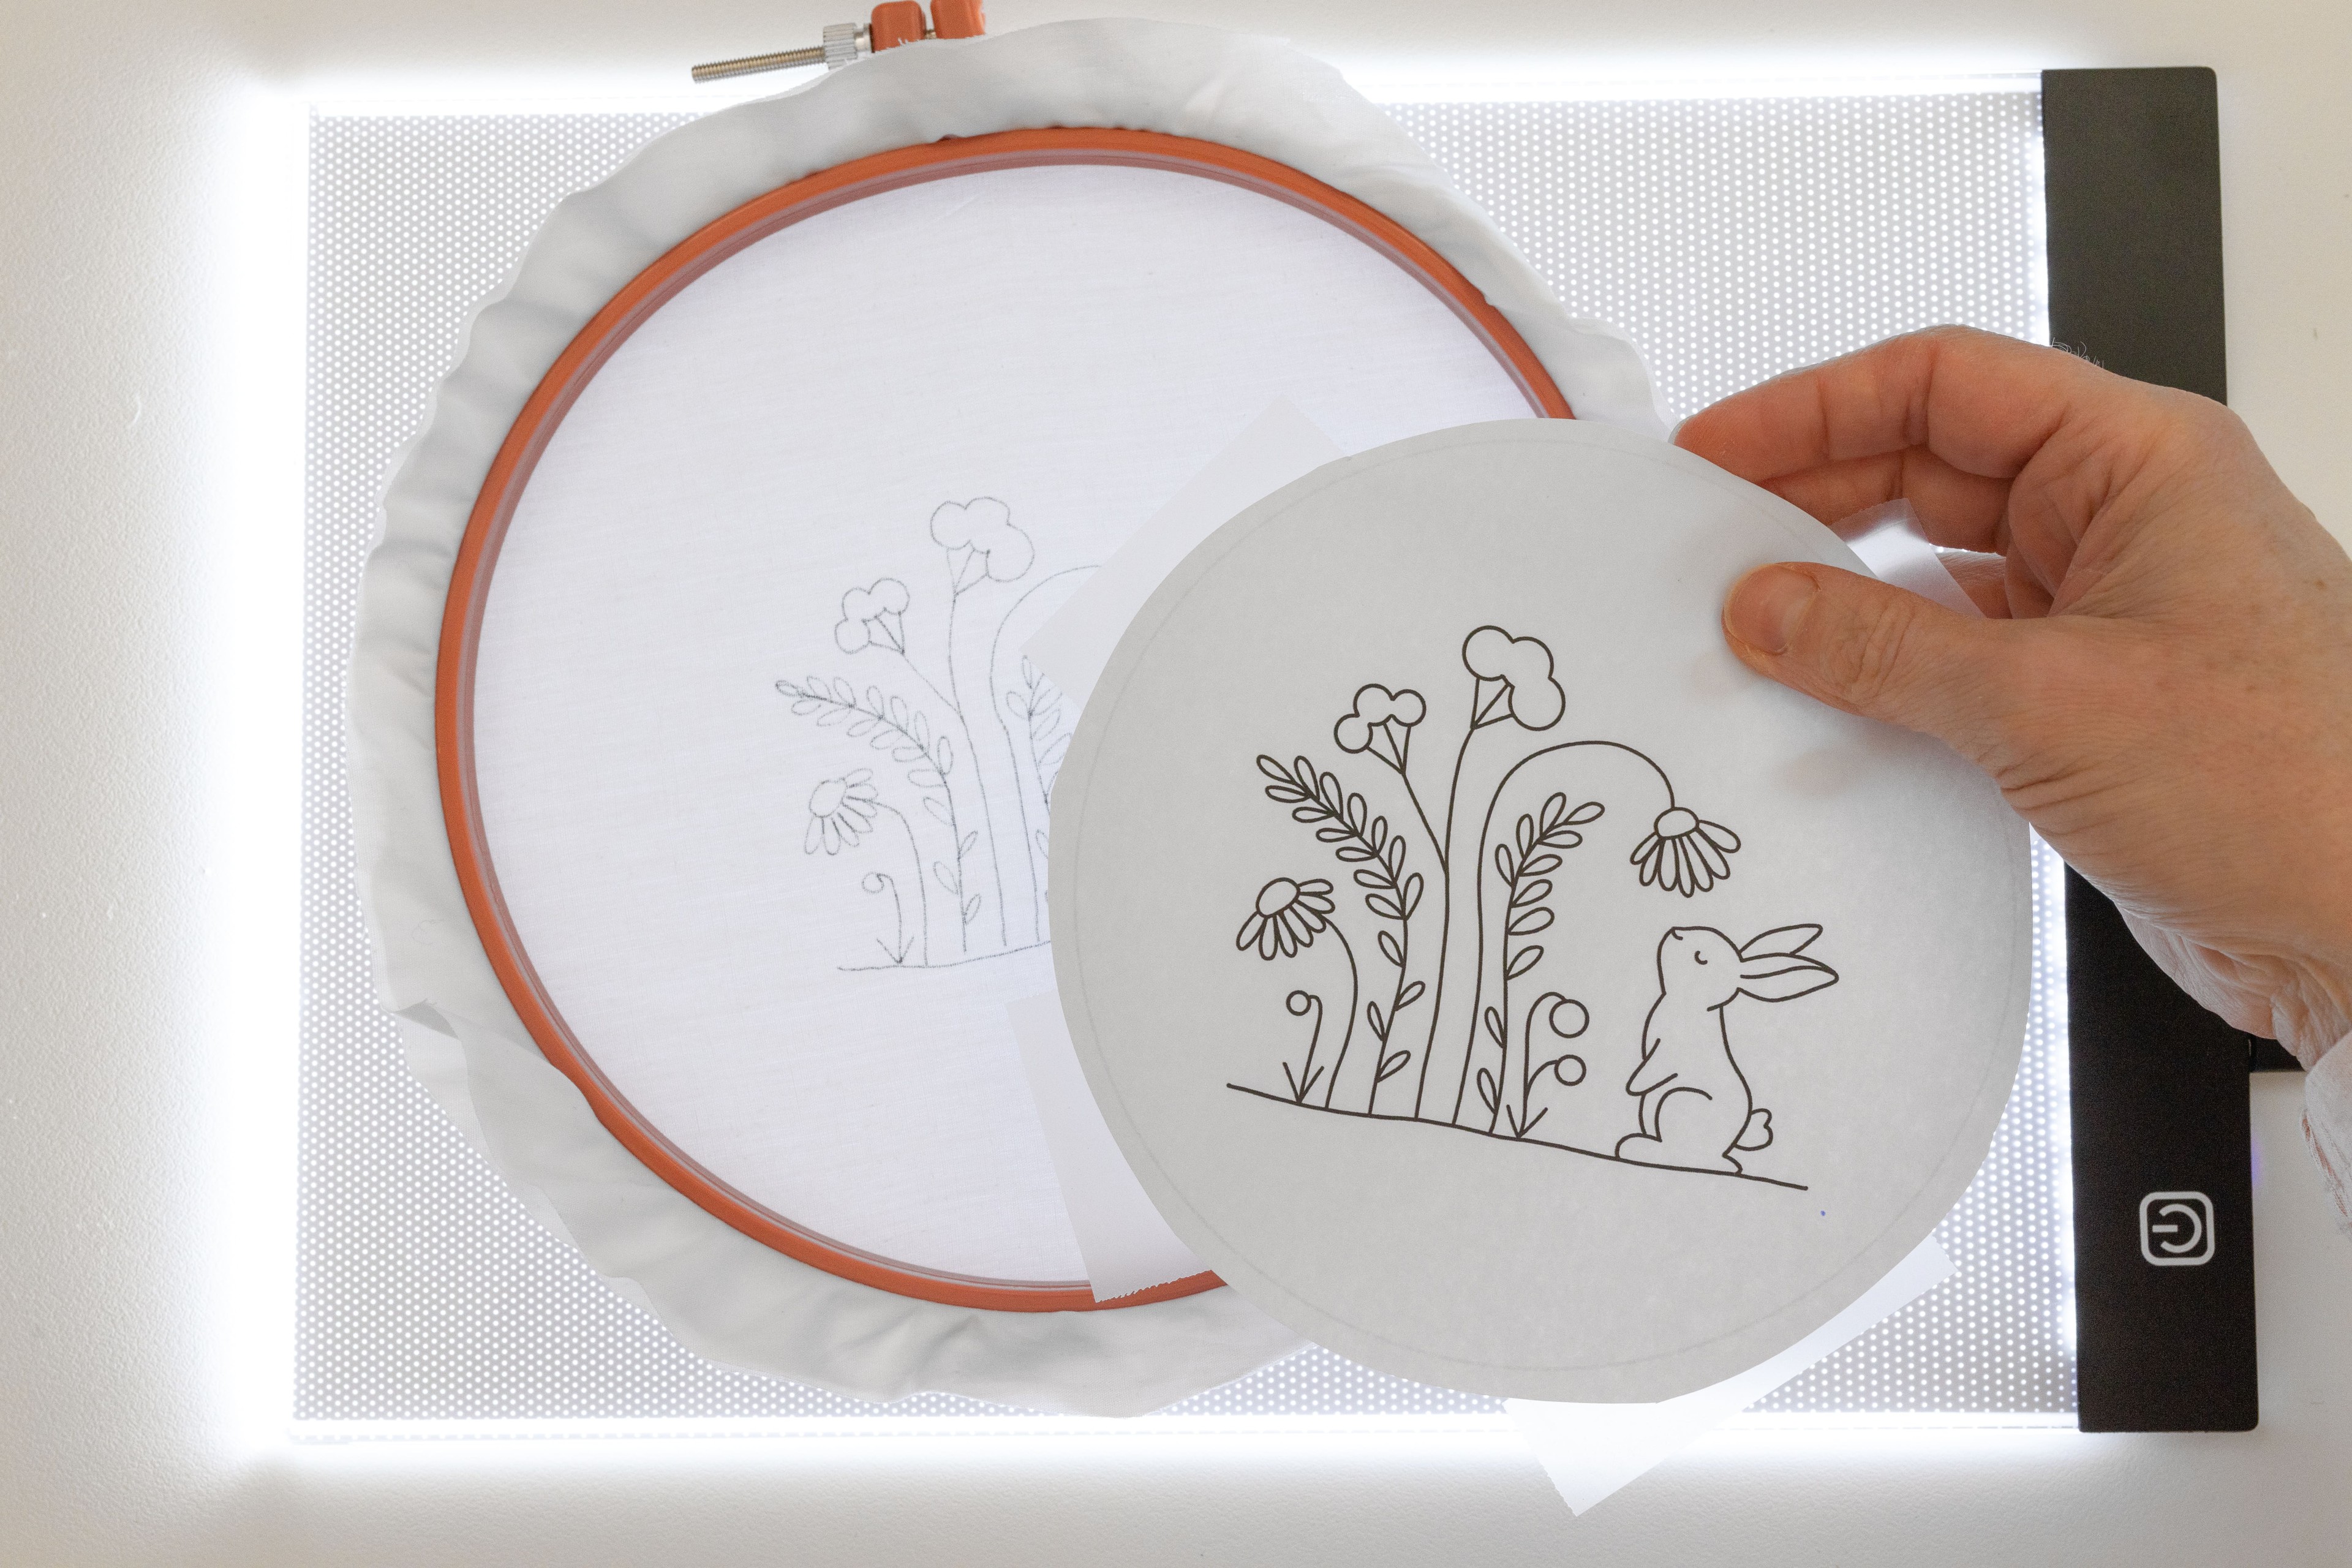
Step 5
Rehoop Fabric (optional): You can either rehoop your fabric (so that the design is on the topside of your hoop) or stitch your design on the underside of the hoop – whichever works for you is fine.
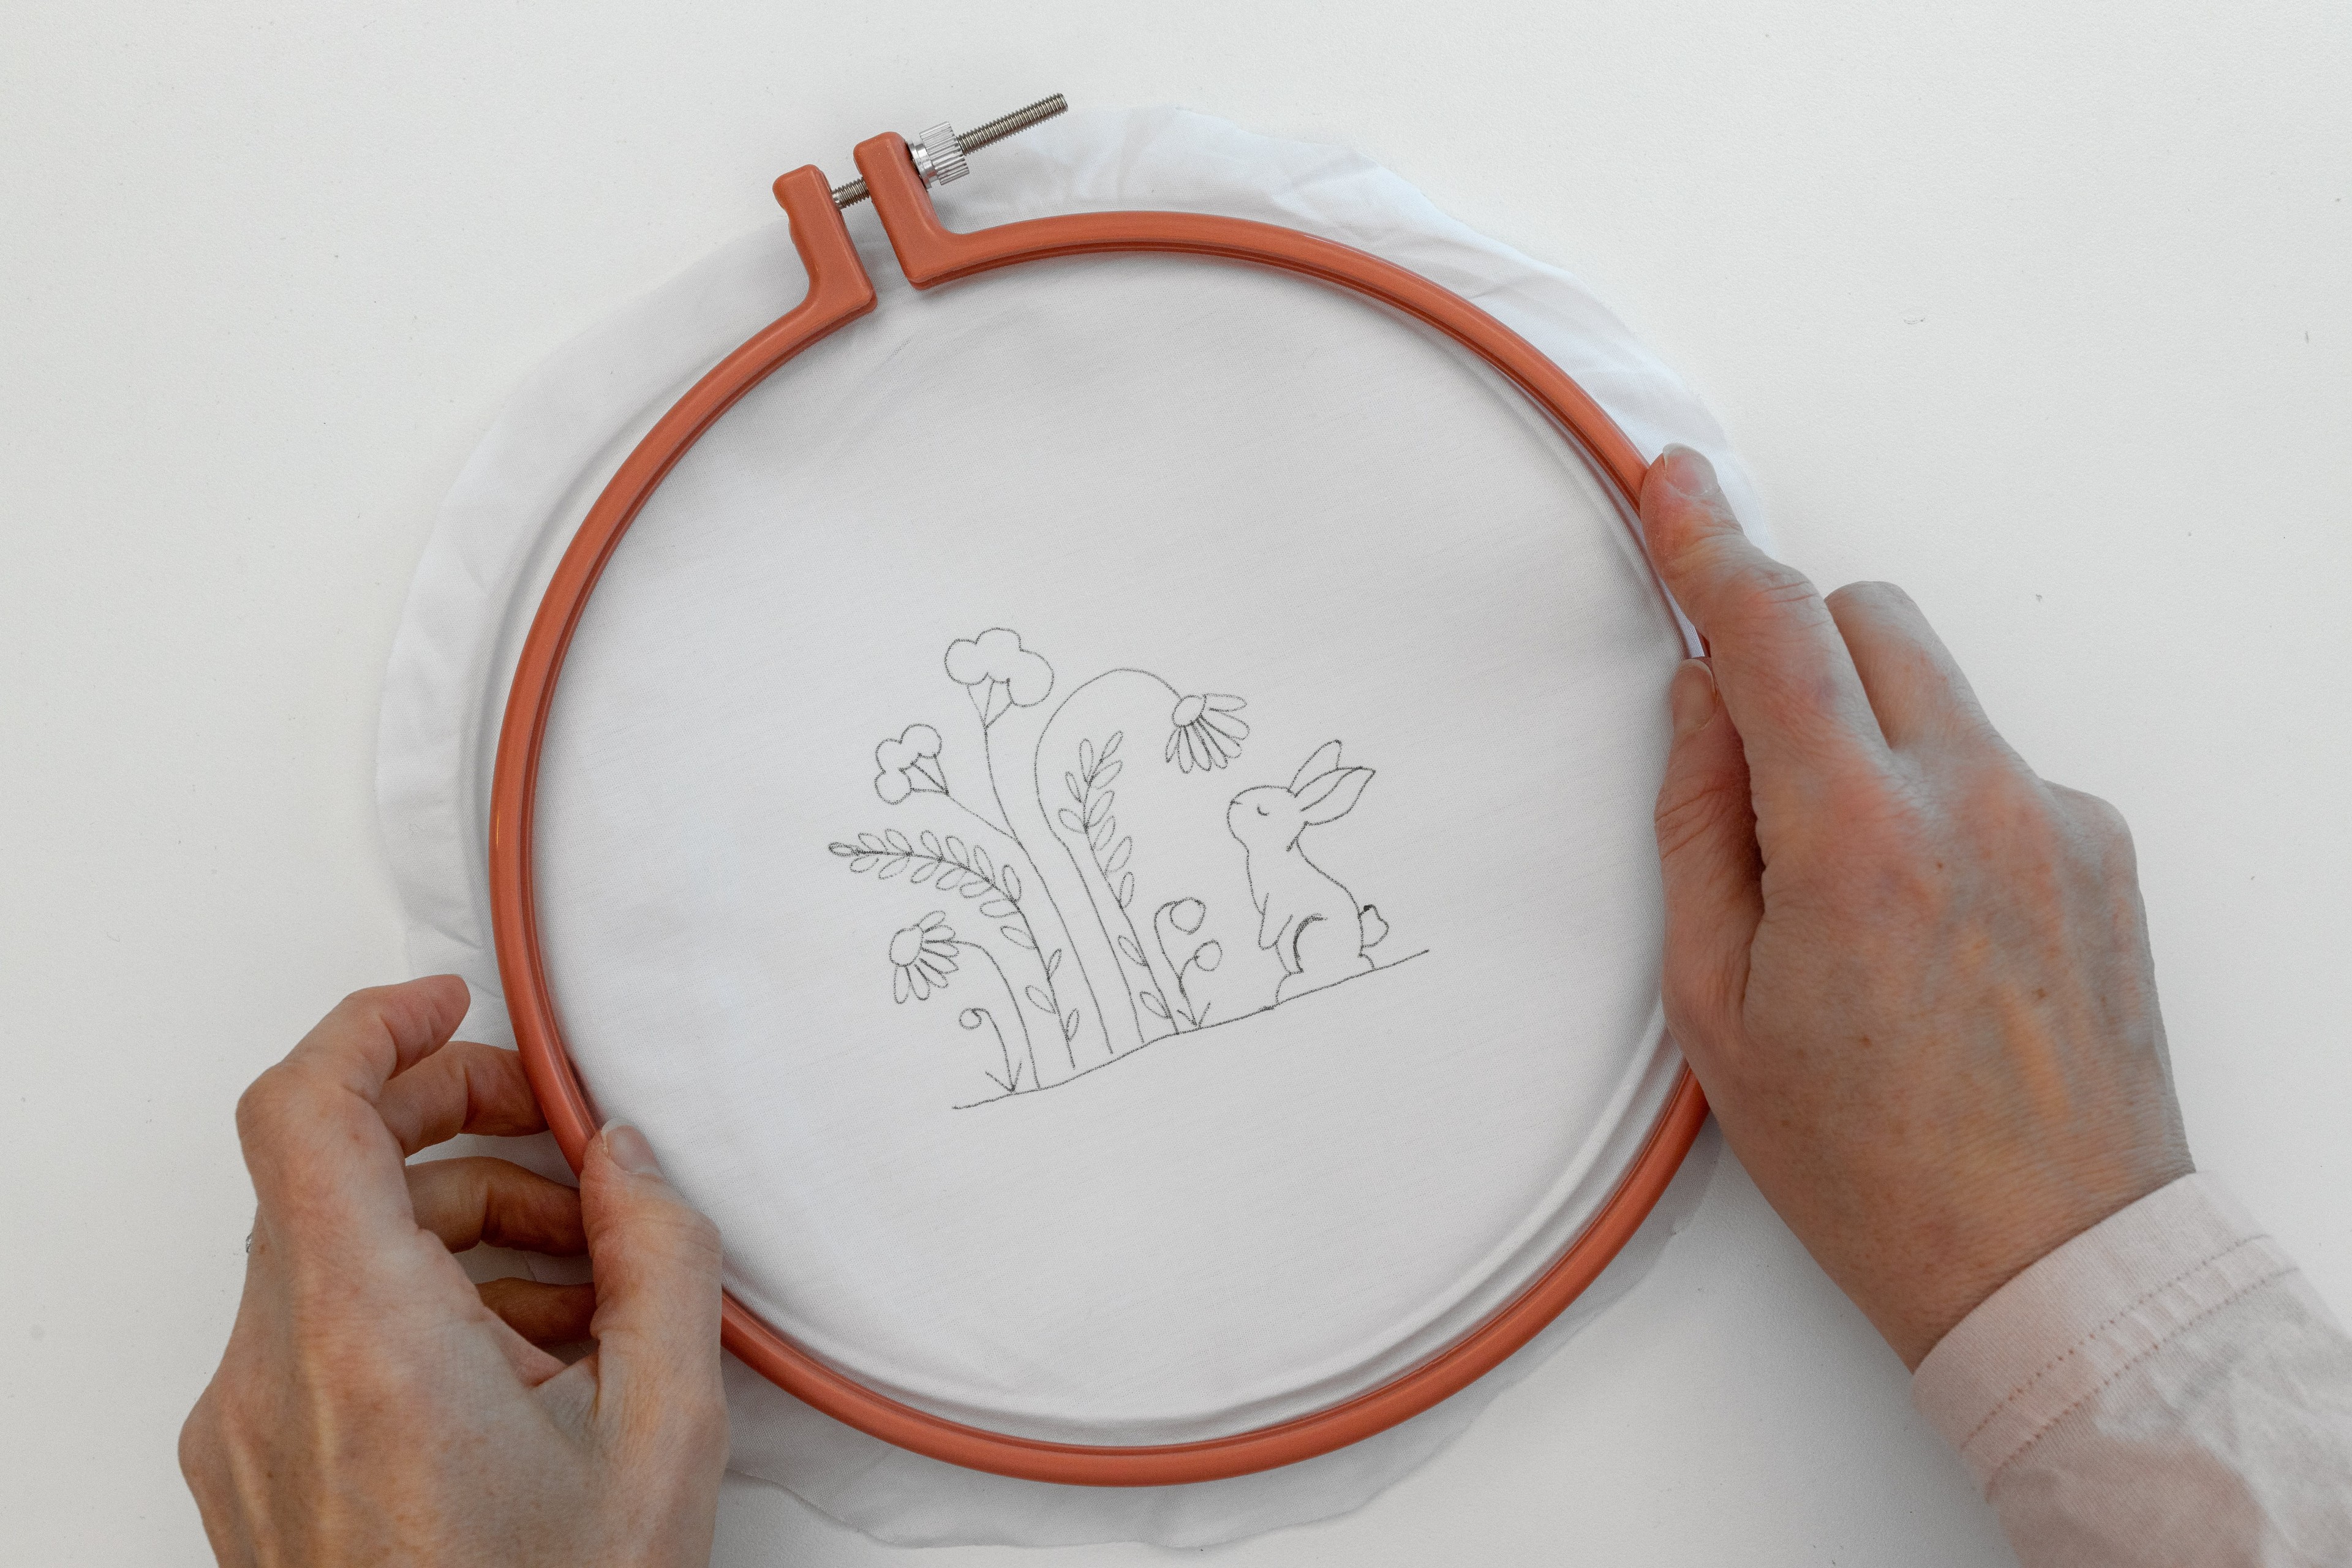
Now your template has been transferred to your pattern and you can move to the next step of making your pattern, how wonderful! You’ll find more info about transfer pens and how to remove any visible pen marks at the end.
3. Tracing Directly from a Device or Computer Screen
Pros:
-
No printer required
-
Quick and easy
-
Works on light or see-through fabrics
-
Pen lines removable
-
Pen lines clear and visible
-
Works day + night
-
No need to stitch through an extra layer
Cons:
-
Doesn’t work on dark or thick fabrics
-
Drawing skills required
-
Challenges to keep digital template still (depending on software)
-
Lightbox software required (usually)
-
Limited to screen size
Let’s explore how you can transfer your design directly from your computer or device, using it as a make shift lightbox! Many people love this method, especially when they can’t print out the design template. It works really well with light-coloured fabrics which you can see through to trace. But be warned – the tricky part is figuring out how to keep it all steady and still.
IN A NUTSHELL: Bring the design template up on your screen, place your fabric on top, and trace the design directly from the device onto your fabric.
You will need:
-
Device (e.g., iPad, tablet or laptop screen)
-
Digital copy of design template
-
Dressed hoop or loose fabric
-
Transfer pen (my fav is a Pilot Frixion fine rollerball)
-
Lightbox software (optional)
How to:
Step 1
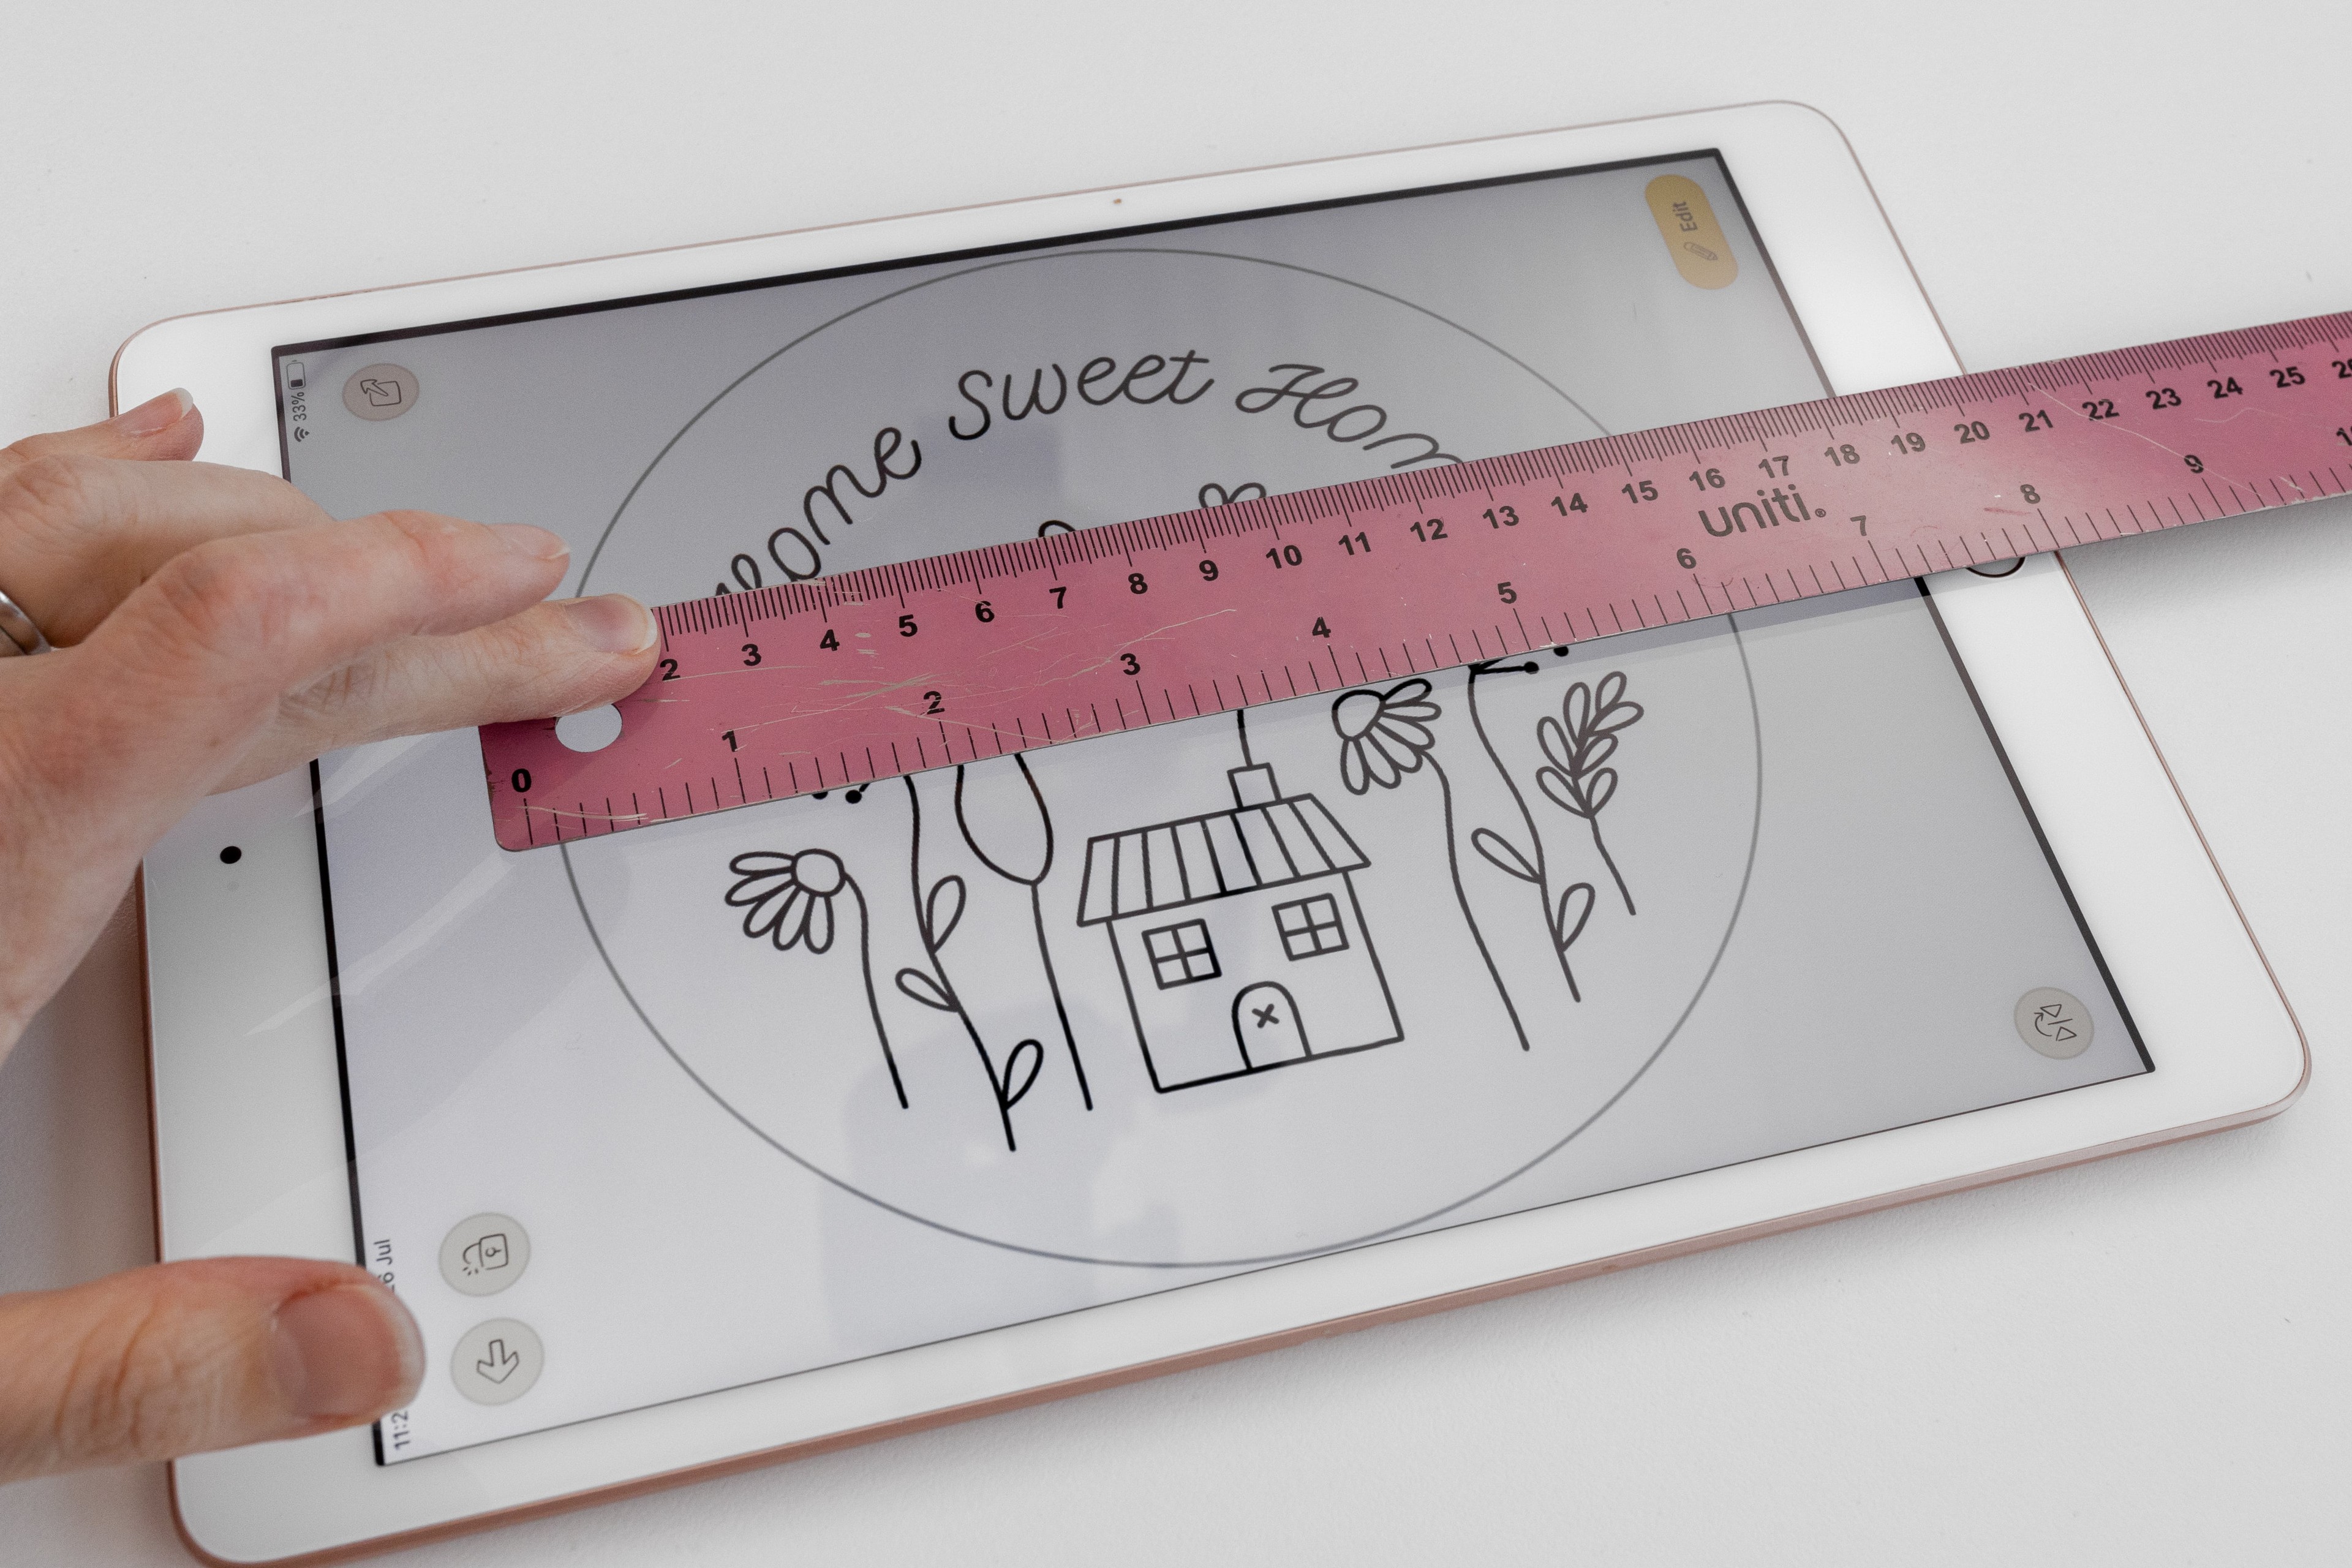
Open Digital Template: Bring the design template up on the screen of your device. Now check, is your design showing up to the correct scale, or in other words at 100% size? Can you lock the image in place at the correct size? Depending on your software, you may need to adjust this and check the size with a ruler.
Step 2
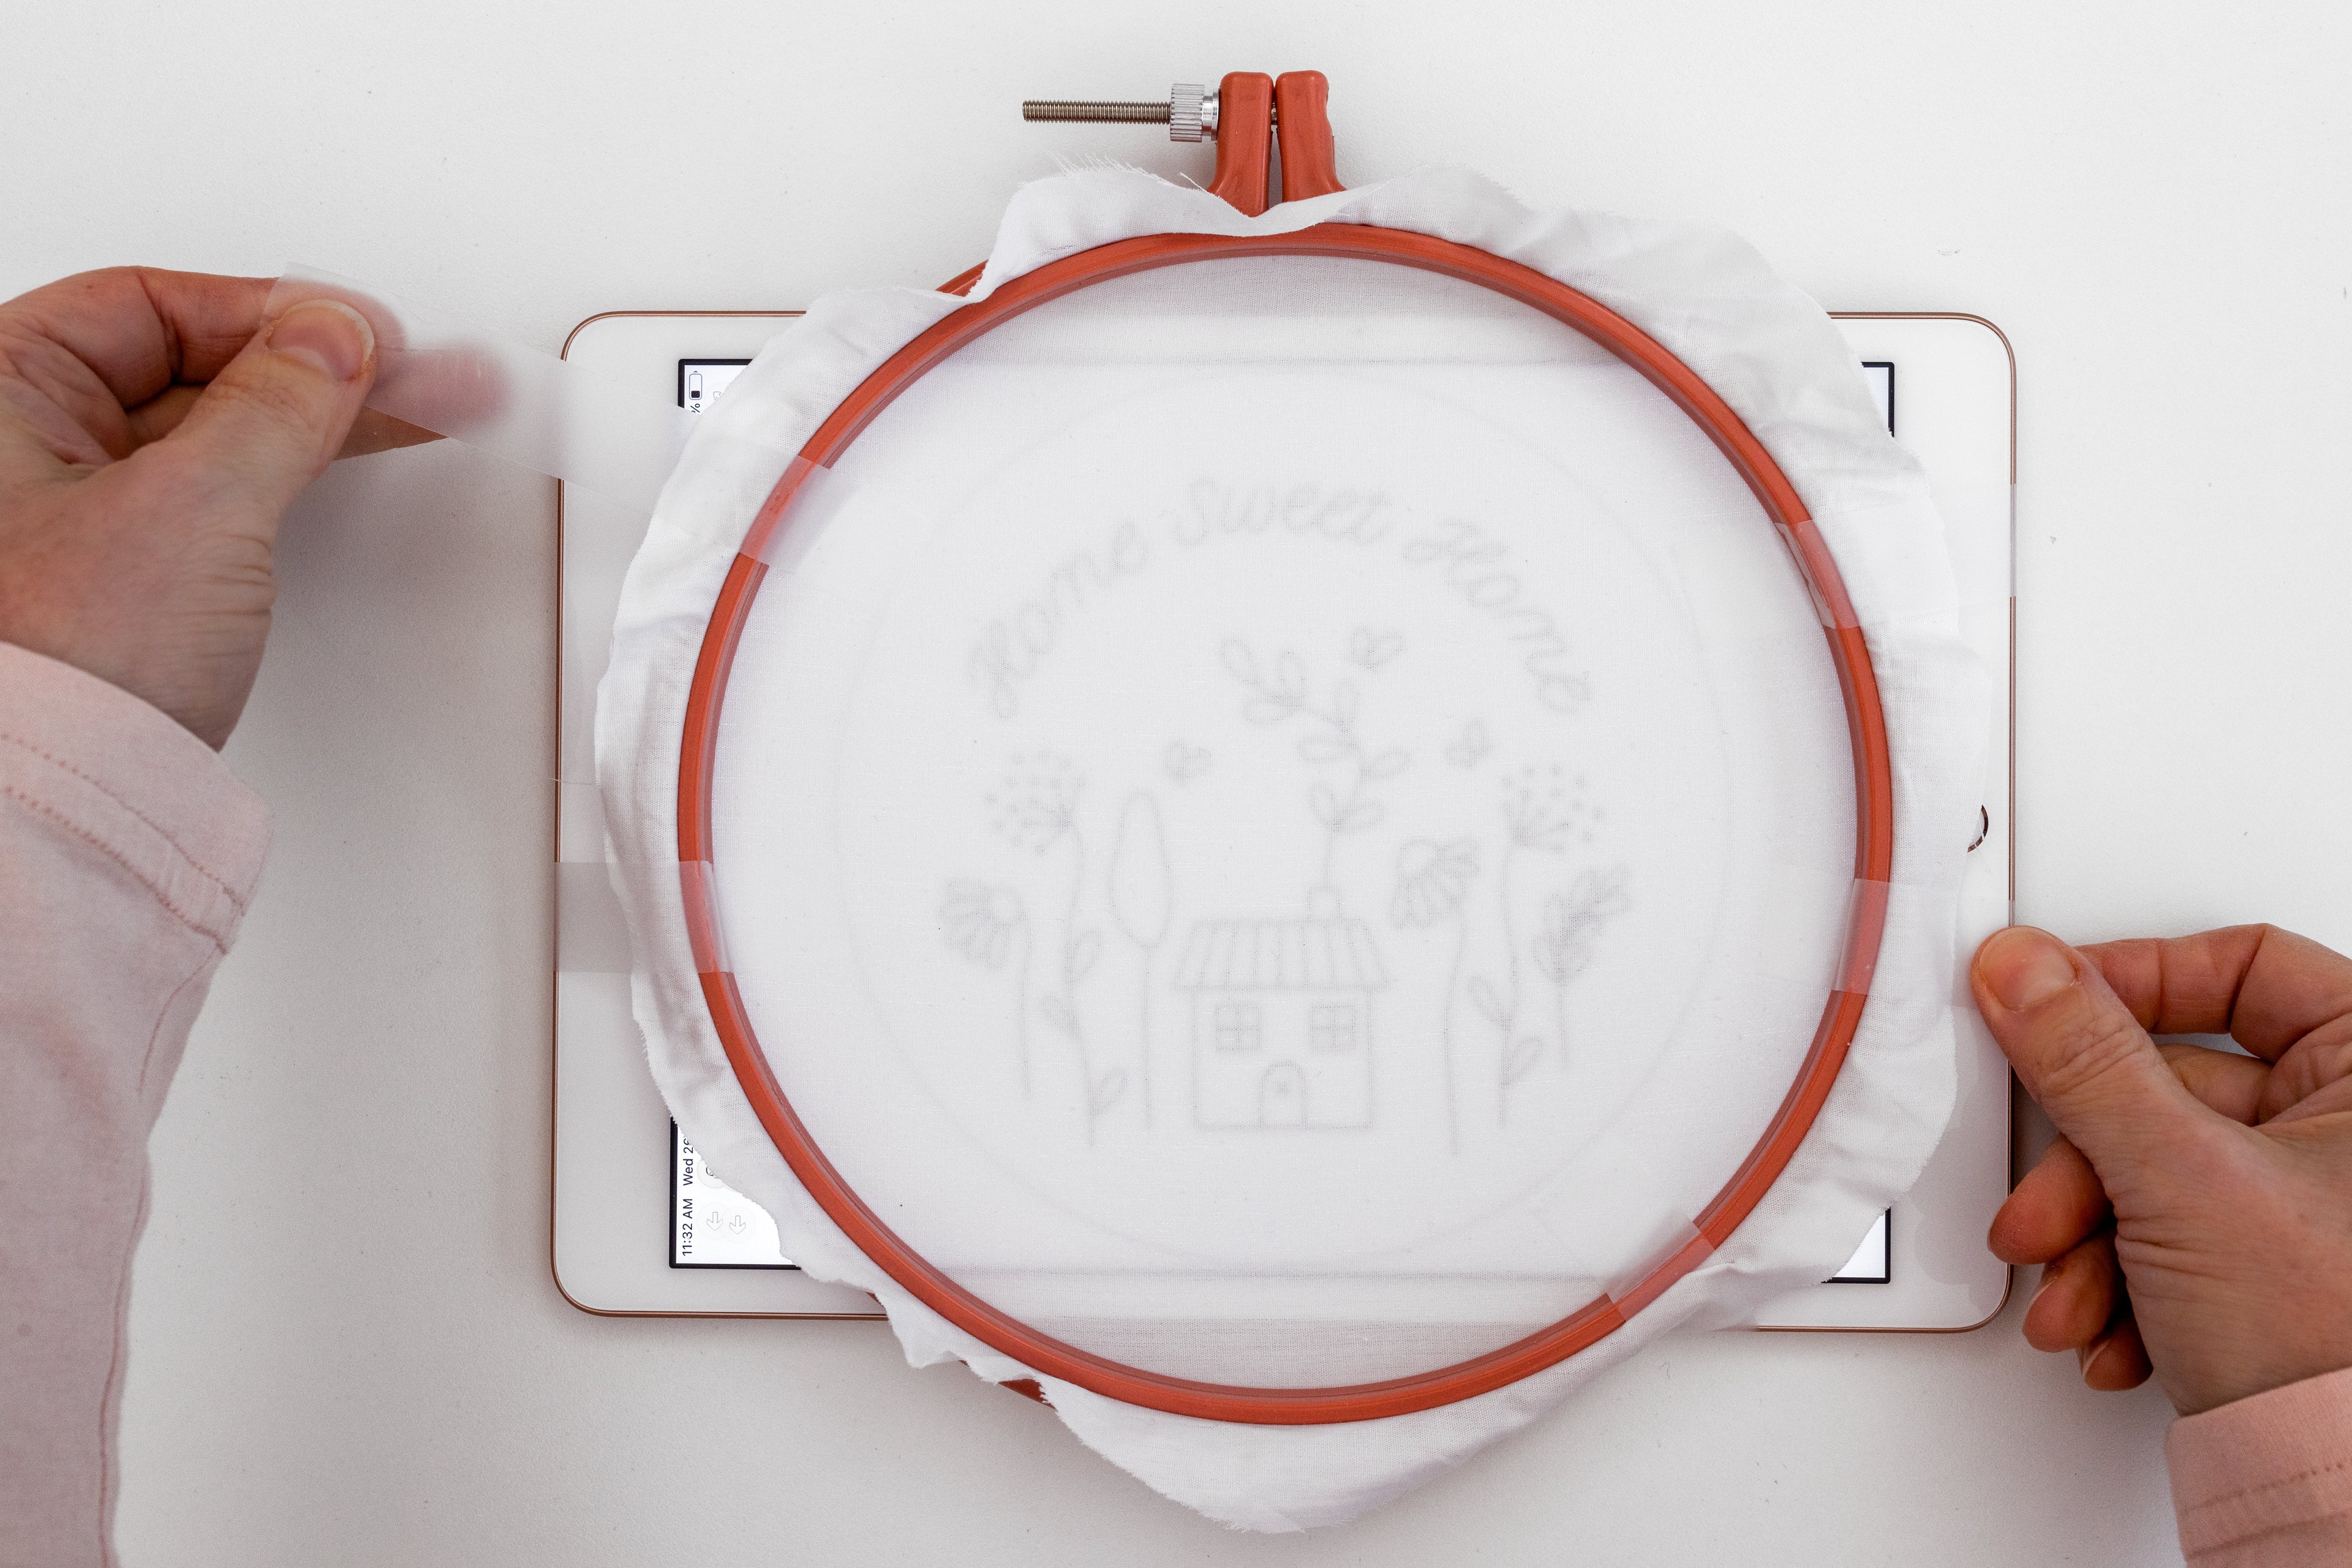
Position Fabric: Dress your hoop (i.e. mount your fabric tightly in the hoop and trim away any excess fabric), then place it face down on top of the template, and position it so that the design sits wherever you want it (usually this would be in the centre). It’s also really helpful (believe me!) to secure your hoop into place, so that it doesn’t move around on the screen as you do the tracing step. So I’d recommend that you use clear sticky tape to tape your hoop to the device – but please take care when using tape on your screen.
Tip to trace onto loose fabric instead:
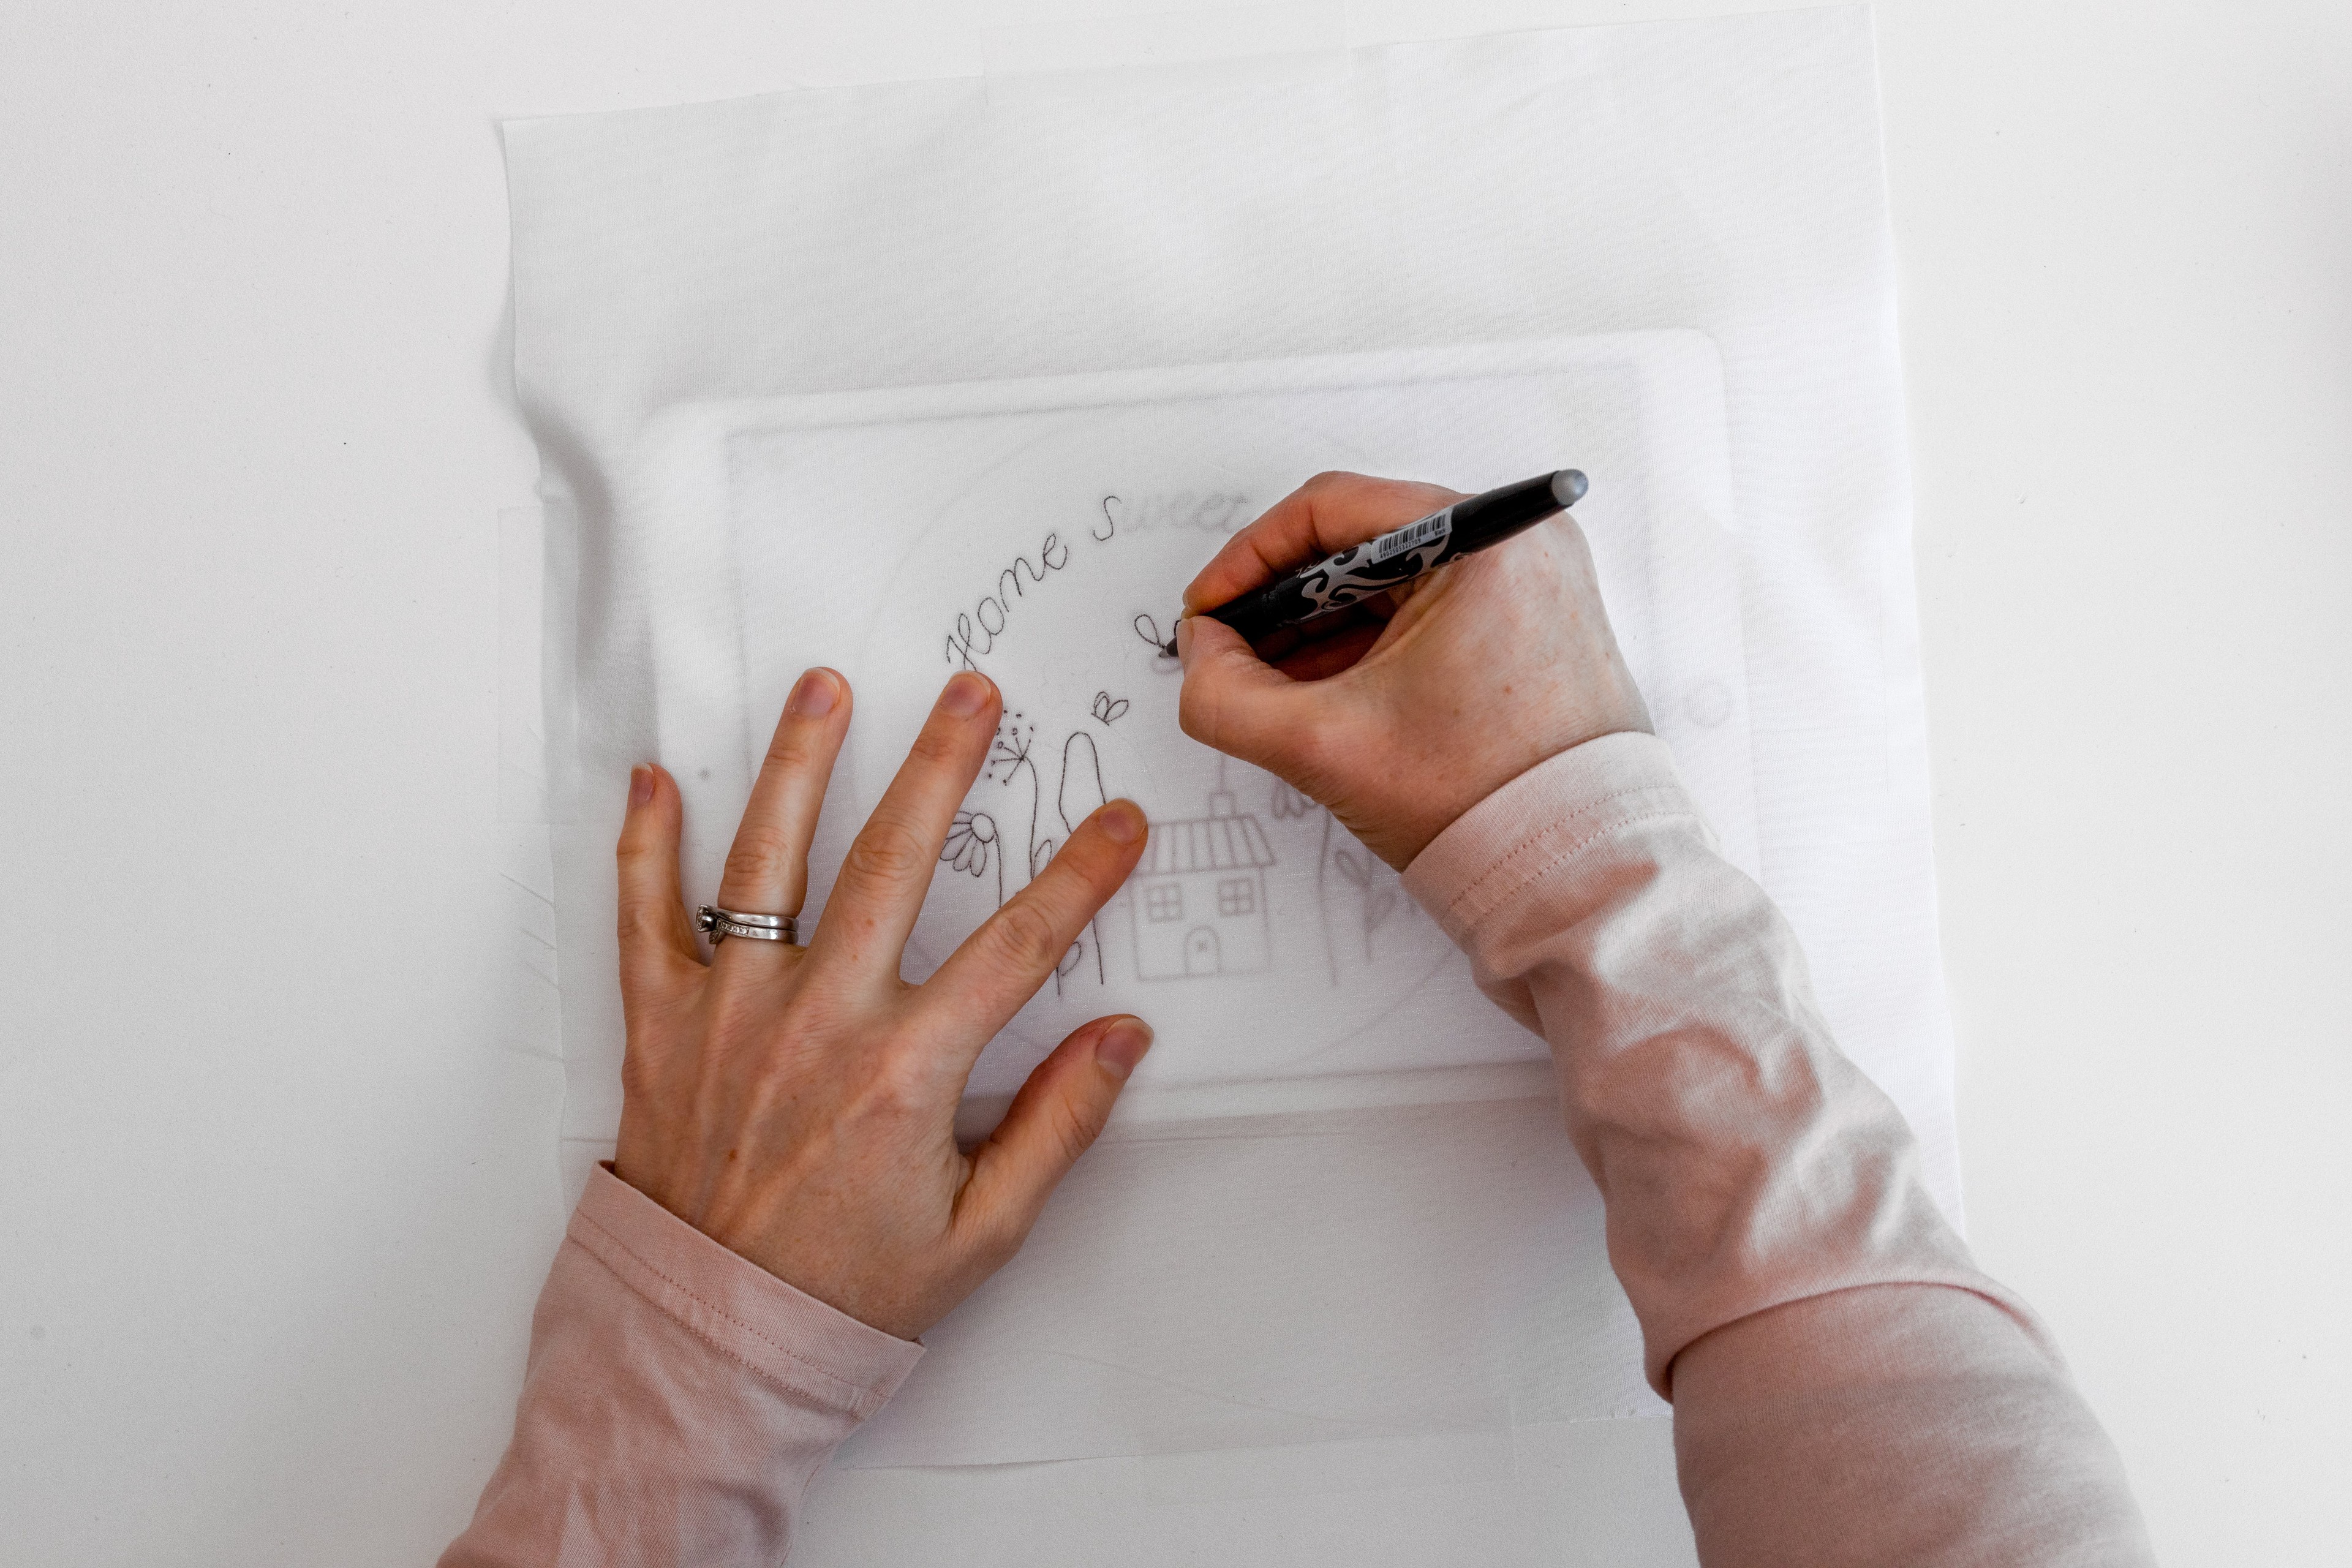
If you prefer, you can dress your hoop after the tracing step. In this case, you would lay your fabric over the screen and secure it into place with clear tape, then do the tracing step. Personally, I find it easier to trace onto stretched fabric rather than loose fabric, even if it’s taped down.
Step 3
Check Transparency: Can you easily see the template through the fabric? Is it visible enough for you to trace over? If it’s nice and clear, then jump straight to step 5. Or, if your design template is a bit tricky to see, then go to step 4.
Step 4
Increase Light: Your first option is to turn up the brightness on your screen. If that isn’t enough, you can download lightbox software, which will brighten your screen. This software can also be helpful for sizing, positioning, and locking your digital template in place. Read on for some tips on which apps to use.
Step 5
Trace: With the light shining up through the template, you should be able to easily see the design clearly on your fabric. So go ahead a trace the template onto your fabric.
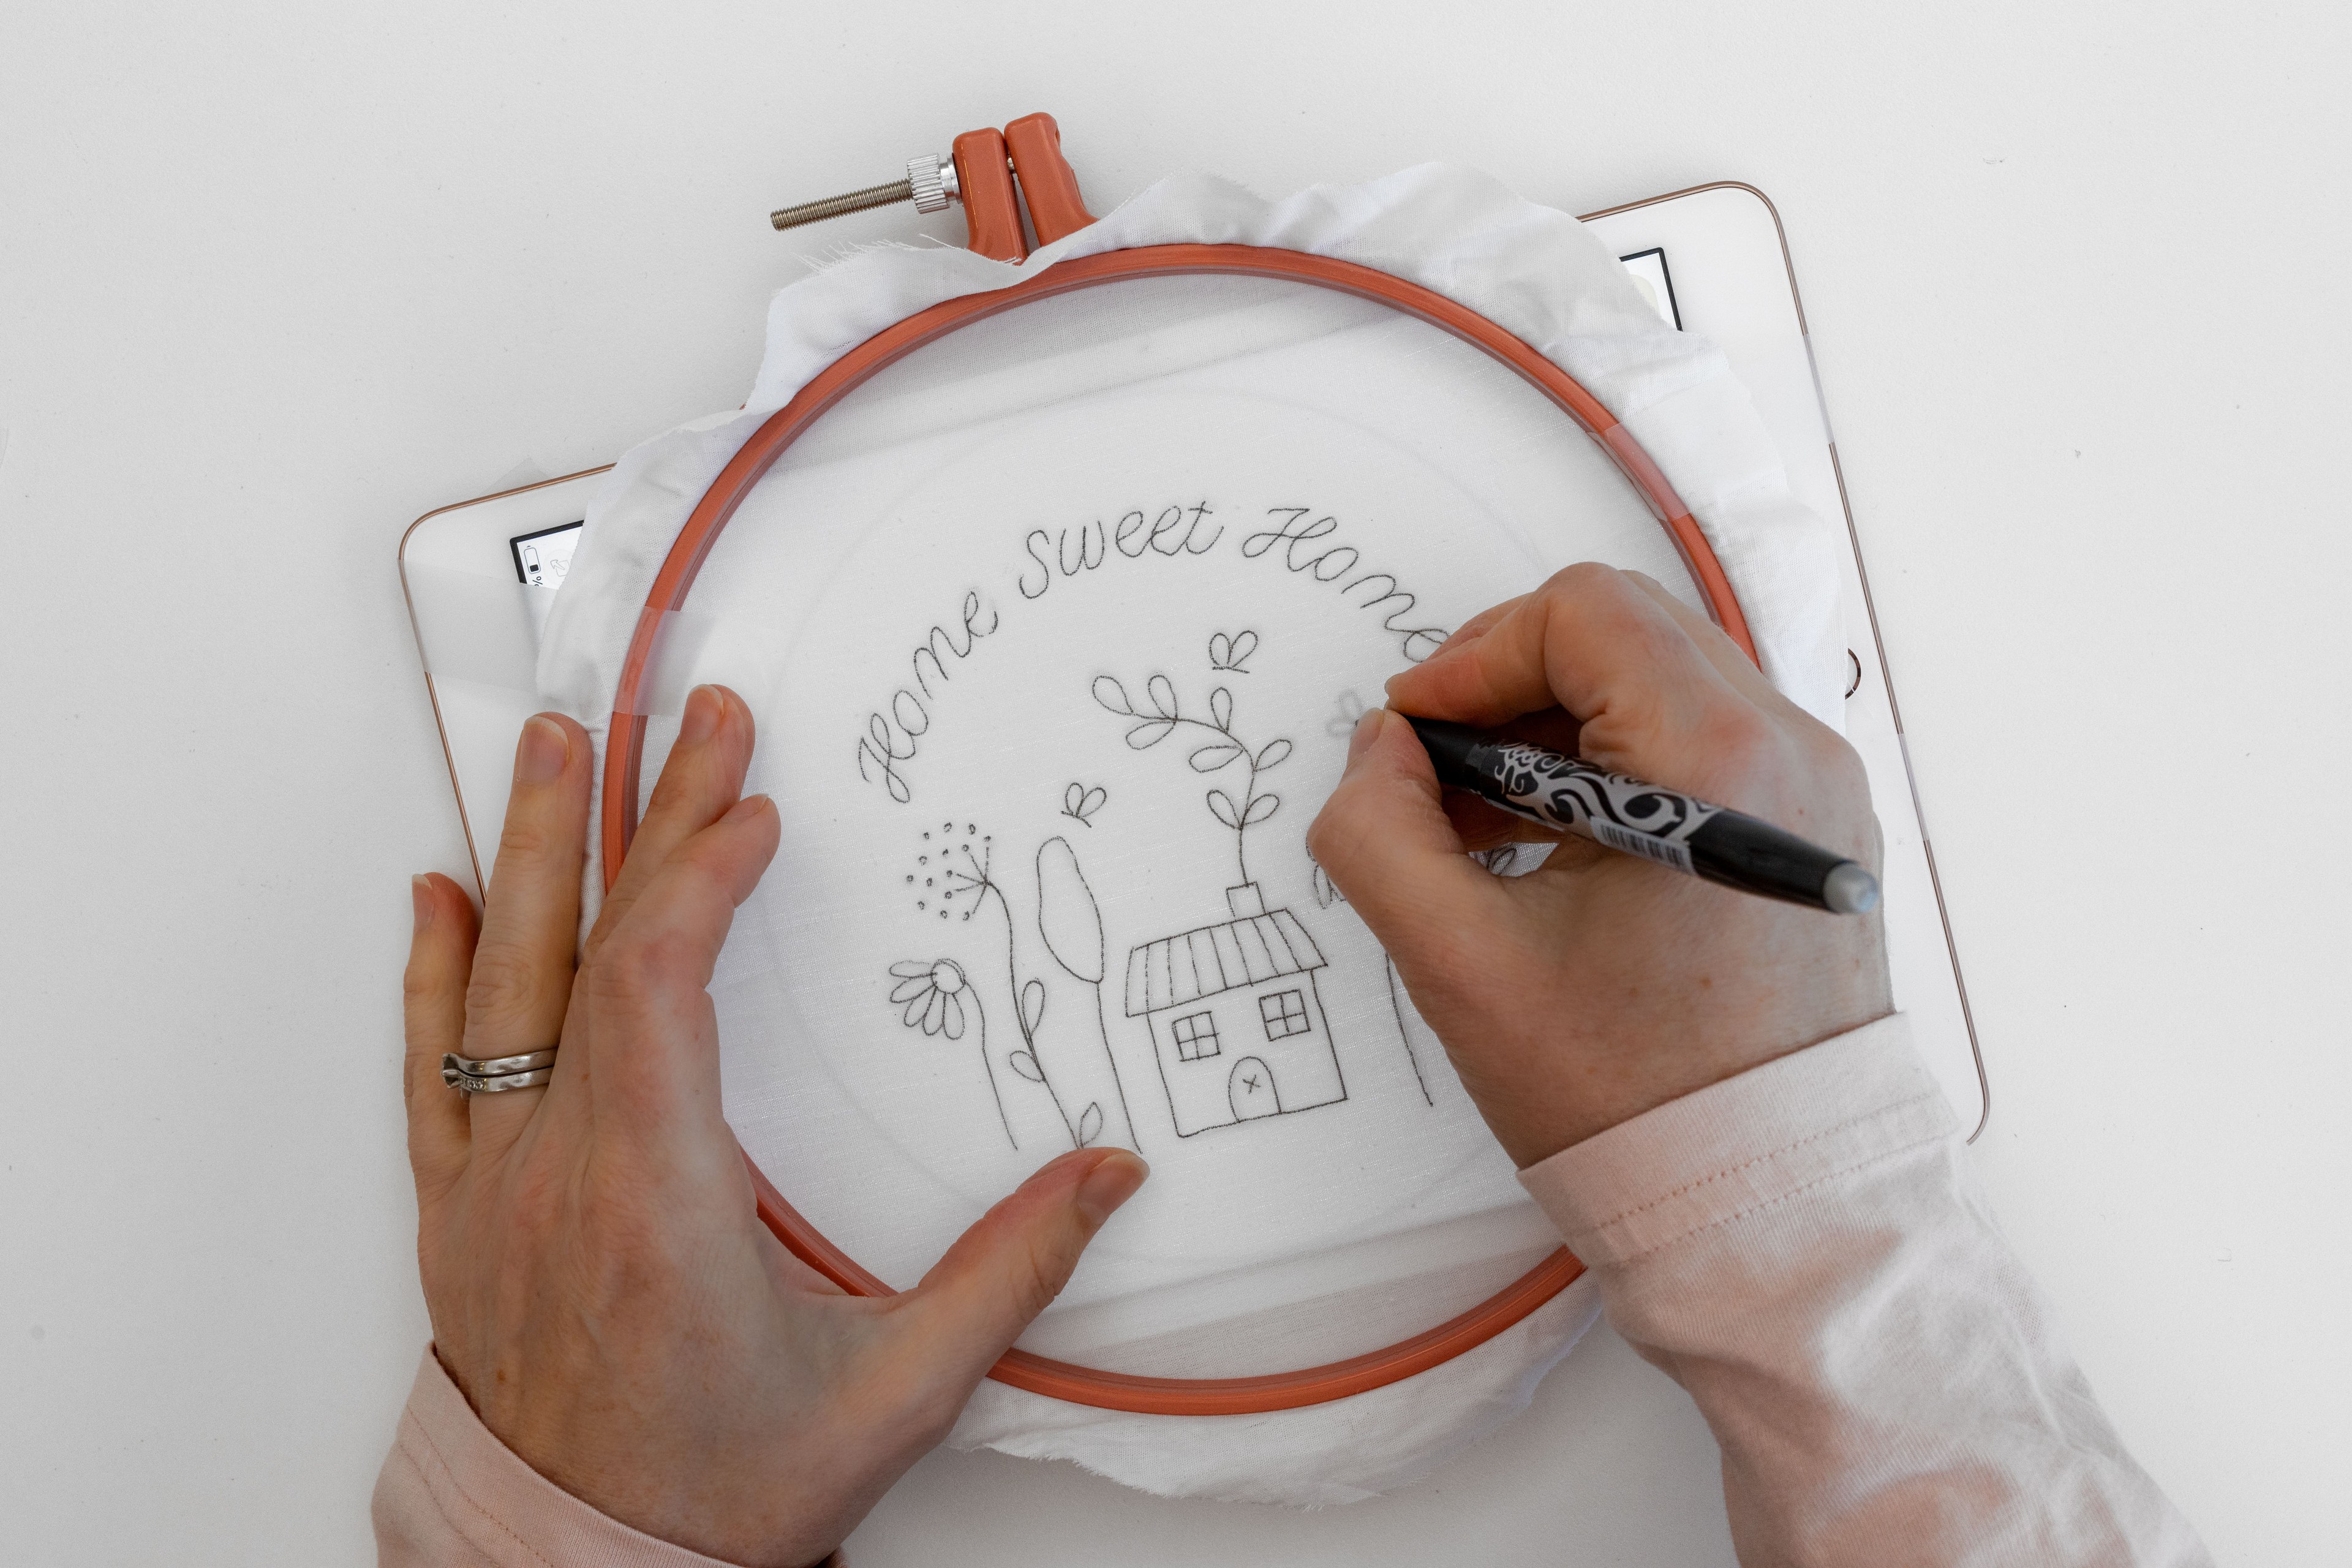
Now your template has been transferred to your pattern and you can move to the next step of making your pattern, fantastic work! You’ll find more info about transfer pens and how to remove any visible pen marks at the end.
TIP: If I don’t have a printer, I will often follow the steps above to trace my design onto a piece of paper instead of directly onto the fabric. Then I’ll use go ahead and transfer using method # 1 (my go-to!). I find that easier than tracing straight off a screen to fabric. But do whatever works for you!
Q & A
Help! Everything is moving around on my device screen.
As you trace your pattern and apply pressure to the screen with your transfer pen, you may notice that your digital template moves around, or even disappears! This can be really frustrating. But don’t worry, you can usually turn on a function on your device that locks things in place. For example, if you’re using an iPad, you can turn on the ‘guided access’ function. For tablets, look for the ‘Screen Pinning’ or ‘Screen Lock’ feature. In any case, you’ll need to use whatever locking function is available on your device.
What Lightbox app should I use?
There are loads of different options out there, and I encourage you to do your own research before you choose. But here’s a couple of ideas:
-
I use and like the ‘Trace Table – Light Box’ app, which I downloaded for free on my iPad.
-
I’ve heard ‘Tracer! Lightbox tracing app’ on Google Play is good.
4. Iron-on Transfers
Pros:
-
Works on light fabrics
-
Template lines clear and visible
-
Template lines might be removable
-
Works day + night
-
May be able to reuse the transfers
Cons:
-
Transfers not visible on dark fabrics
-
Additional cost of the transfers
-
Need to use iron (not suitable for some fabrics)
-
Design won’t adhere to some textured fabrics (e.g. wool)
-
Risk of the transfer moving and disrupting the outline
-
Template lines might not be removable
-
Need to remember to reverse the transfer design
This is a popular way for pattern templates to be provided in kits. The design is pre-printed on transfer paper. This method works best on lighter coloured fabrics. Depending on the brand, the outlines may be removable.
IN A NUTSHELL: The pattern template is provided to you as an iron-on transfer (in reverse), which you place face-down onto your fabric. By applying heat with an iron, the design adheres to the fabric’s surface (facing the right way).
You will need:
-
Iron-on transfers of your design template
-
Dressed hoop (e.g. fabric mounted tightly in the hoop and excess fabric trimmed off)
-
Heat Iron
How to:
NOTE: Below is a quick summary, but it’s important to follow the instructions provided with the specific ready-made iron-on transfer that you’re using. This is because different brands may have slightly different guidelines for optimal results. The ones shown here are from Love Embroidery Magazine, designed by Vivian Yiwing.
Step 1
Place: Place the iron-on transfer ink-side down on the top side of the fabric. Ensure it is centred and covers the desired area.
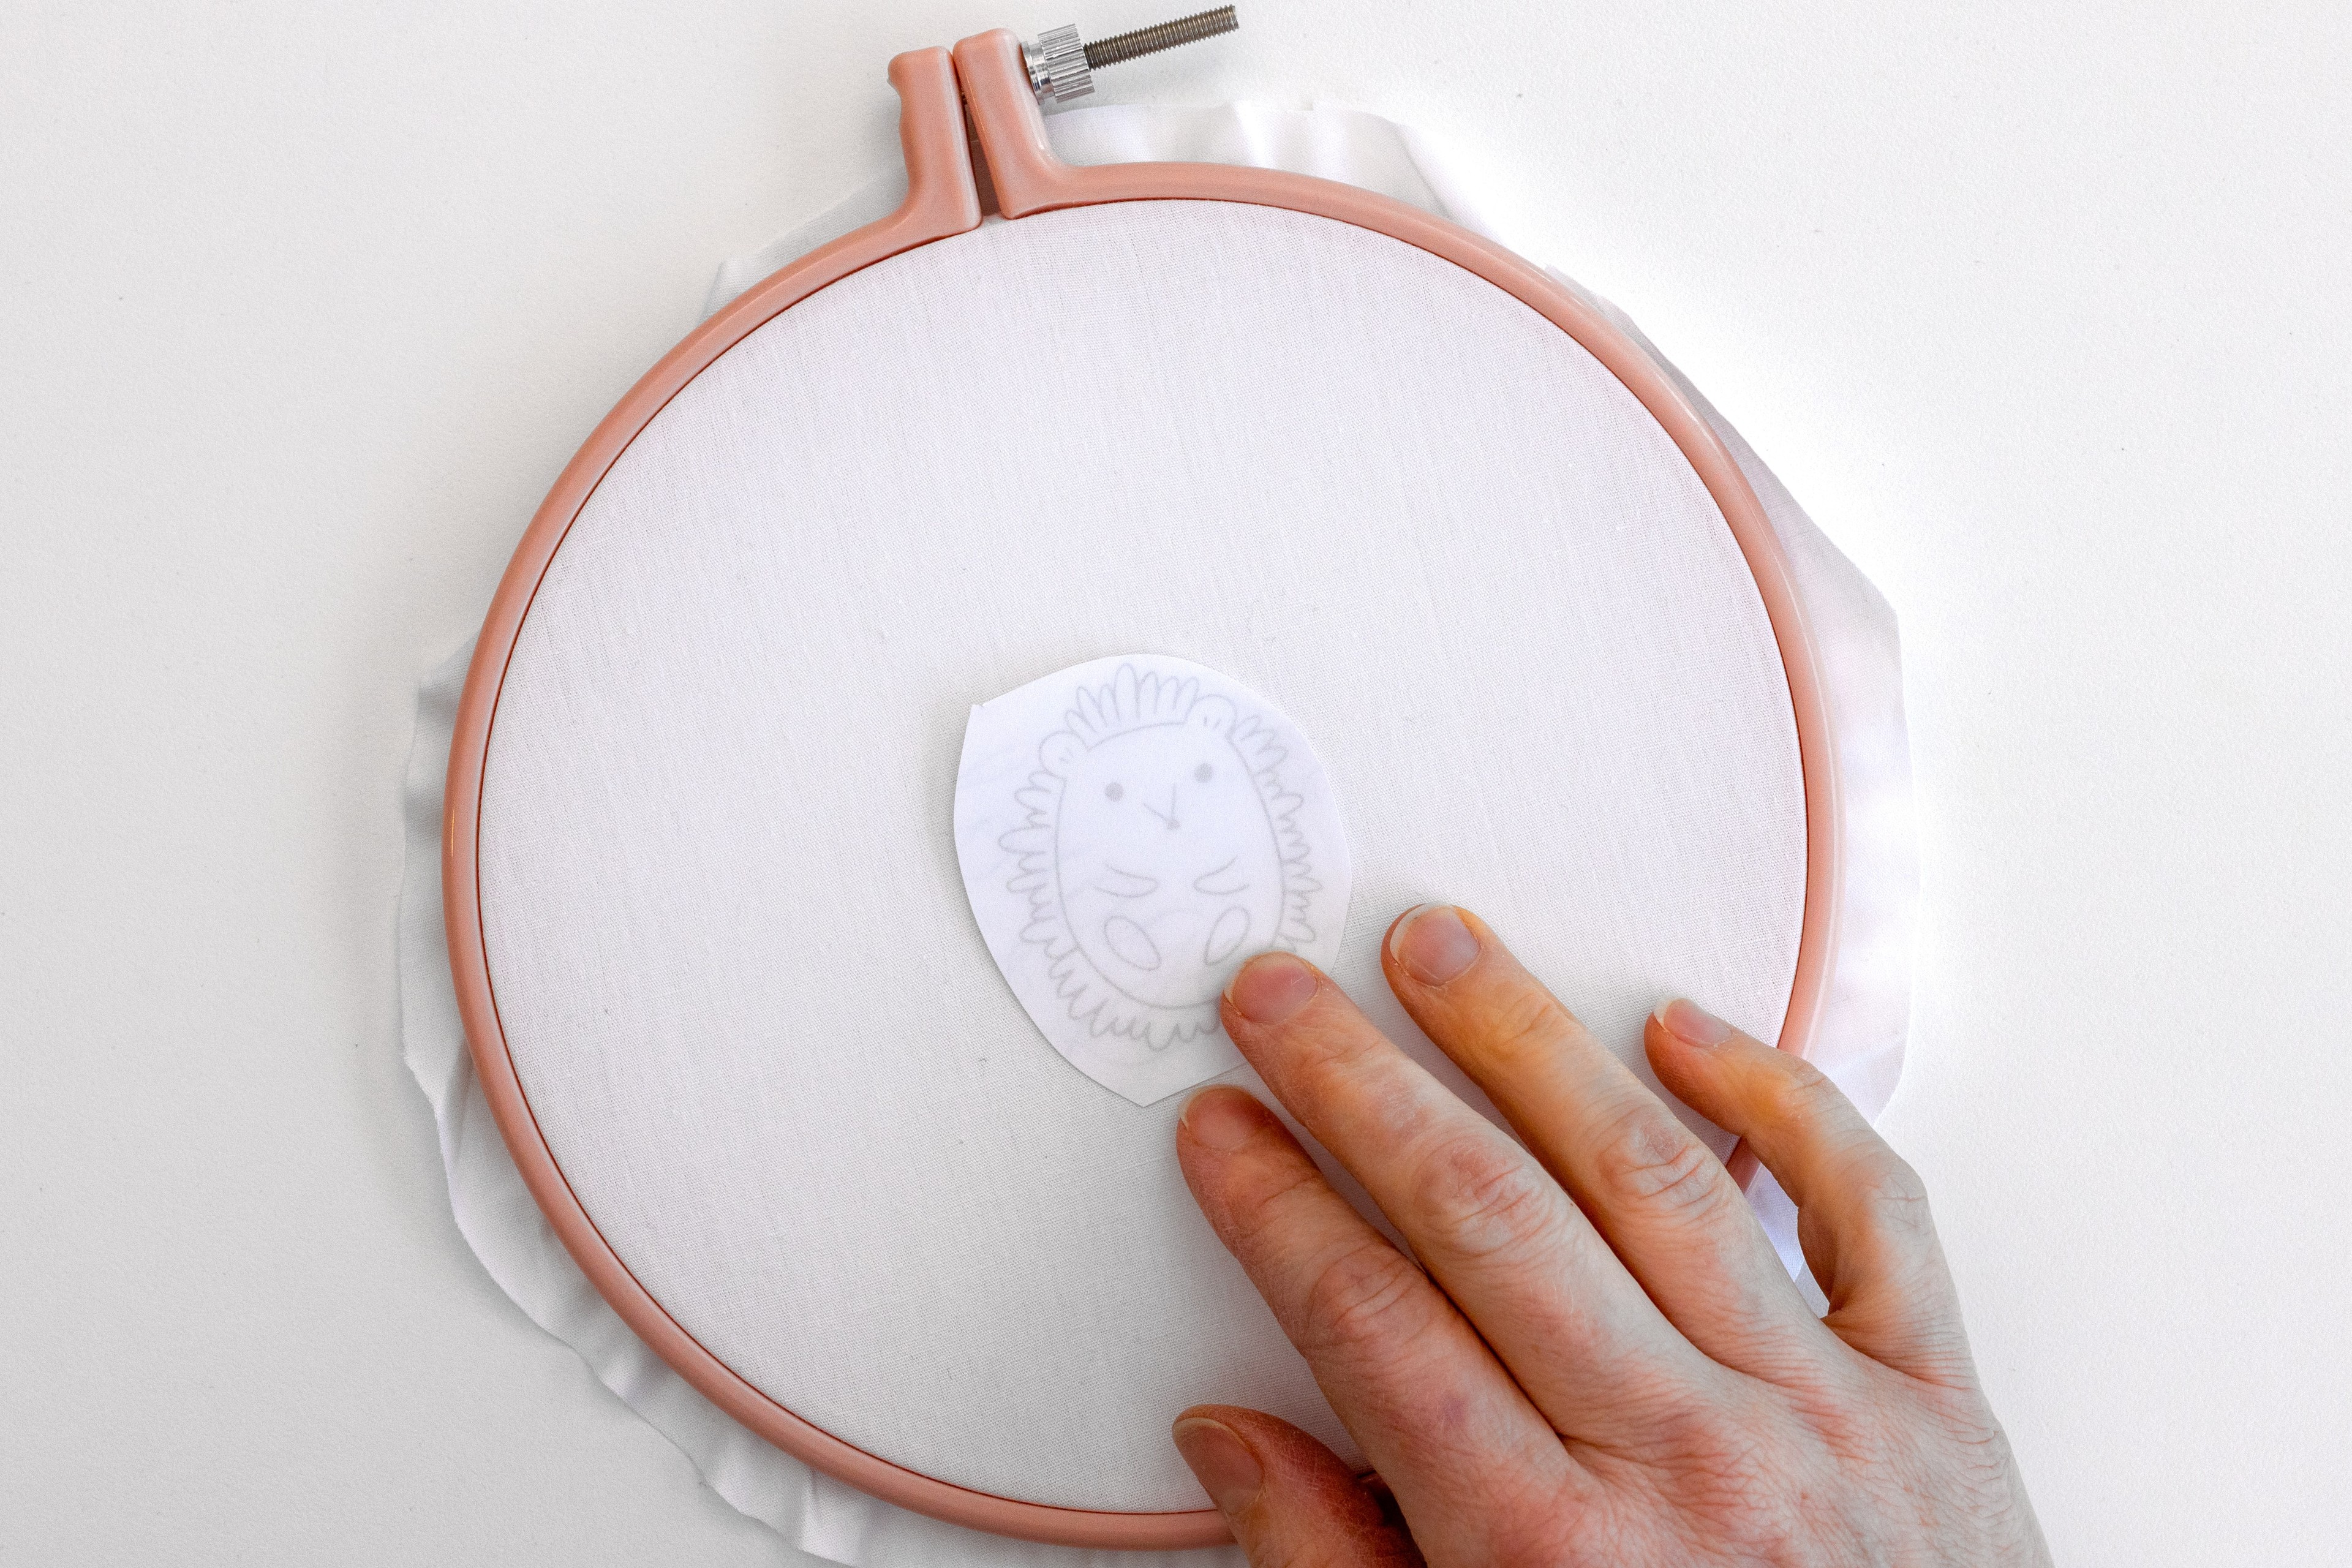
Step 2
Heat: Apply heat using a hot dry iron (take care with the heat to avoid damaging your fabric). As you do this, you need to be really careful that you don’t move the transfer around.
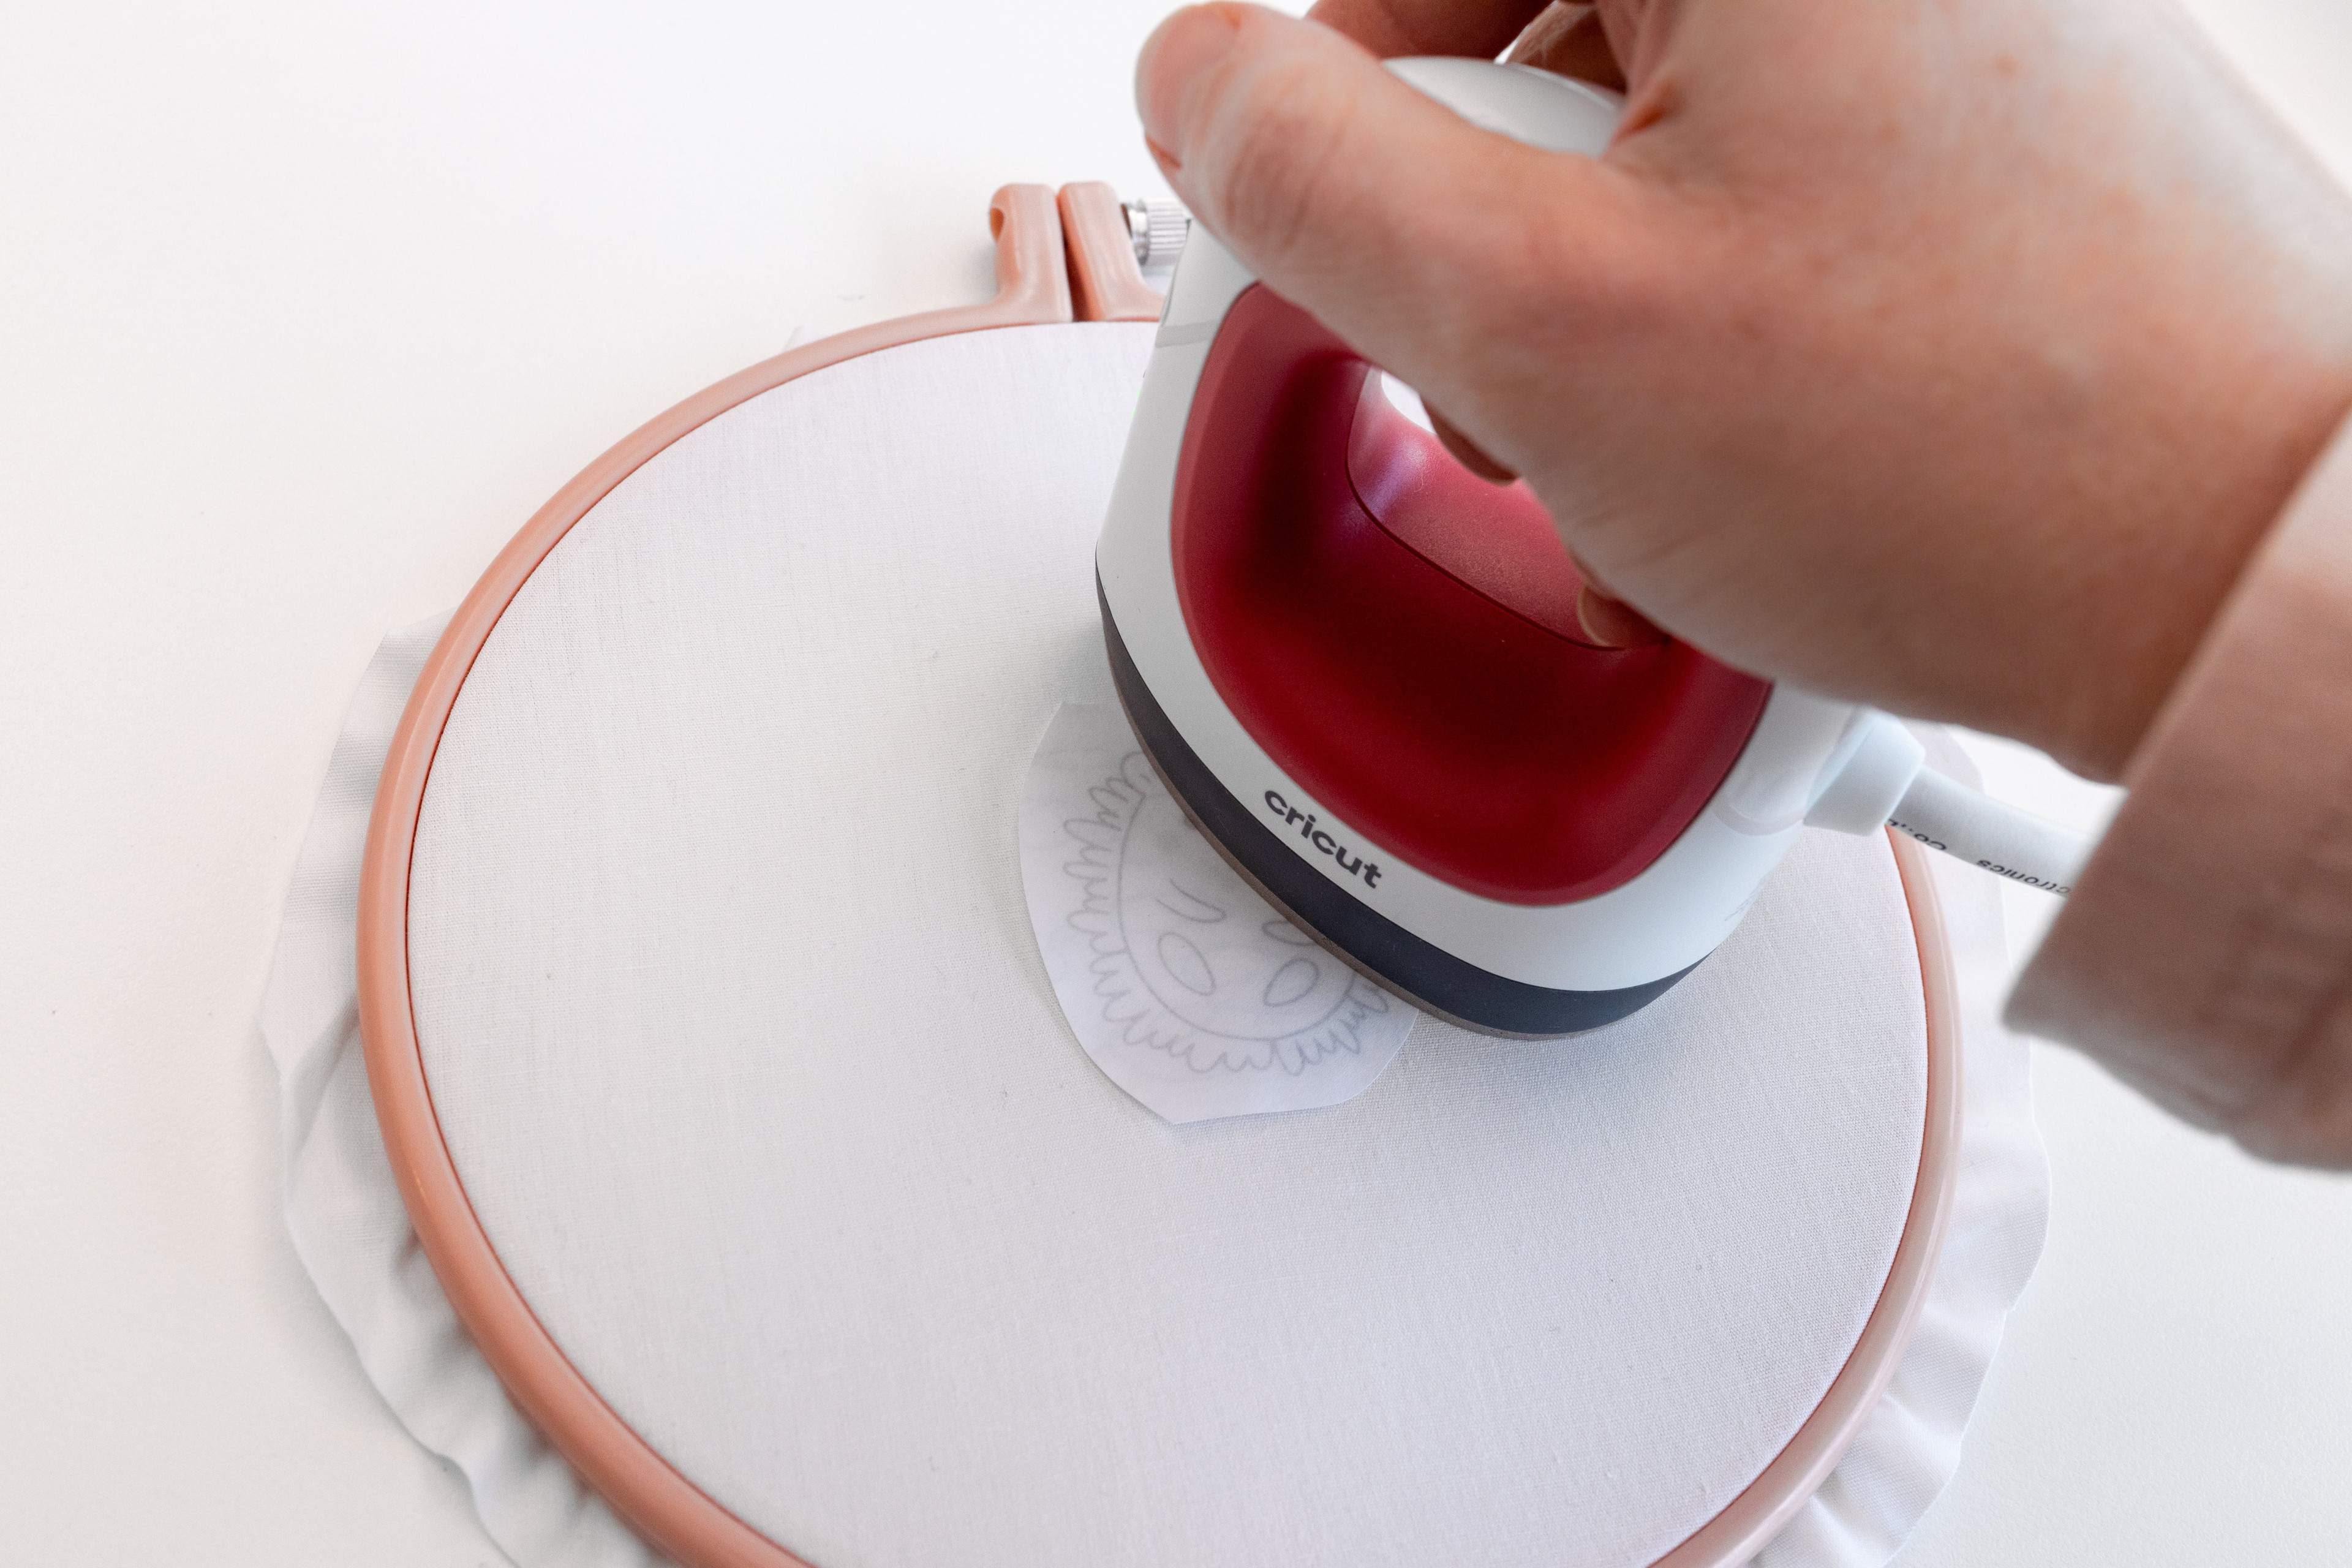
Tip to keep your transfer in place: You could secure it with some heat-resistant pins.
Step 3
Check: Allow the fabric to cool, then lift up a corner of the transfer, to check it has fully transferred before you remove it. If not, go ahead and iron it again.

Step 4
Remove: Once it’s cooled and transferred properly, remove the transfer.

Now your template has been transferred to your pattern and you can move to the next step of making your pattern, well done!
Removing the template lines:
This will depend on the brand of your transfers, but they may remove with washing or fade over time. It pays to check this before you proceed, in case the lines are permanent and need to be covered with stitches.
What about dark fabrics?
Before we proceed, let’s address the elephant in the room – what if your fabric is so dark or thick that you can’t see through it to trace the template? This can be a real challenge as it eliminates tracing techniques 1-4 in this blog. However, the good news is that the rest of the methods in this blog will work on this type of fabric. So, keep reading to learn more.
But before we dive into the methods, here are some quick top tips on this topic.
Tip 1
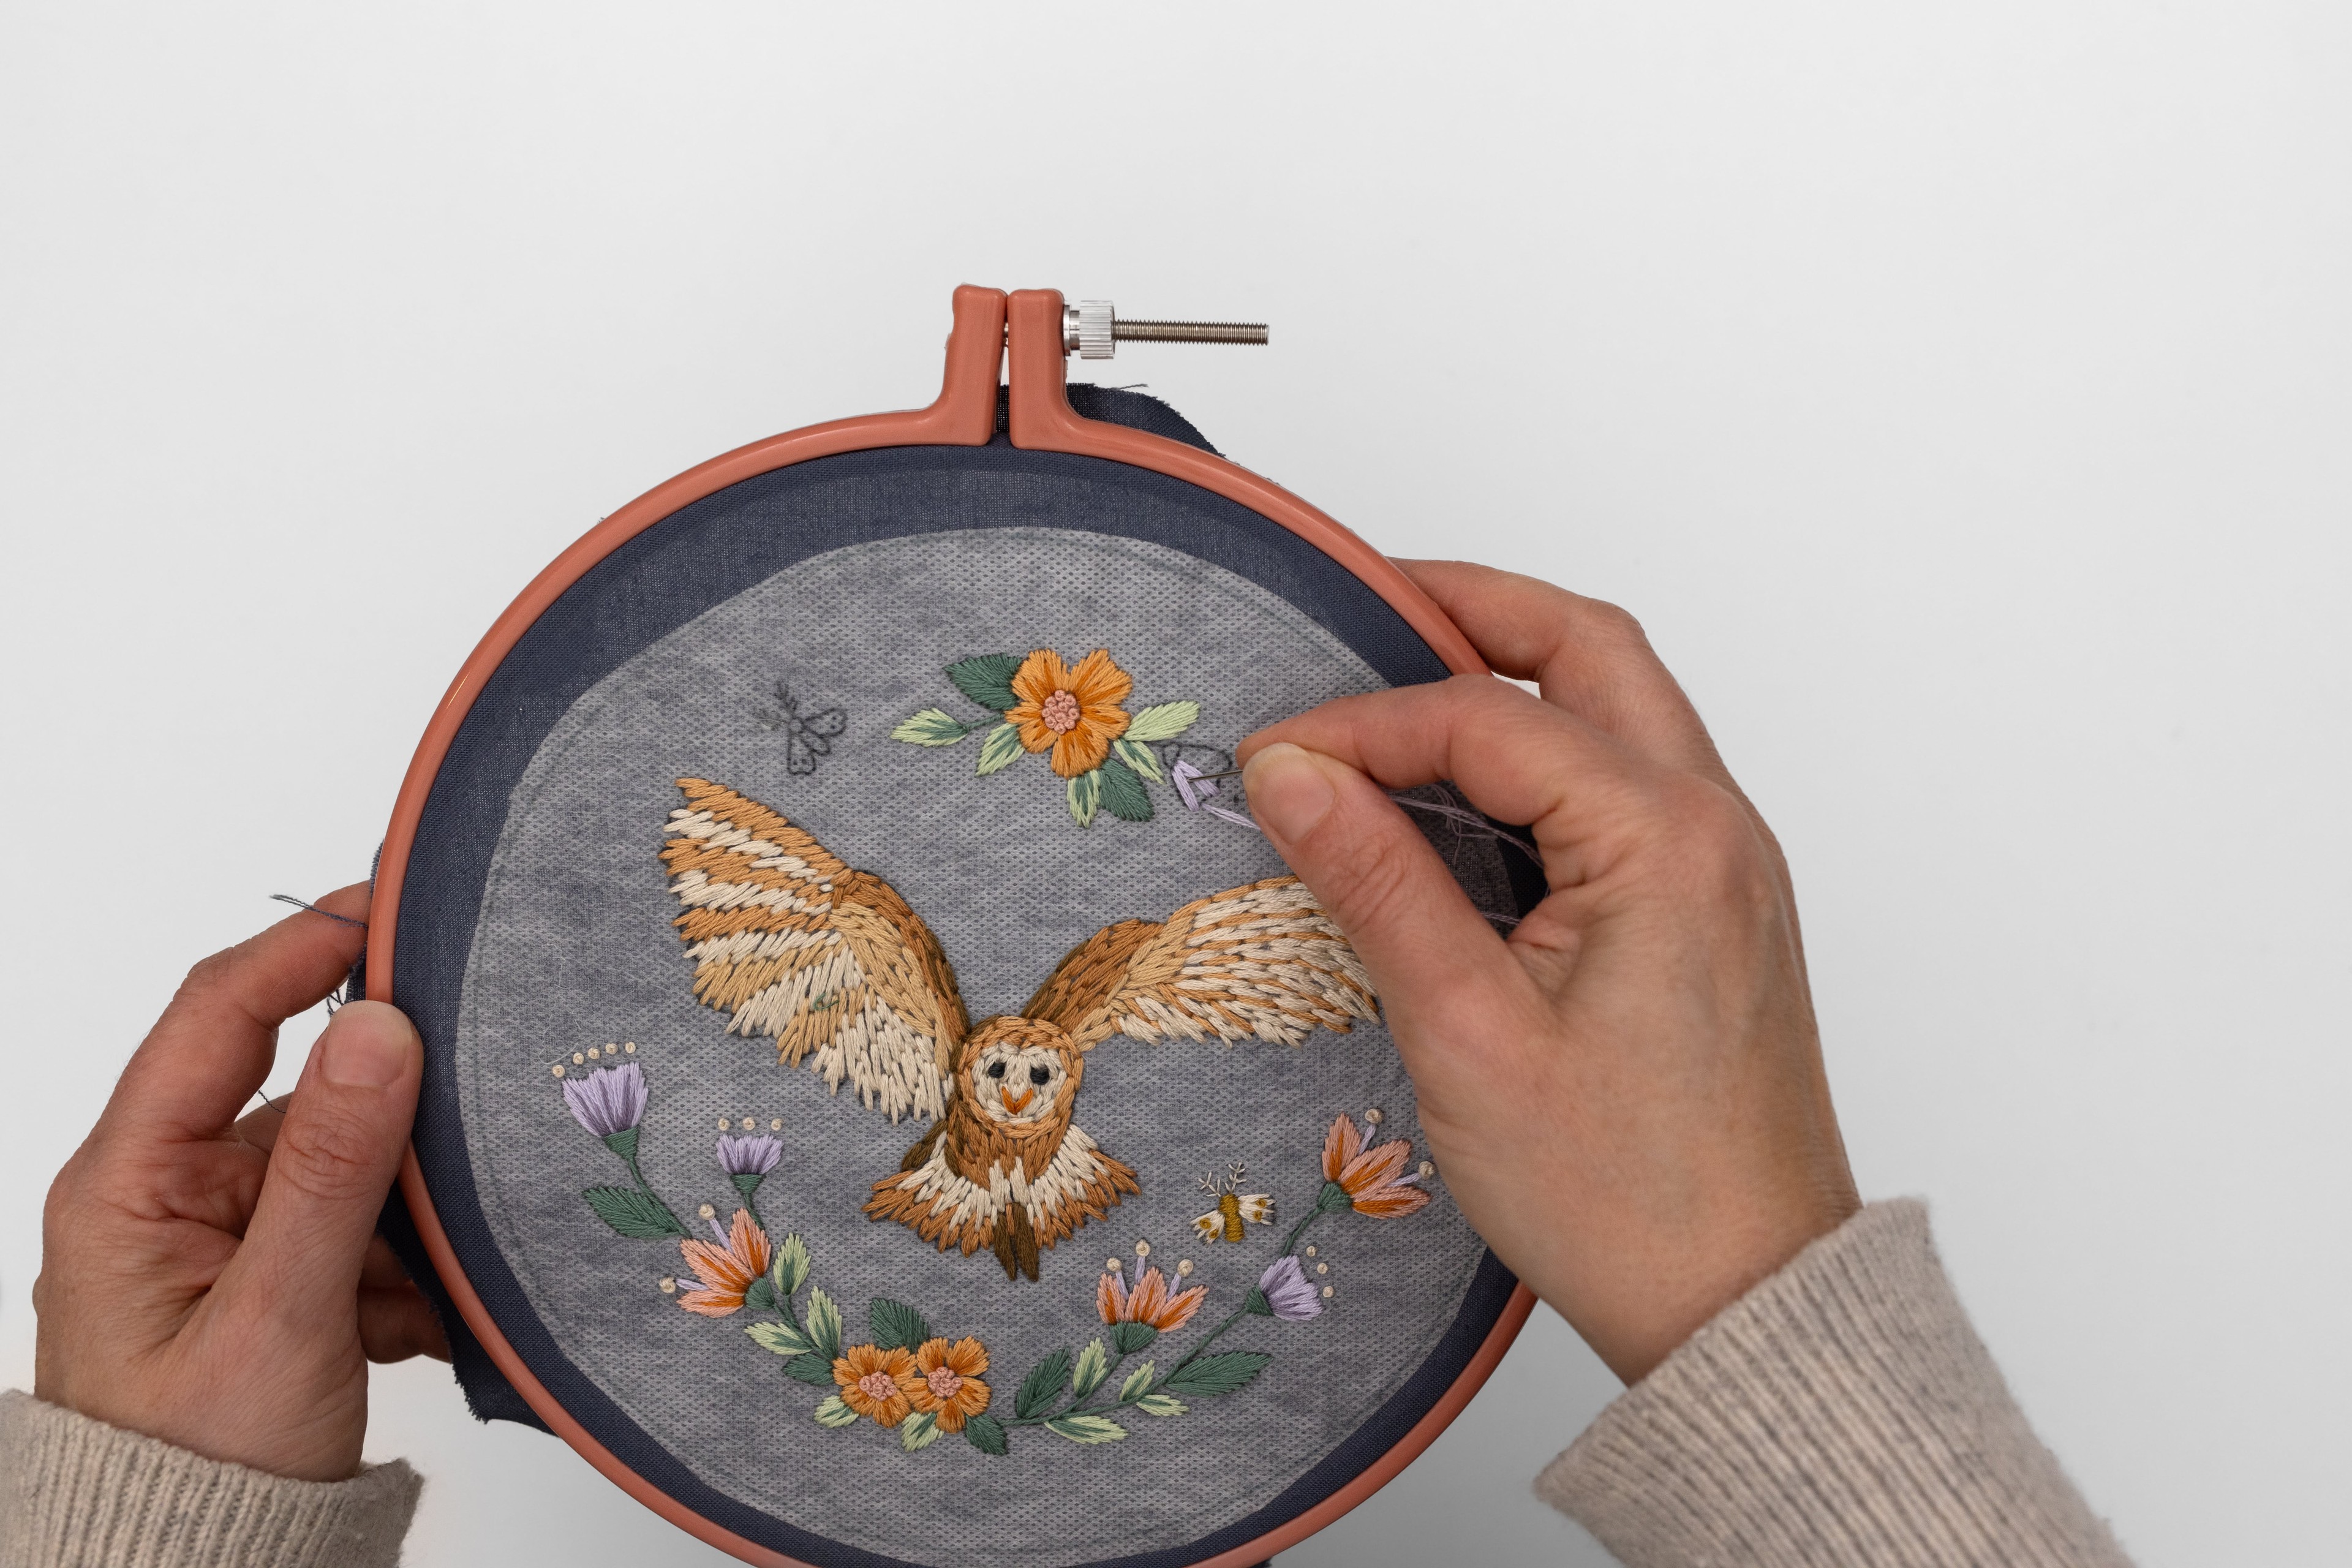
Use a tracing method if you can: Before you move on, I recommend that you double check – can you see through your dark fabric well enough to use one of the tracing methods already outlined in this blog?
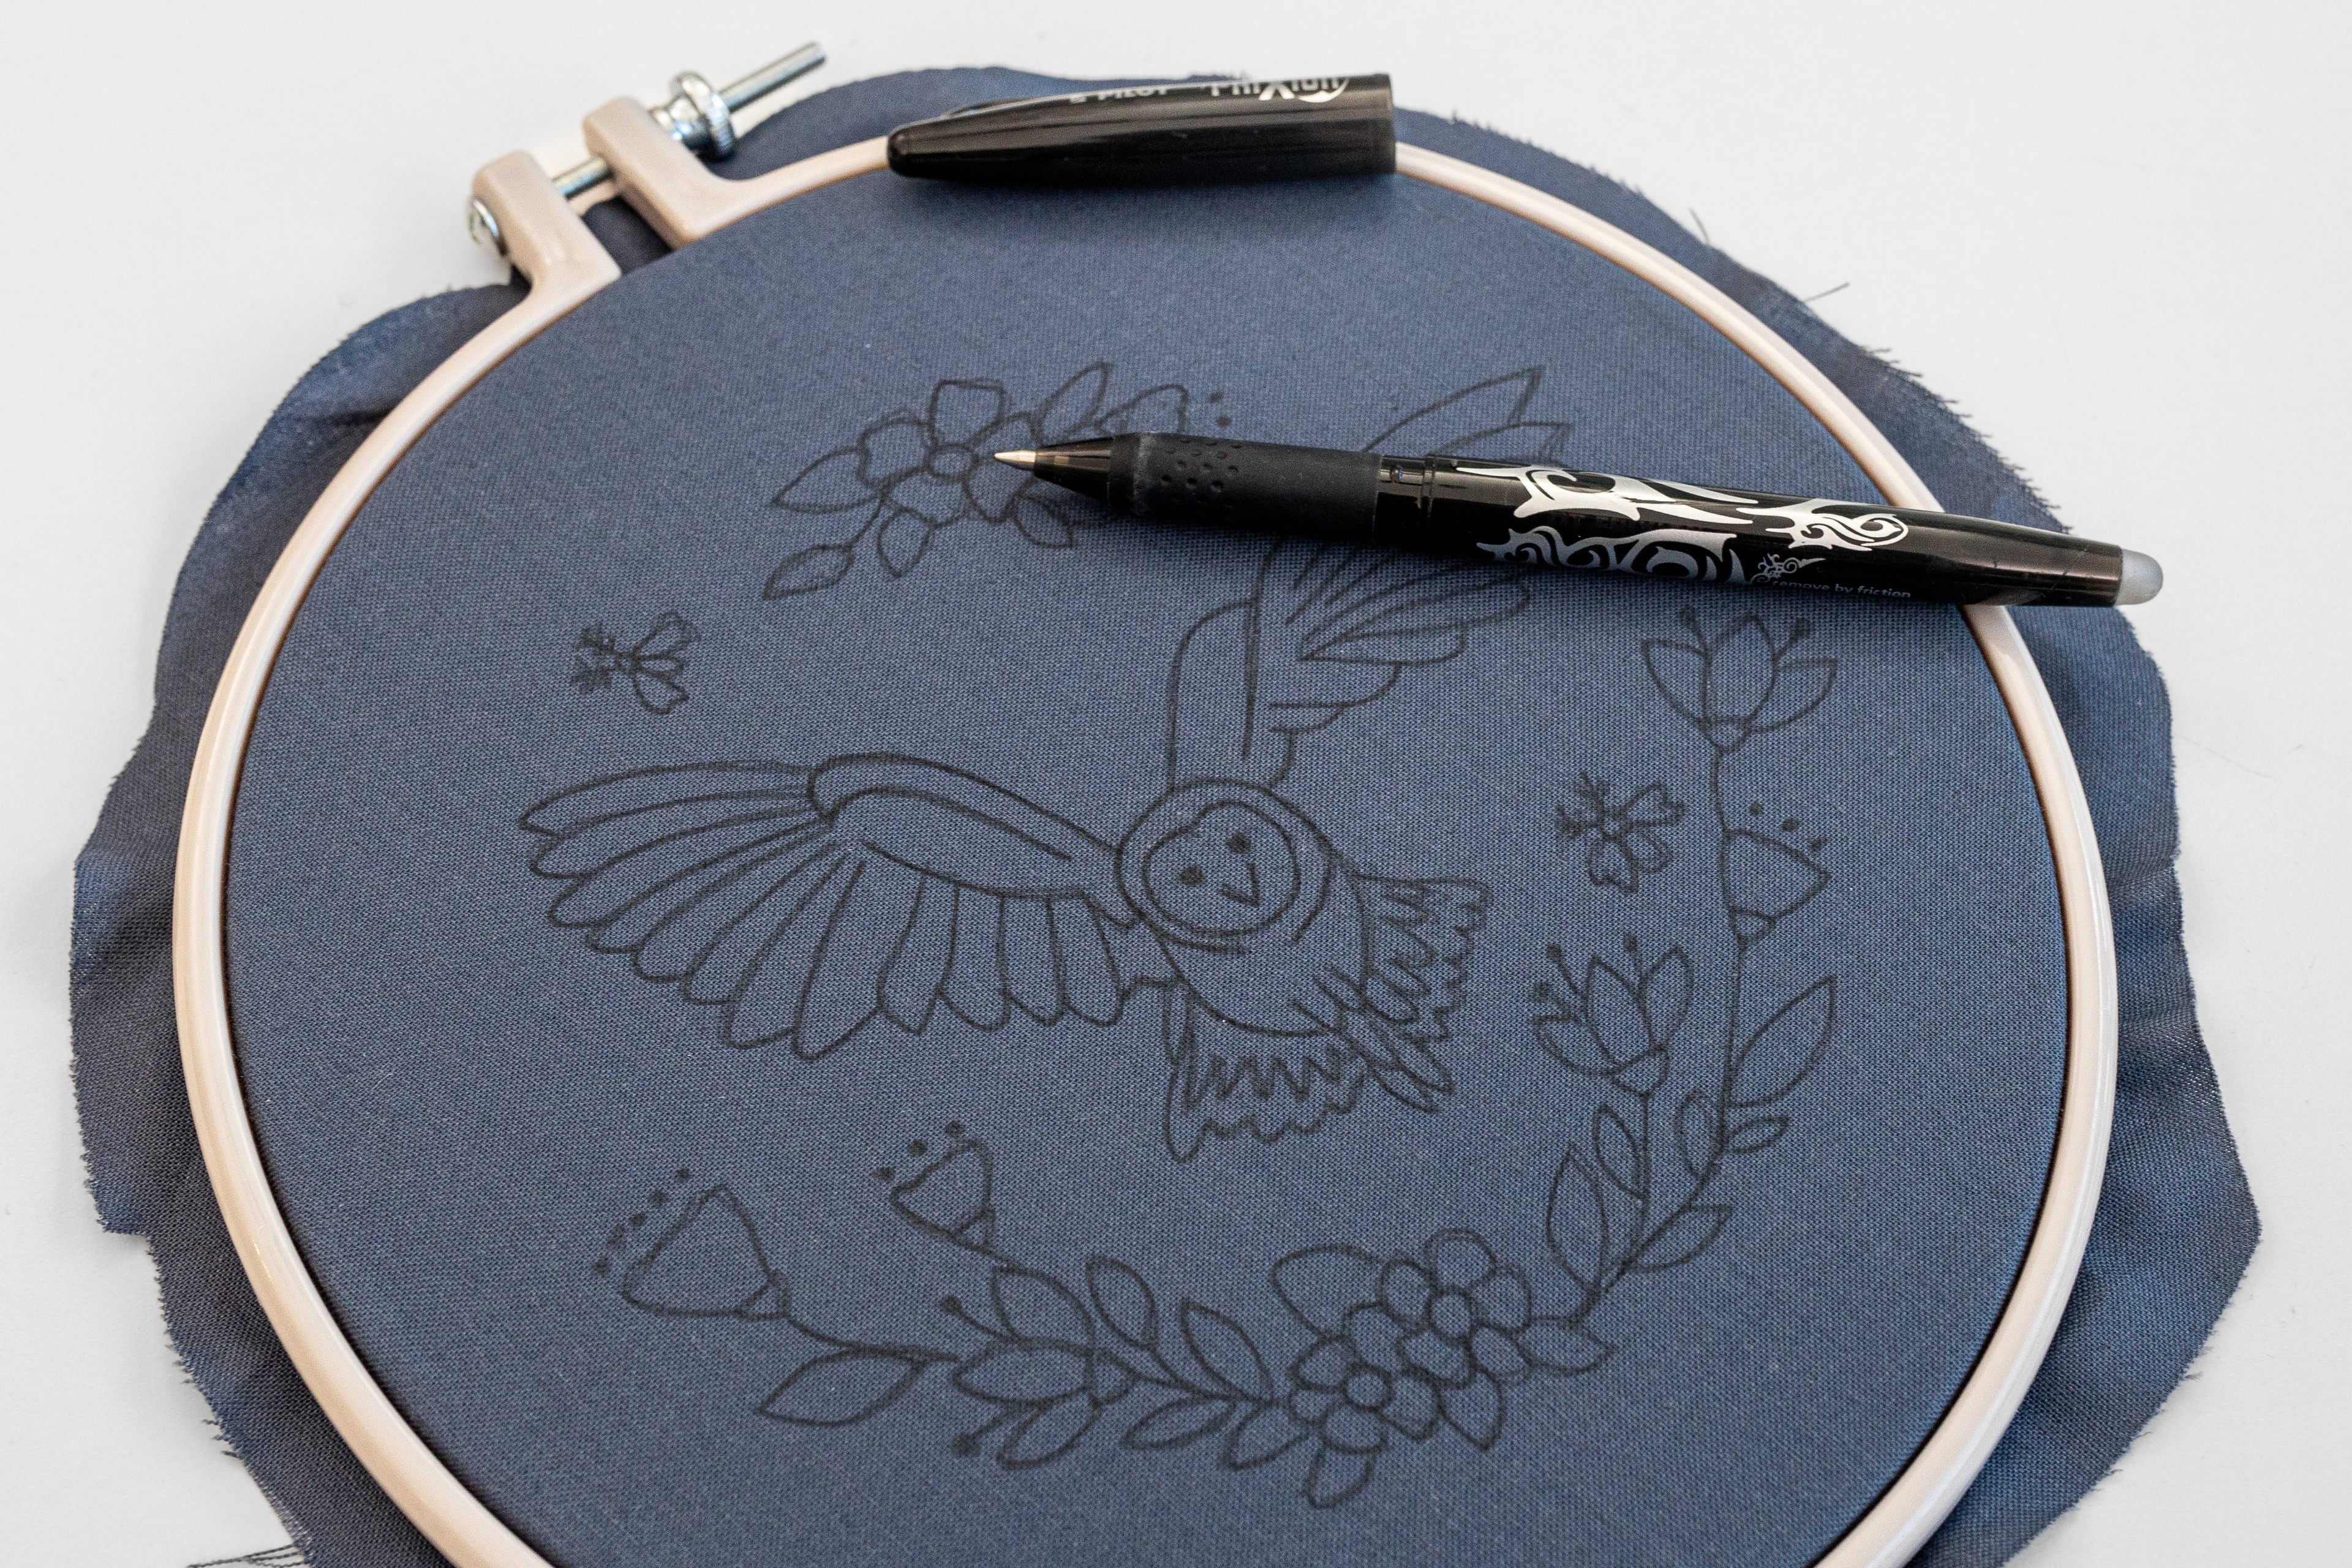
Honestly, it’s so much less hassle to trace using methods 1-3 at both the transferring and stitching stage. So grab the strongest light source you have and re-evaluate if the template is visible. You might be surprised! Additionally, test the transfer pen you plan to use – sometimes even a black pen can still be visible enough on dark fabric. But please note: some heat erasable pens leave a residue or outline after removal, which can be really visible on dark fabric. So, be sure to test your pen’s visibility and removability against your fabric first!
For example, even though this lovely cotton fabric is quite dark, I can still see through it just enough to trace the pattern. And the dark black lines of the Pilot Frixion pen show up just enough for me to see, especially if I go over them a few times. So, in this case, I could actually proceed with tracing with a black heat erasable pen rather than investing in supplies such as wash-away stabiliser, carbon transfer paper, or a white pen. I’ll just need to be sure to cover all the pen marks with stitches.
Tip 2
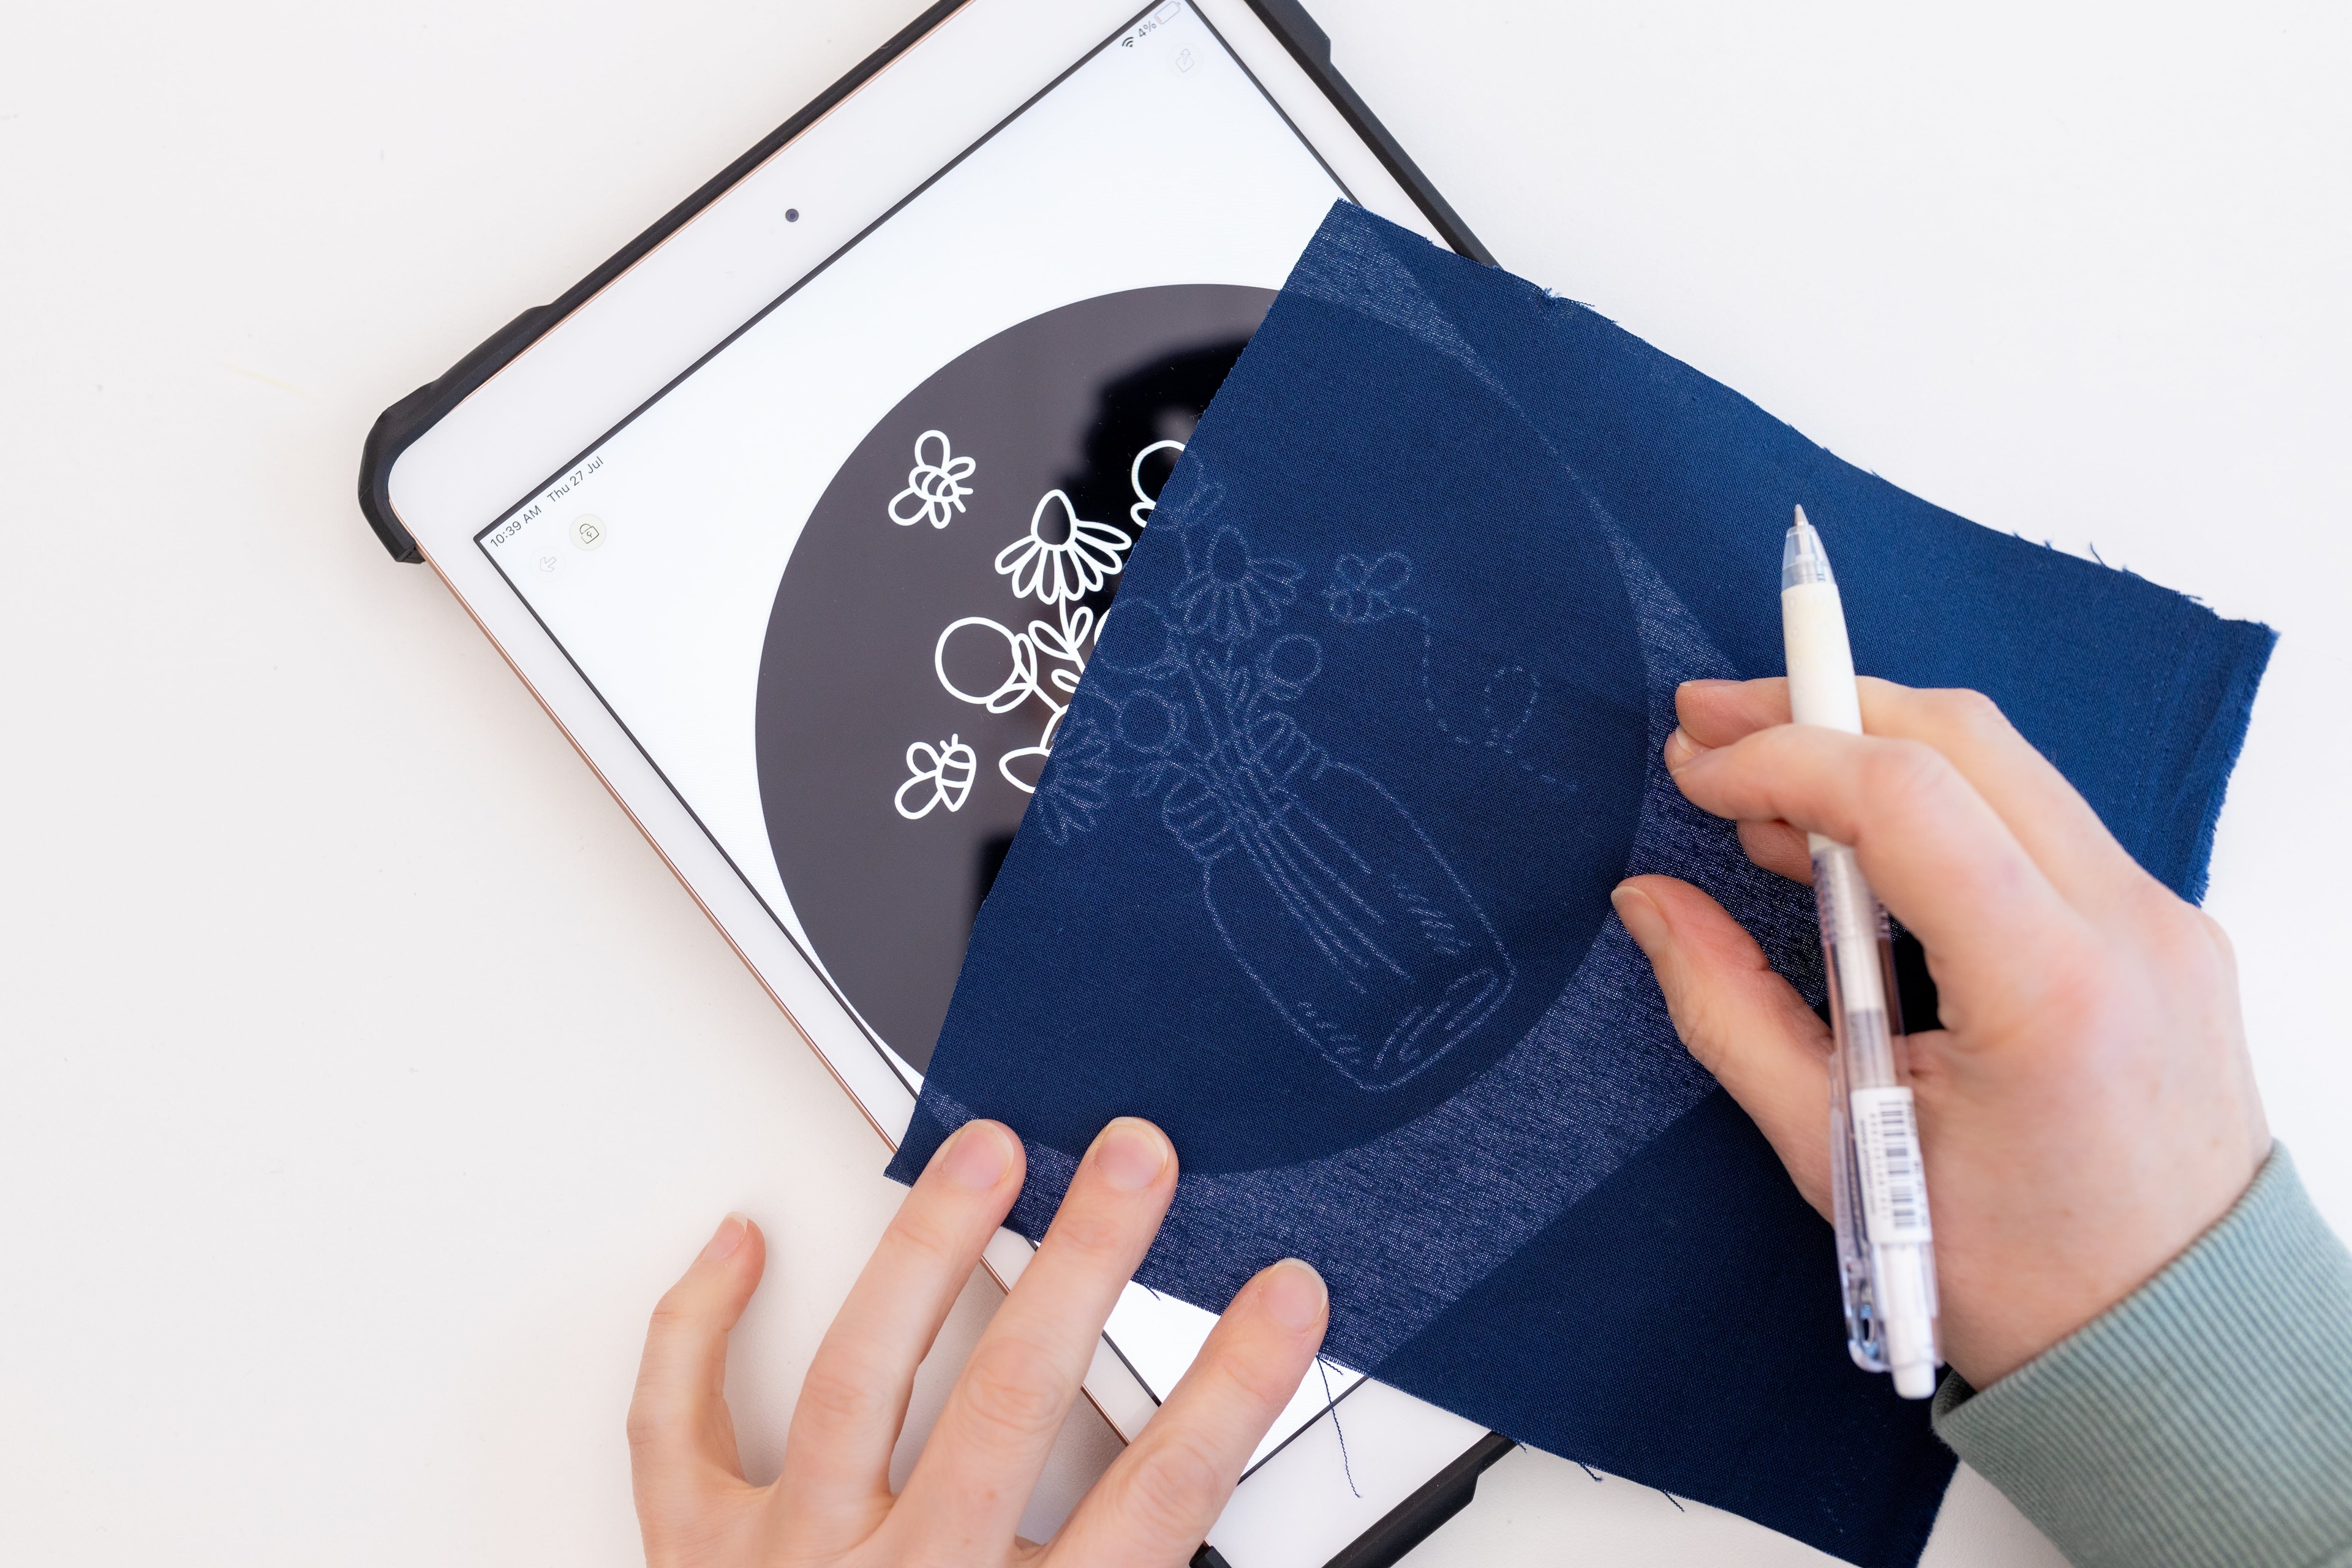
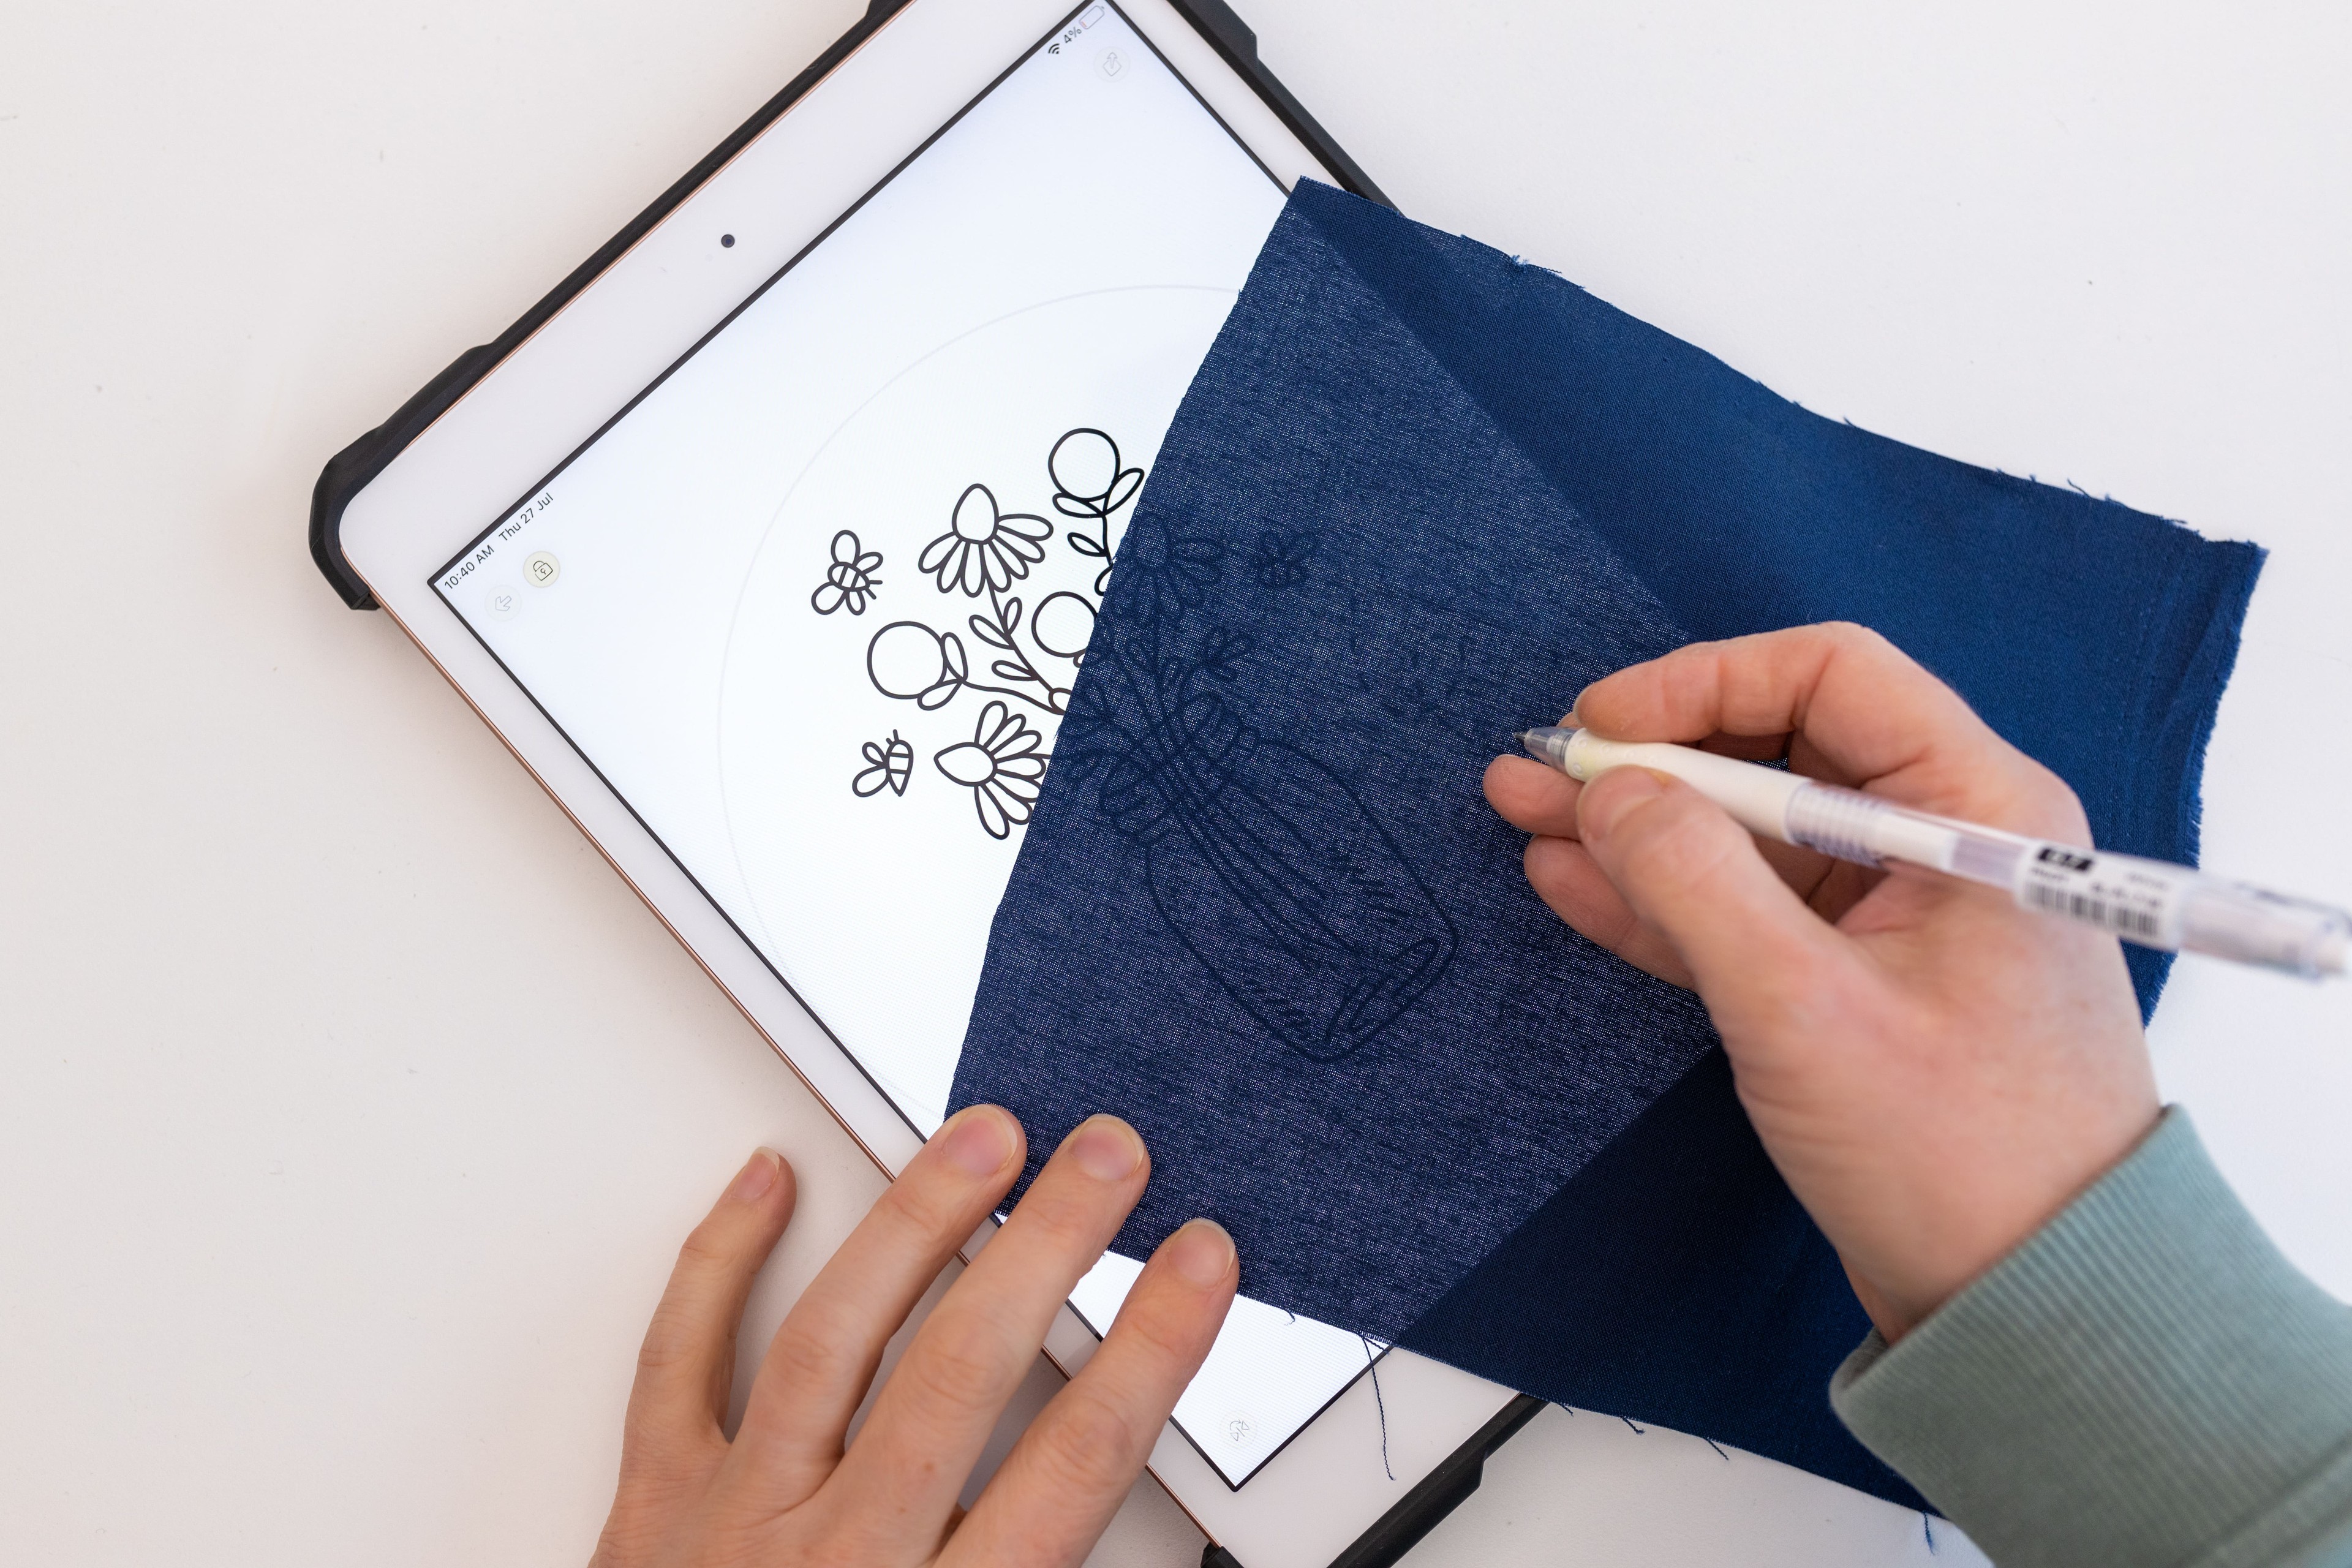
Reverse the template: If you’re able to reverse the template so that it’s white lines against black, you may find this easier to see for the tracing stage. See the images below for a comparison between the two options.
Tip 3
Use a white pen for more visible lines: If the lines of your pen aren’t so visible against the dark fabric, then go over them with a white pen (if you can get your hands on one!). Below is an example that compares carbon paper, a white permanent pen, and a heat-erasable white pen.

5. Water-Soluble Stabiliser
Pros:
-
Also works on dark or thick fabrics
-
Template lines clear and visible
-
Template lines removable
-
Works day + night
-
Great for complex designs (if printing)
-
No drawing skills required (if printing)
-
Stabiliser can be helpful (e.g. stretchy/ delicate fabrics)
Cons:
-
Additional cost of the stabiliser
-
Stitching with stabiliser can be challenging
-
Requires wetting your work
This method is fantastic if you don’t want to hand-draw or trace your design! It’s also my preferred option for dark or thick fabrics which you can’t see through to trace. And I know it’s the go-to method for some embroidery artists, no matter what type of fabric they’re using.
IN A NUTSHELL: Print or trace your design onto a wash-away stabiliser, cut it out and stick it to the top-side of your dressed hoop. Then stitch your design through both layers, and rinse off the stabiliser at the end.
You will need:
-
Water-Soluble Stabiliser (my fav is Sulky Sticky Fabri-Solvy – I’ve used it many times with great success!)
-
Dressed hoop (e.g. fabric mounted tightly in the hoop and excess fabric trimmed off)
-
Transfer pen OR printer
How to:
Step 1
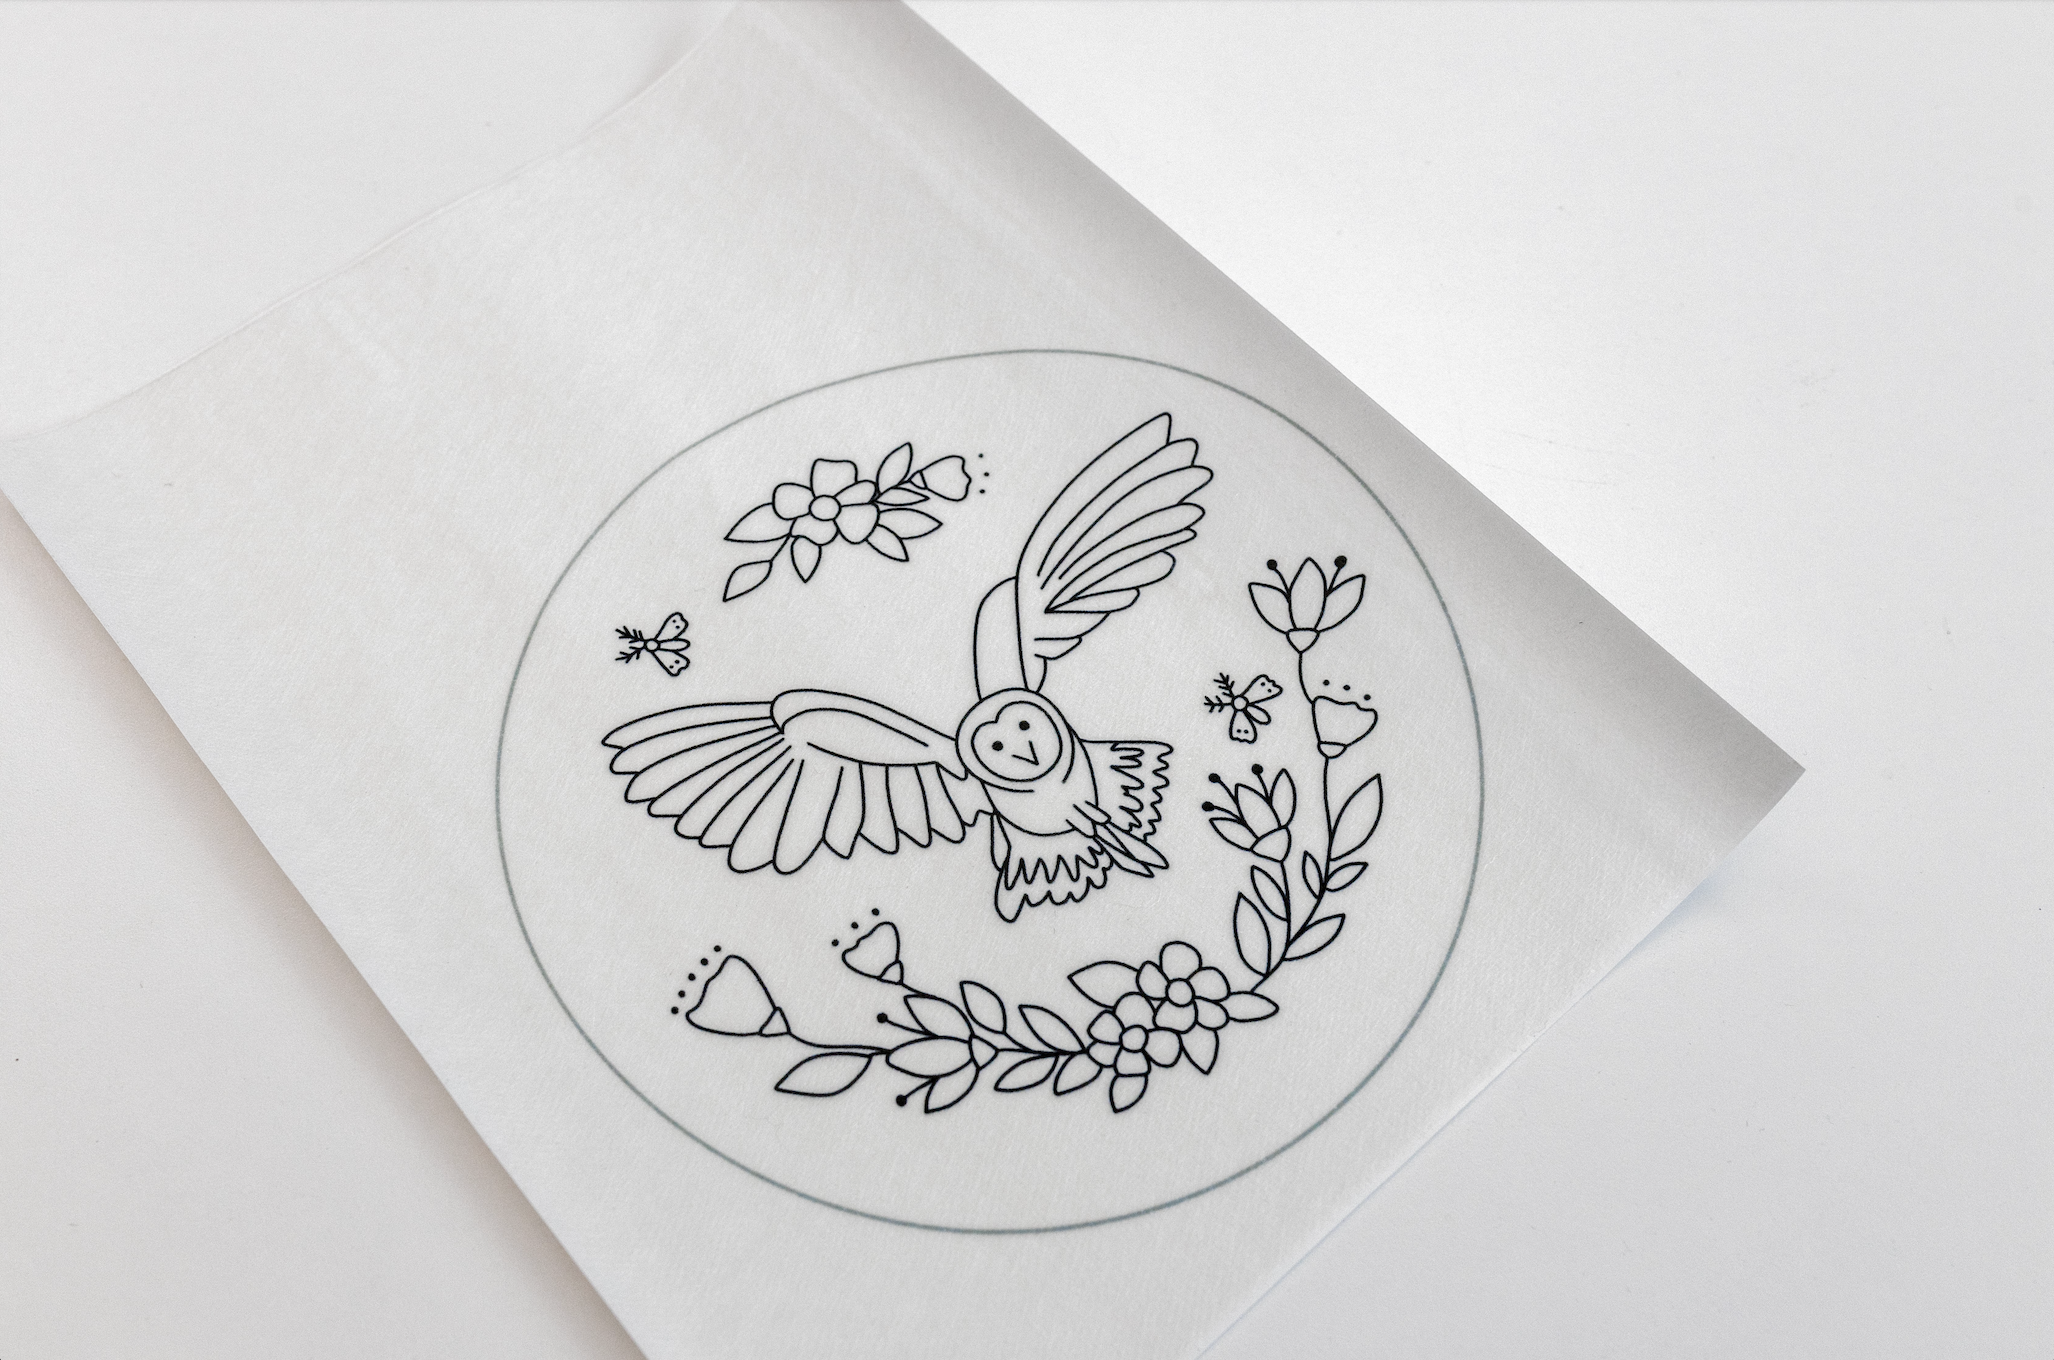
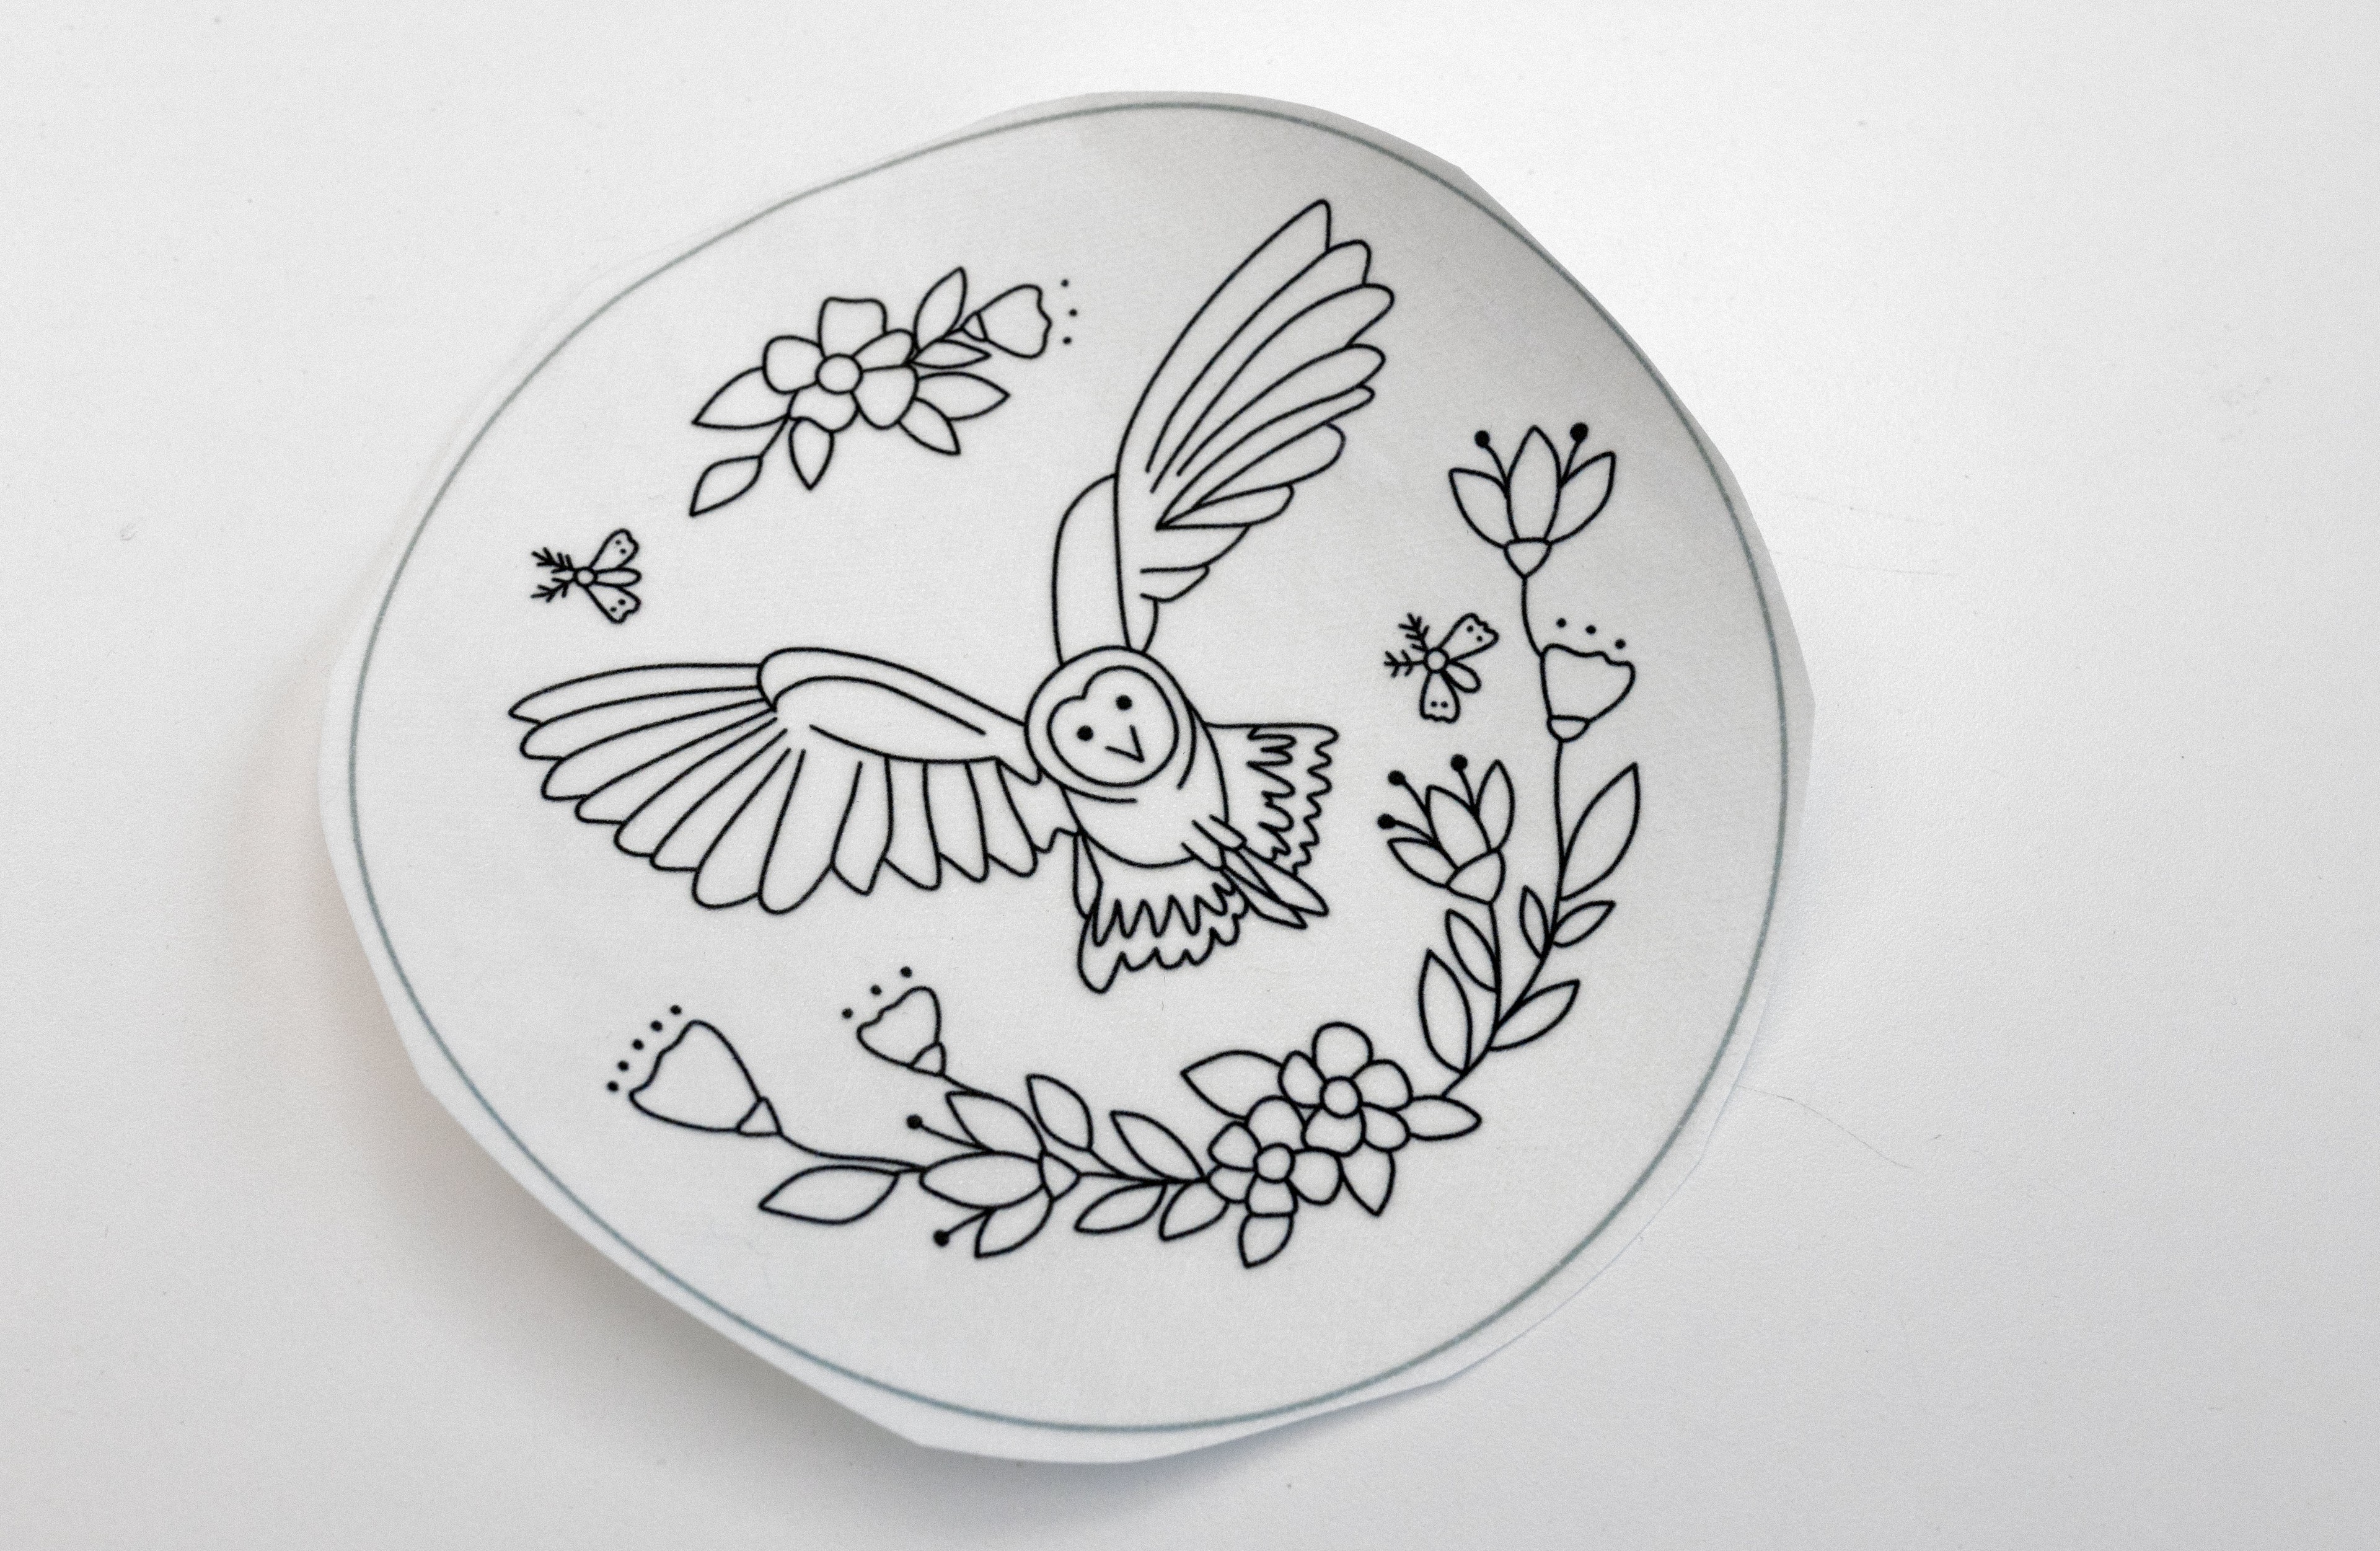
Draw or Print: Trace or print your design on a sheet of water-soluble stabiliser. To do this, simply place a sheet of stabiliser over the top of your printed design (or as viewed on your screen). The sheet should be transparent enough for you to see the design and trace over it. Or print the template directly onto the sheet. Use your regular transfer pen or a normal pen for this process. If you have concerns about the pen or printer ink bleeding into your work, I suggest doing a small test piece before hand to ensure it washes away cleanly.
Step 2
Cut Out: Now cut out your design into a patch or circle, leaving a margin of at least 1⁄2 an inch (10mm).
Step 3
Stick: Remove the backing, and smooth the patch (sticky side down) to the front-side of your dressed hoop, in the middle. If you find that it’s not sticking so well, you can work a ‘basting stitch’ around the outline of the patch – in other words, do a simple Running Stitch to hold it in place, and remove this completely at the end (I didn’t find this step necessary).
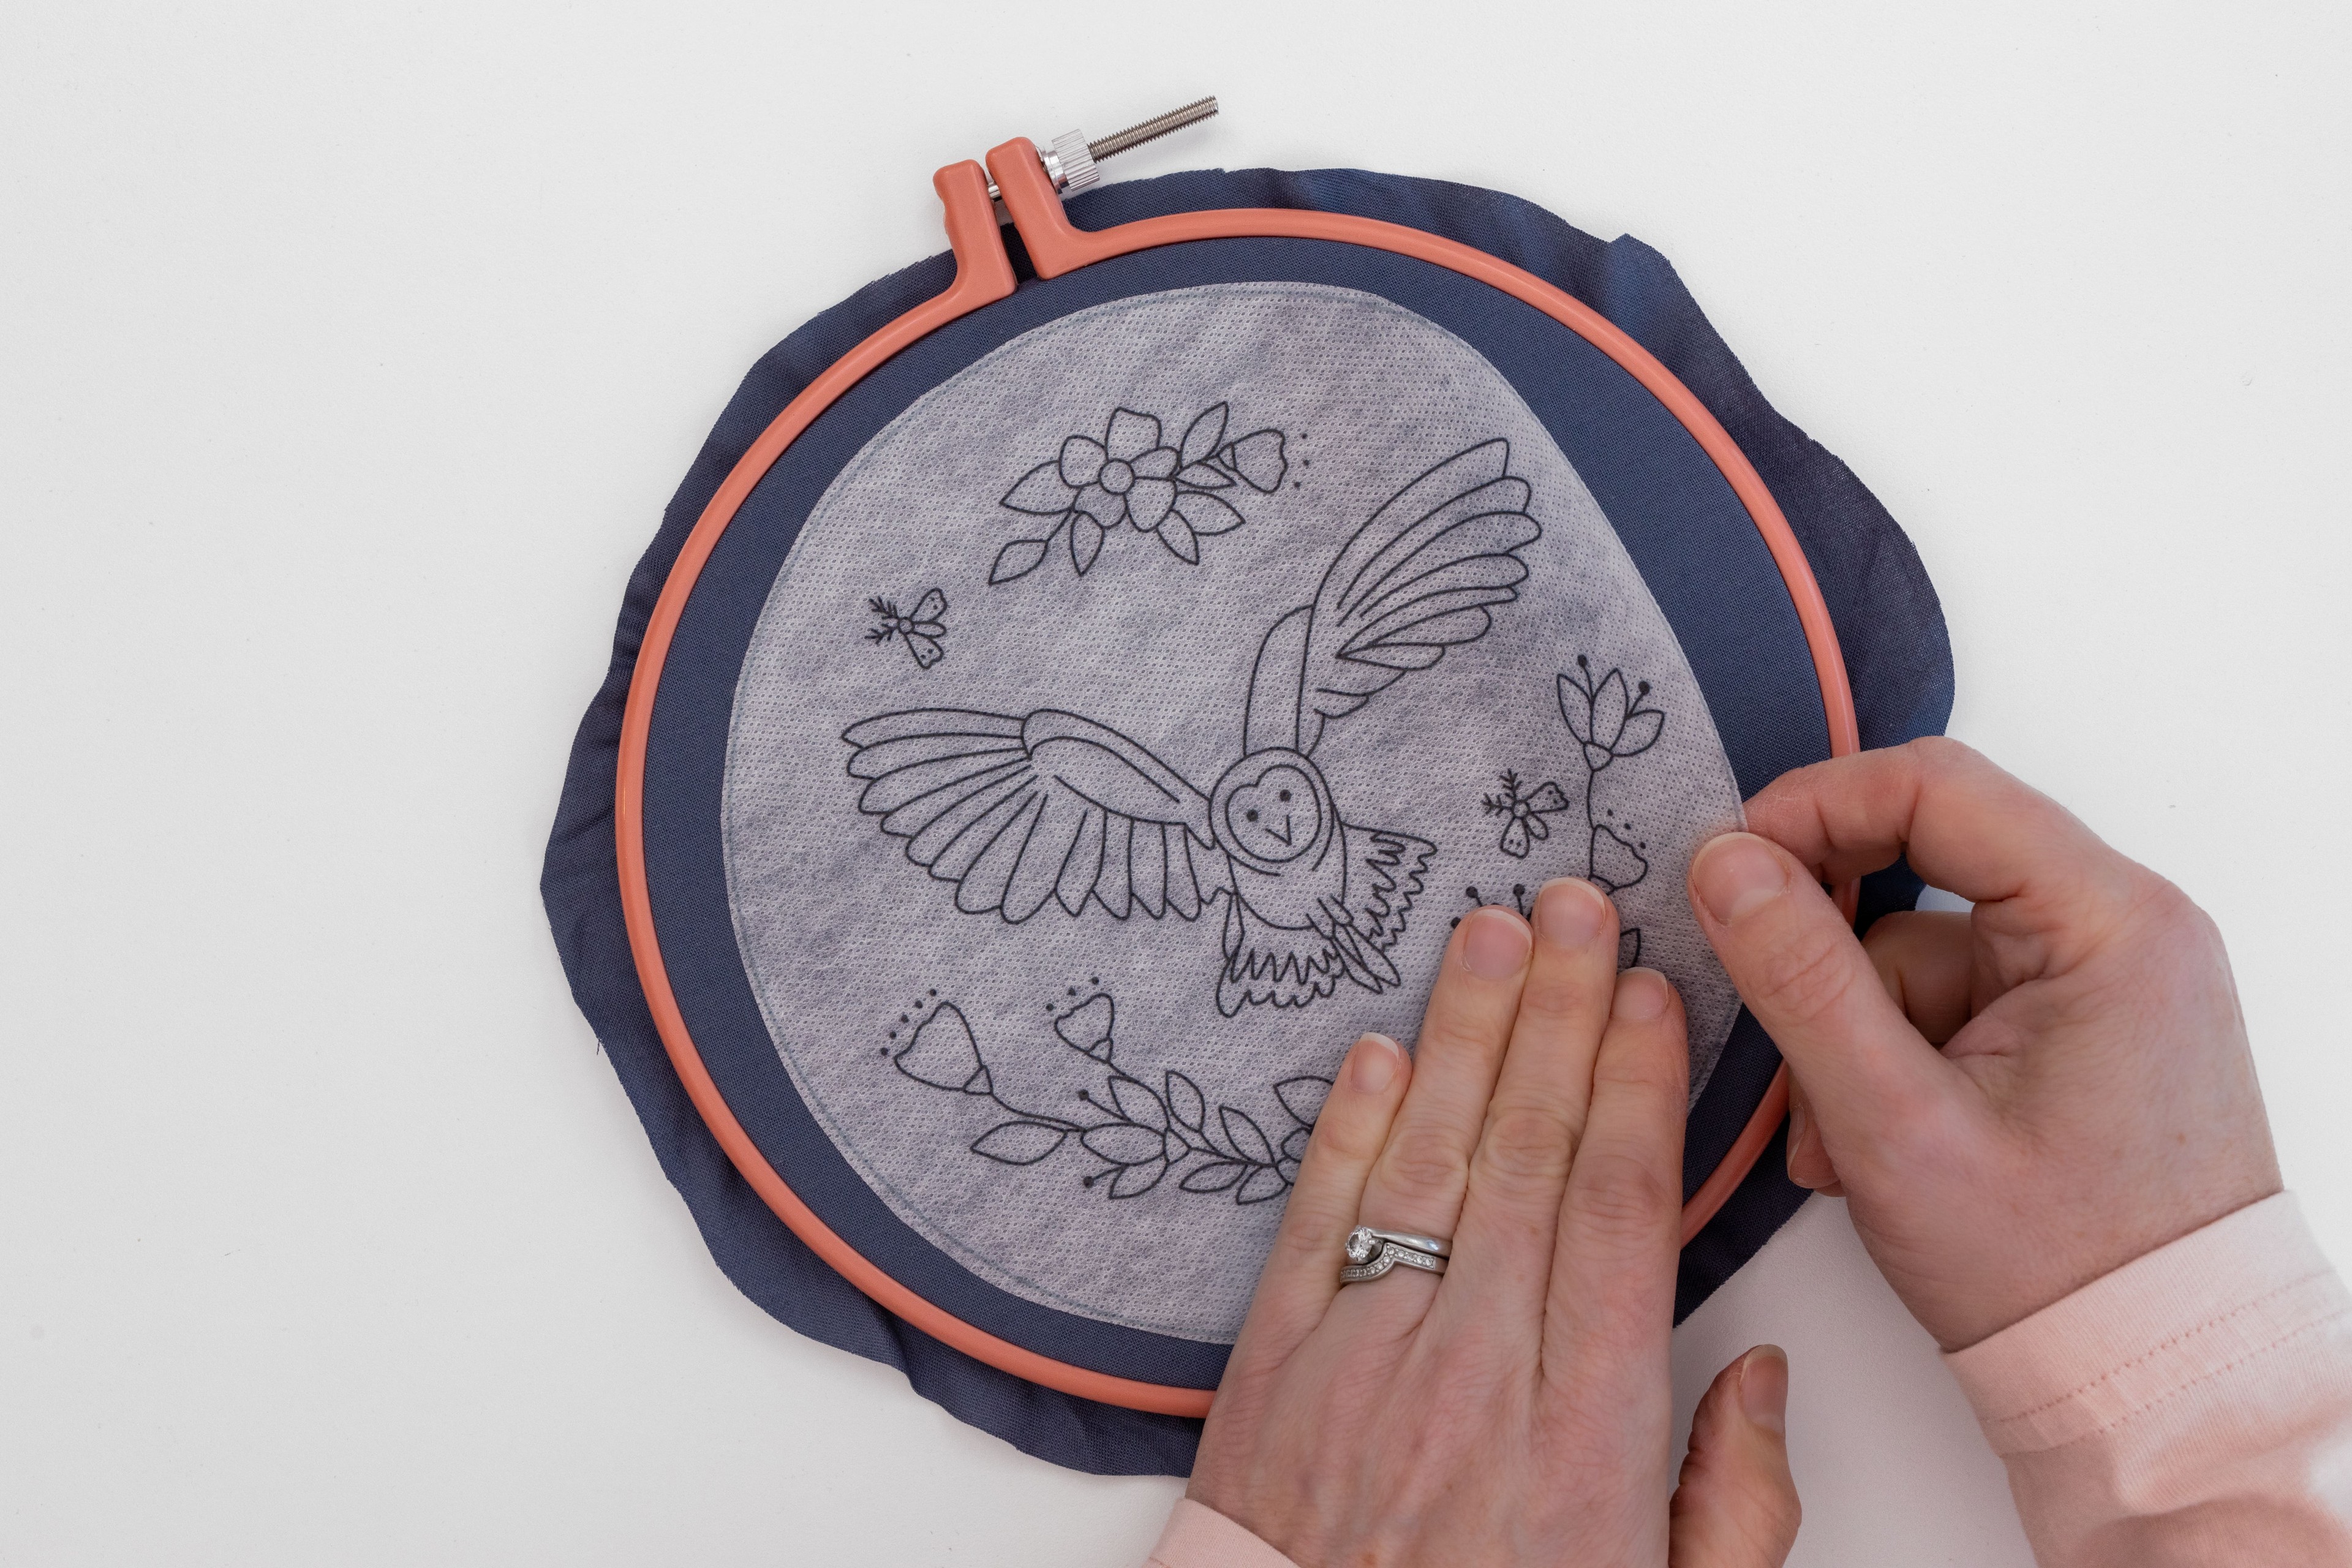
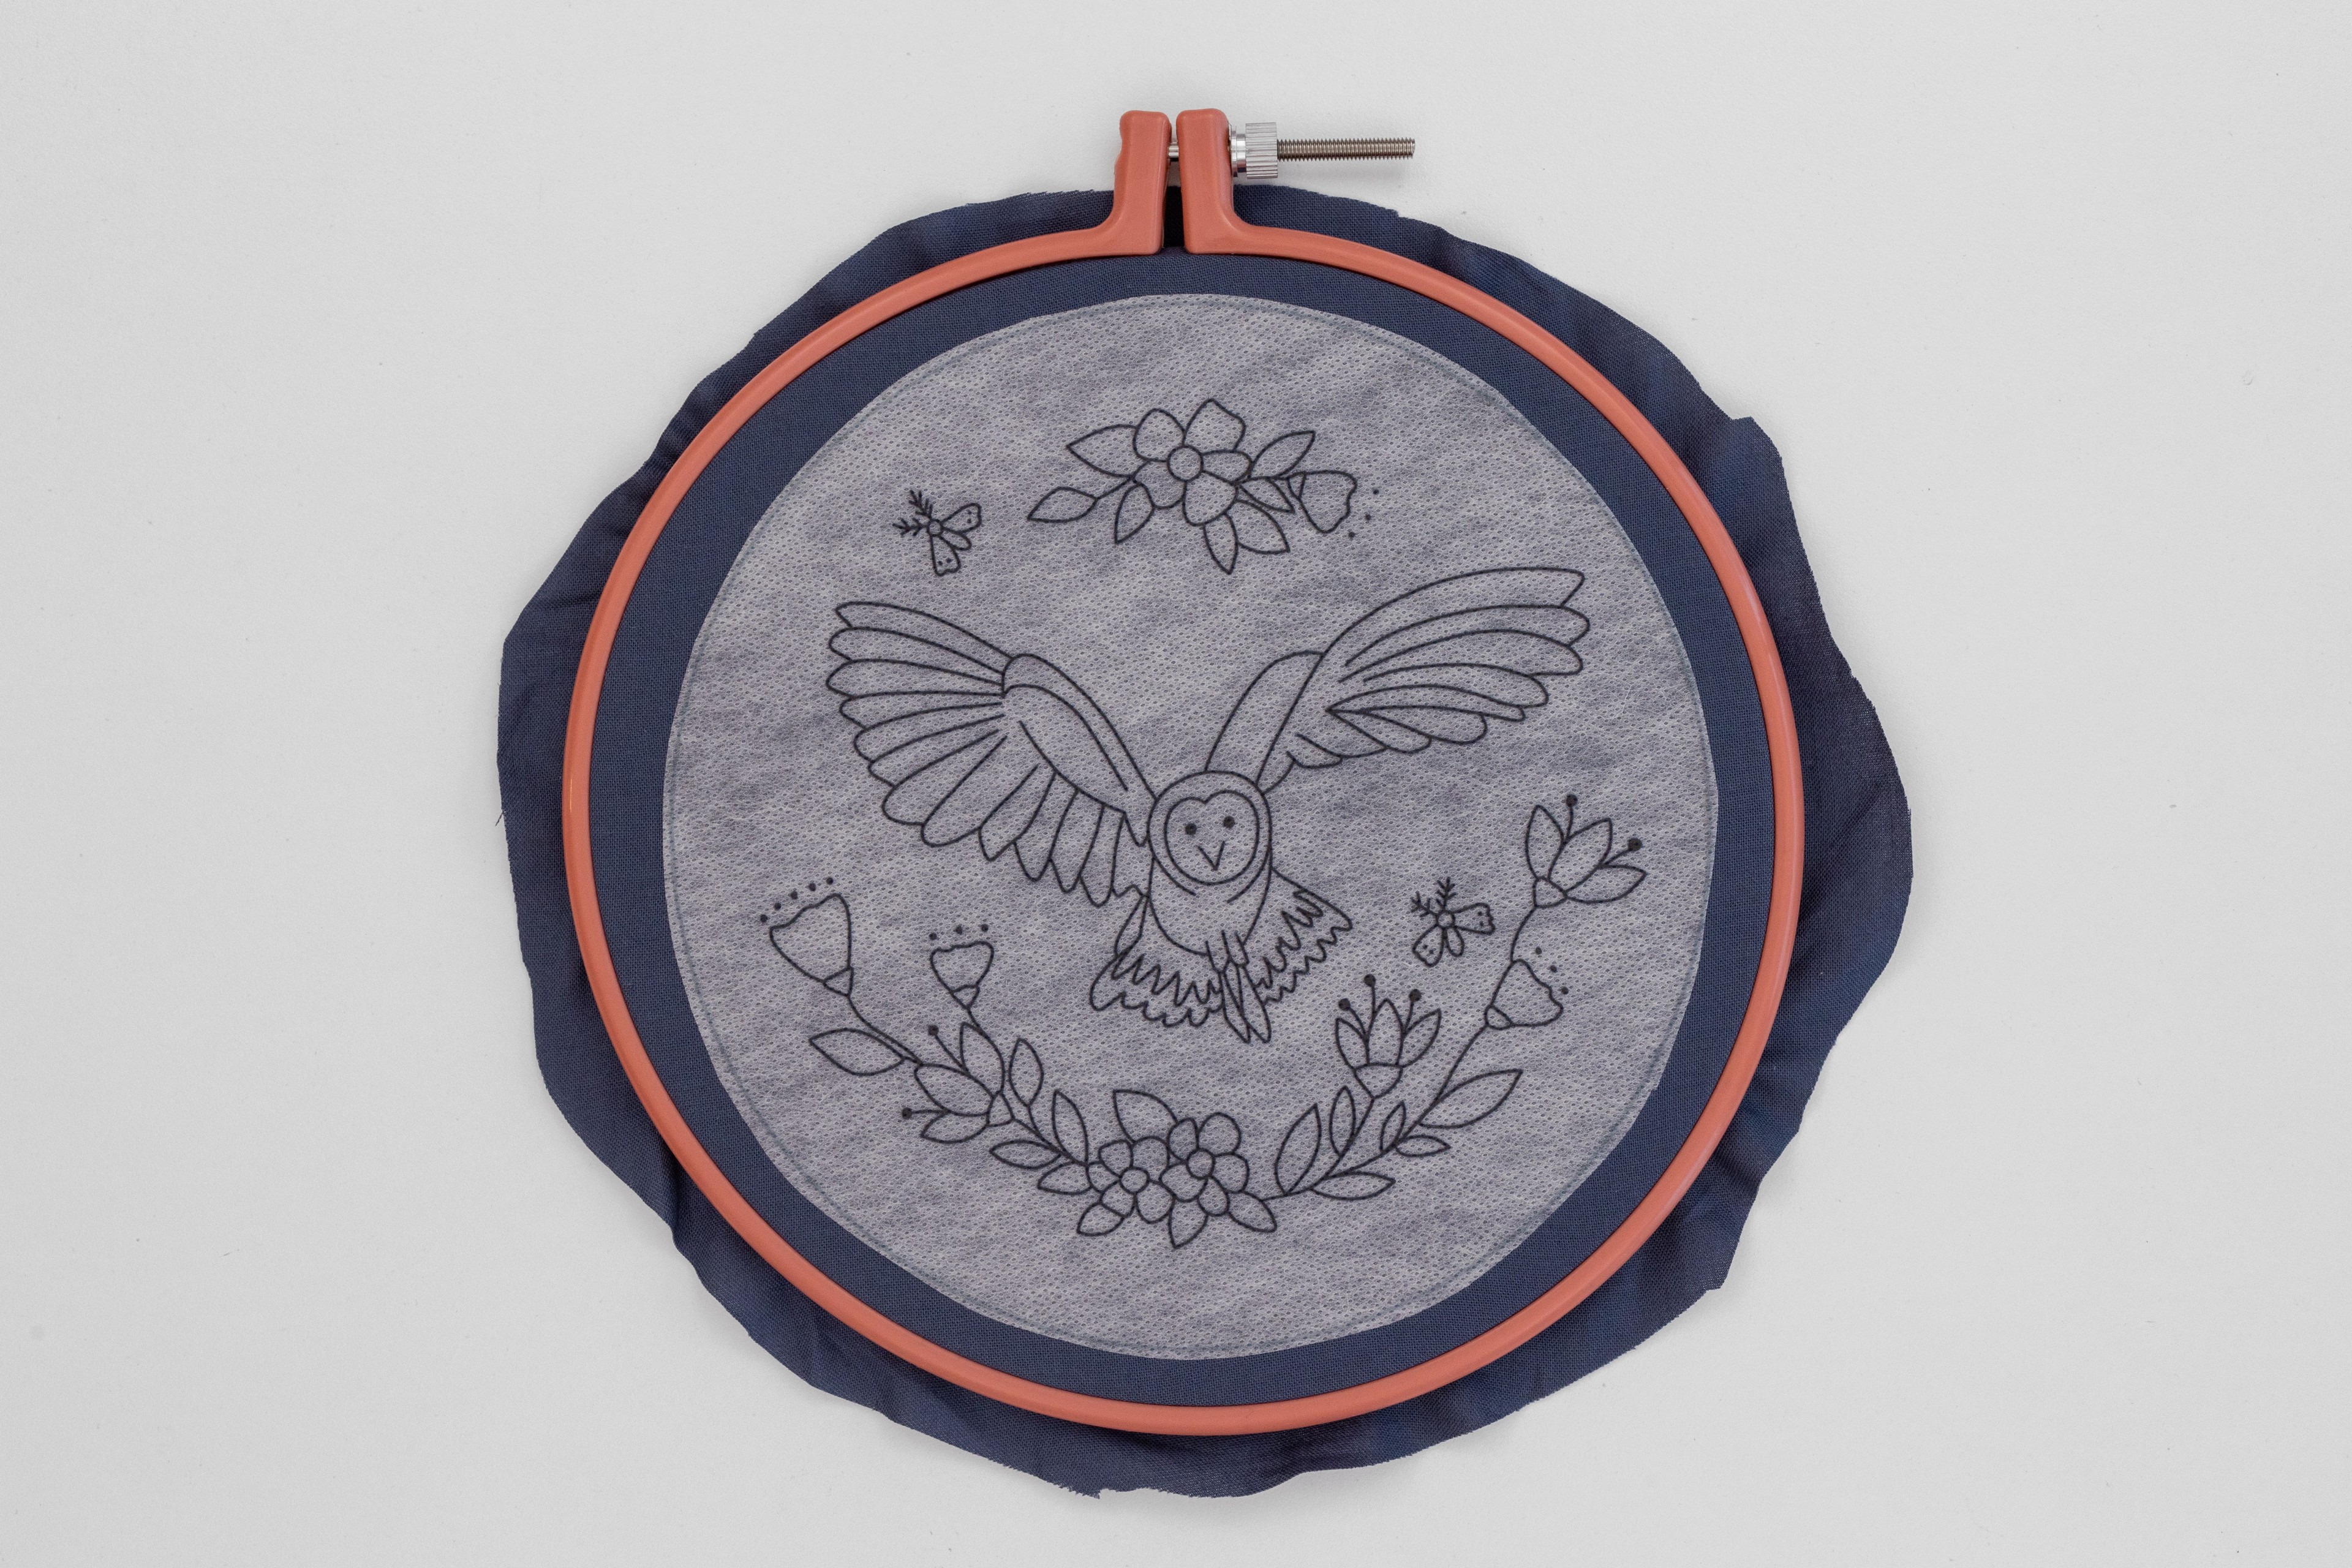
Now your template has been transferred to your pattern and you can move to the next step of making your pattern, fantastic work!
Step 4
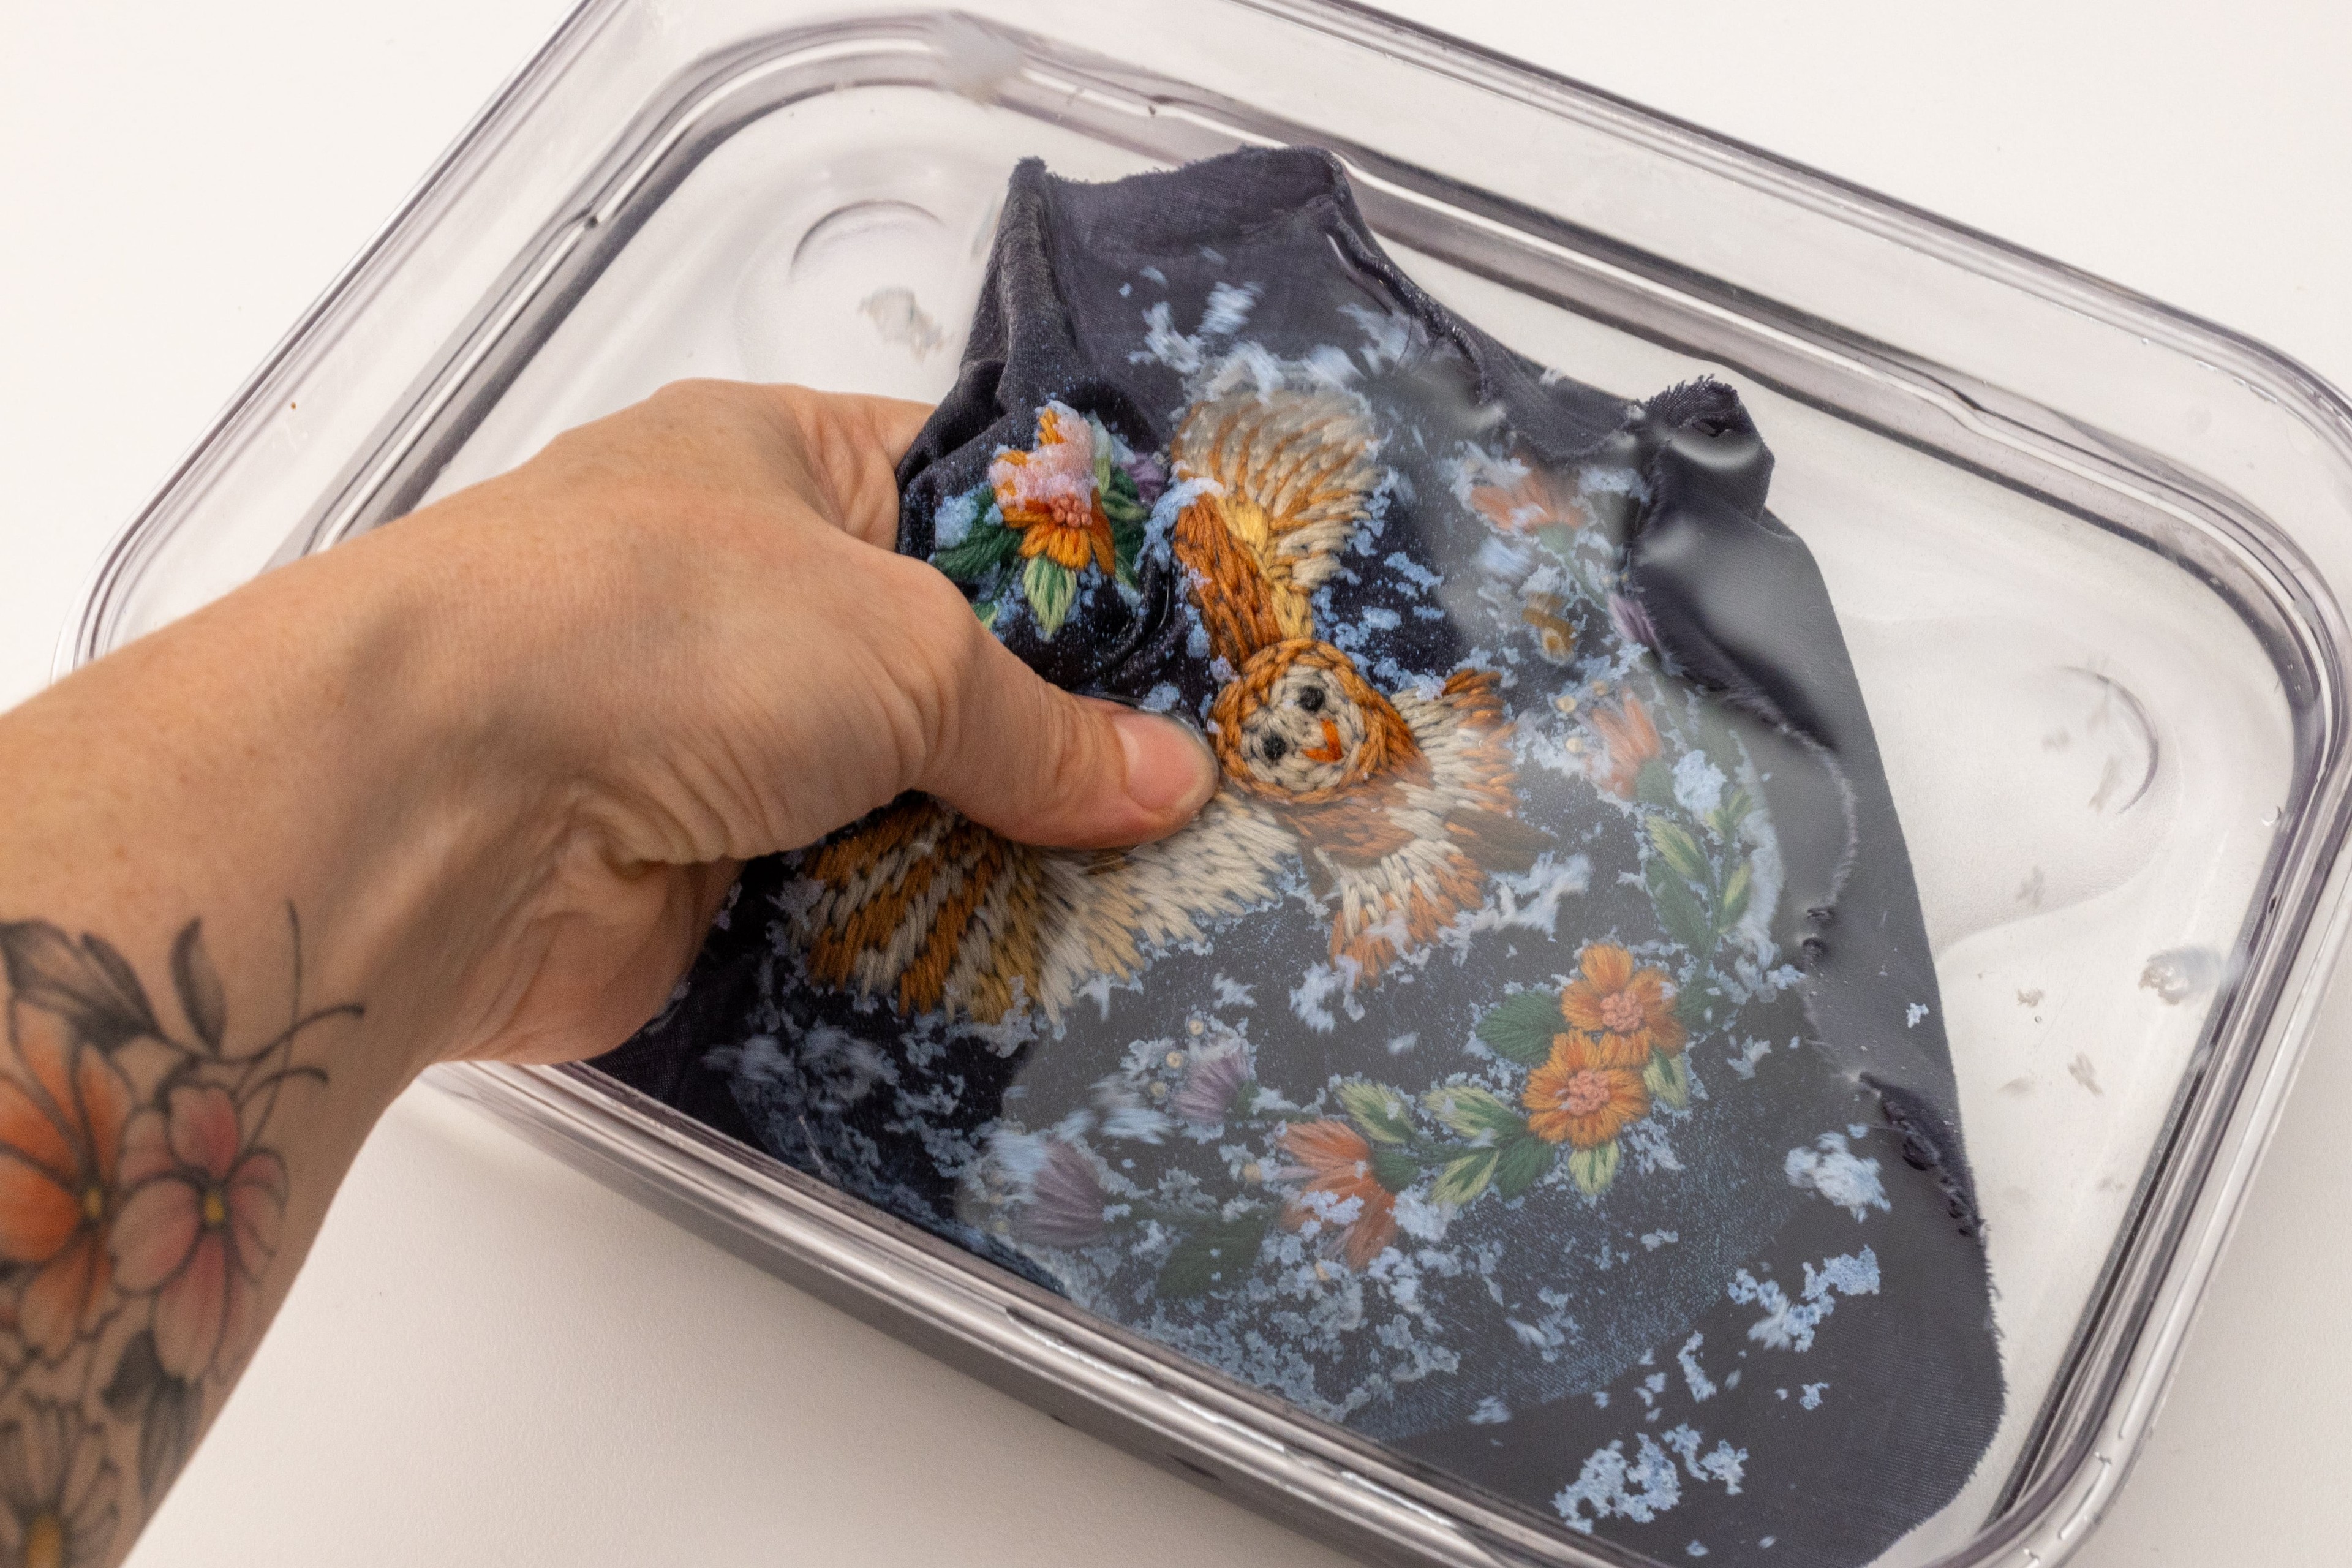
How to rinse off the stabiliser at the end: Immerse the entire area in lukewarm water. Wait a few moments, and you’ll see the stabiliser become more see-through and dissolvable. You can now gently use your fingers to rub away the stabiliser patch, and most will come off really easily. Sometimes the bits right beside the stitches need a gentle rub to encourage them off. It helps if you have some gently running water for this part, so that you can easily see where the bits of stabiliser remain. Once it looks like all of the stabiliser has been removed, give it a final rinse under gentle running water. Then gently pat away the dripping water between towels, and leave it flat to dry.
6. Carbon Tracing Paper
Pros:
-
Also works on dark or thick fabrics
-
Pen lines removable or fade over time (usually)
-
Works day + night
-
No need to stitch through an extra layer
Cons:
-
Carbon lines are often not clear and visible
-
Carbon lines may fade during stitching
-
Additional cost of the carbon paper
-
Carbon paper can be challenging to use
-
Drawing skills required
Another method for transferring patterns is using carbon tracing paper. This paper comes in light or dark colours, which means that this method is suitable for any coloured fabric (including those too dark or thick to see through for tracing). But beware – I’ve had a lot of feedback that the lines may not be very visible and/or fade over time. This will depend on the brand you’re using, but note that you may need to go over the lines with a second pen.
IN A NUTSHELL: Lay your fabric flat, position the coloured side of the carbon paper facing down over the fabric, and overlay your template on top. Trace over the design on the template, and the carbon outline will be transferred to the fabric. Then go over the lines with a transfer pen to make them more visible (optional).
You will need:
-
Printed copy of design template
-
Dressed hoop or loose fabric
-
Pen or Stylus (see info below about which to use)
-
White pen to go over lines (optional)
Step 1
Prepare carbon transfer paper and template: Cut out your design template to size. Then cut out a piece of carbon paper to suit the size of your design template.

Step 2
Position Fabric: Flip over your dressed hoop (e.g. fabric mounted tightly in the hoop and excess fabric trimmed off), so that the fabric is sitting flush with your working surface. Then place the carbon paper in position, so that the coloured side is face down. I recommend securing it to the fabric with clear sticky tape.
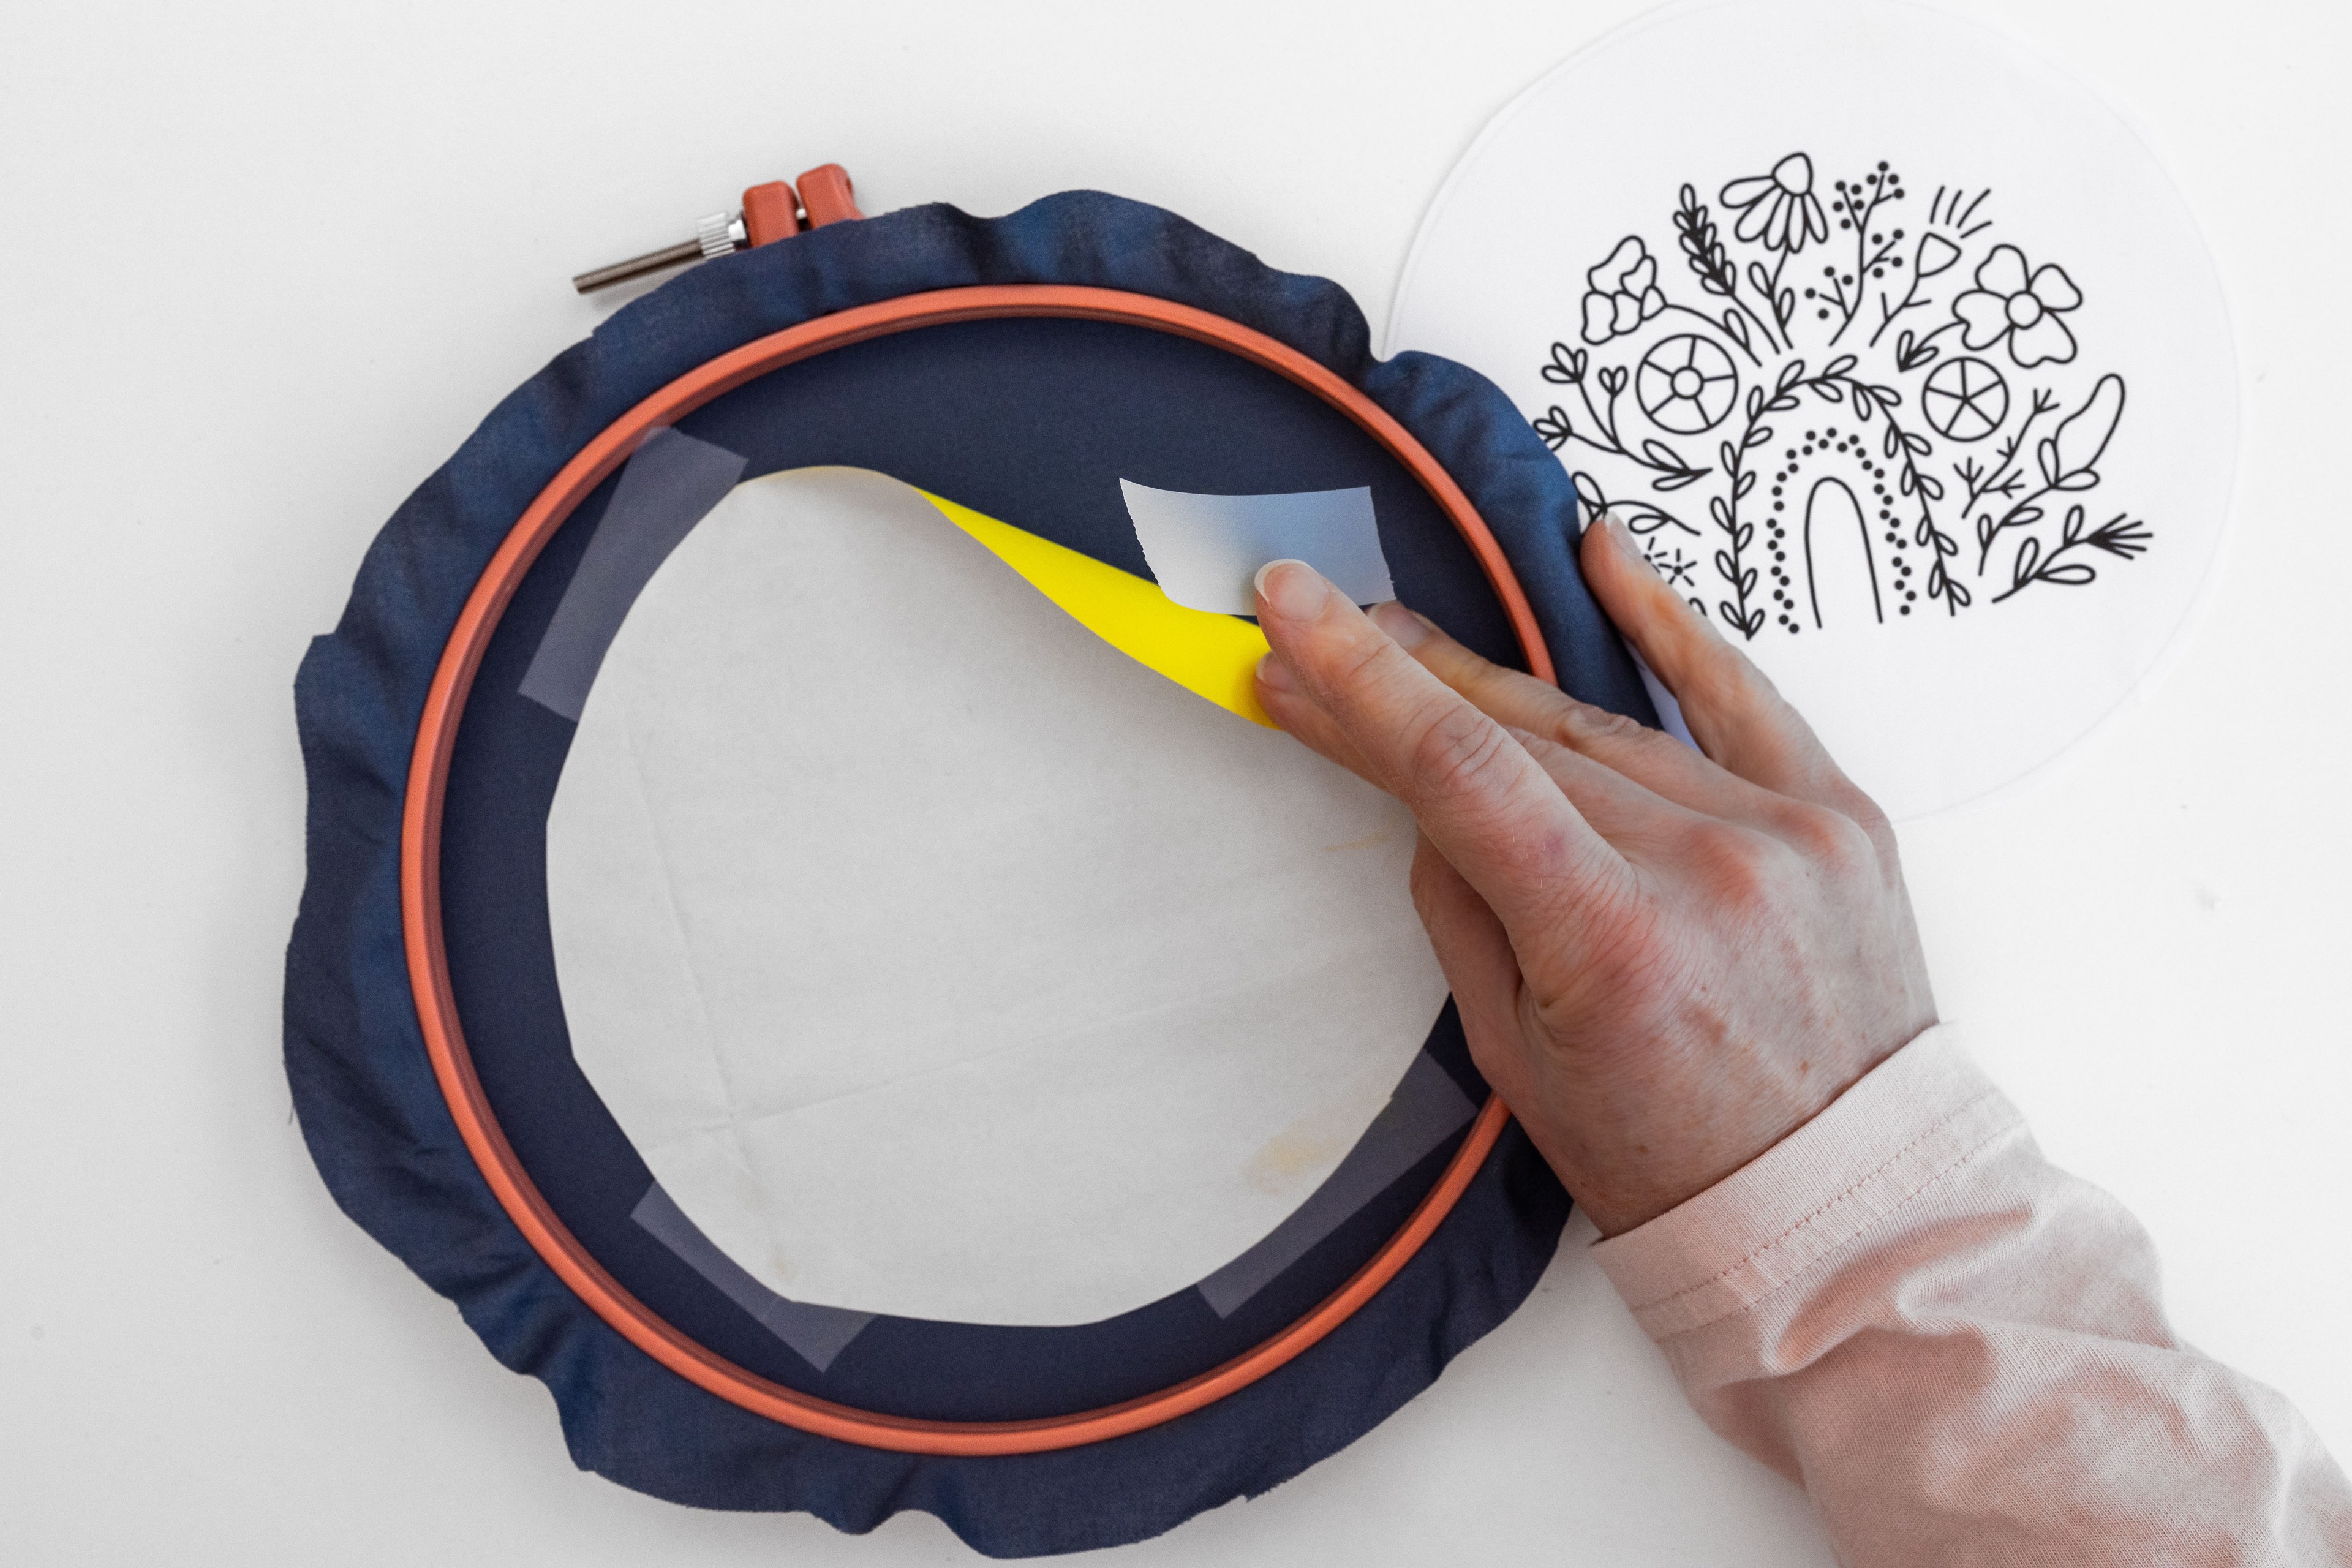
Tip for using loose fabric instead: If you prefer, you can trace the design onto loose fabric, rather than in a dressed hoop. In that case, lay your fabric flat on your work surface, place the carbon paper over top (coloured side down), then place your template over top (face up), and do the tracing step. I recommend you secure your layers in place with clear sticky tape so that your template doesn’t move around as you trace it.
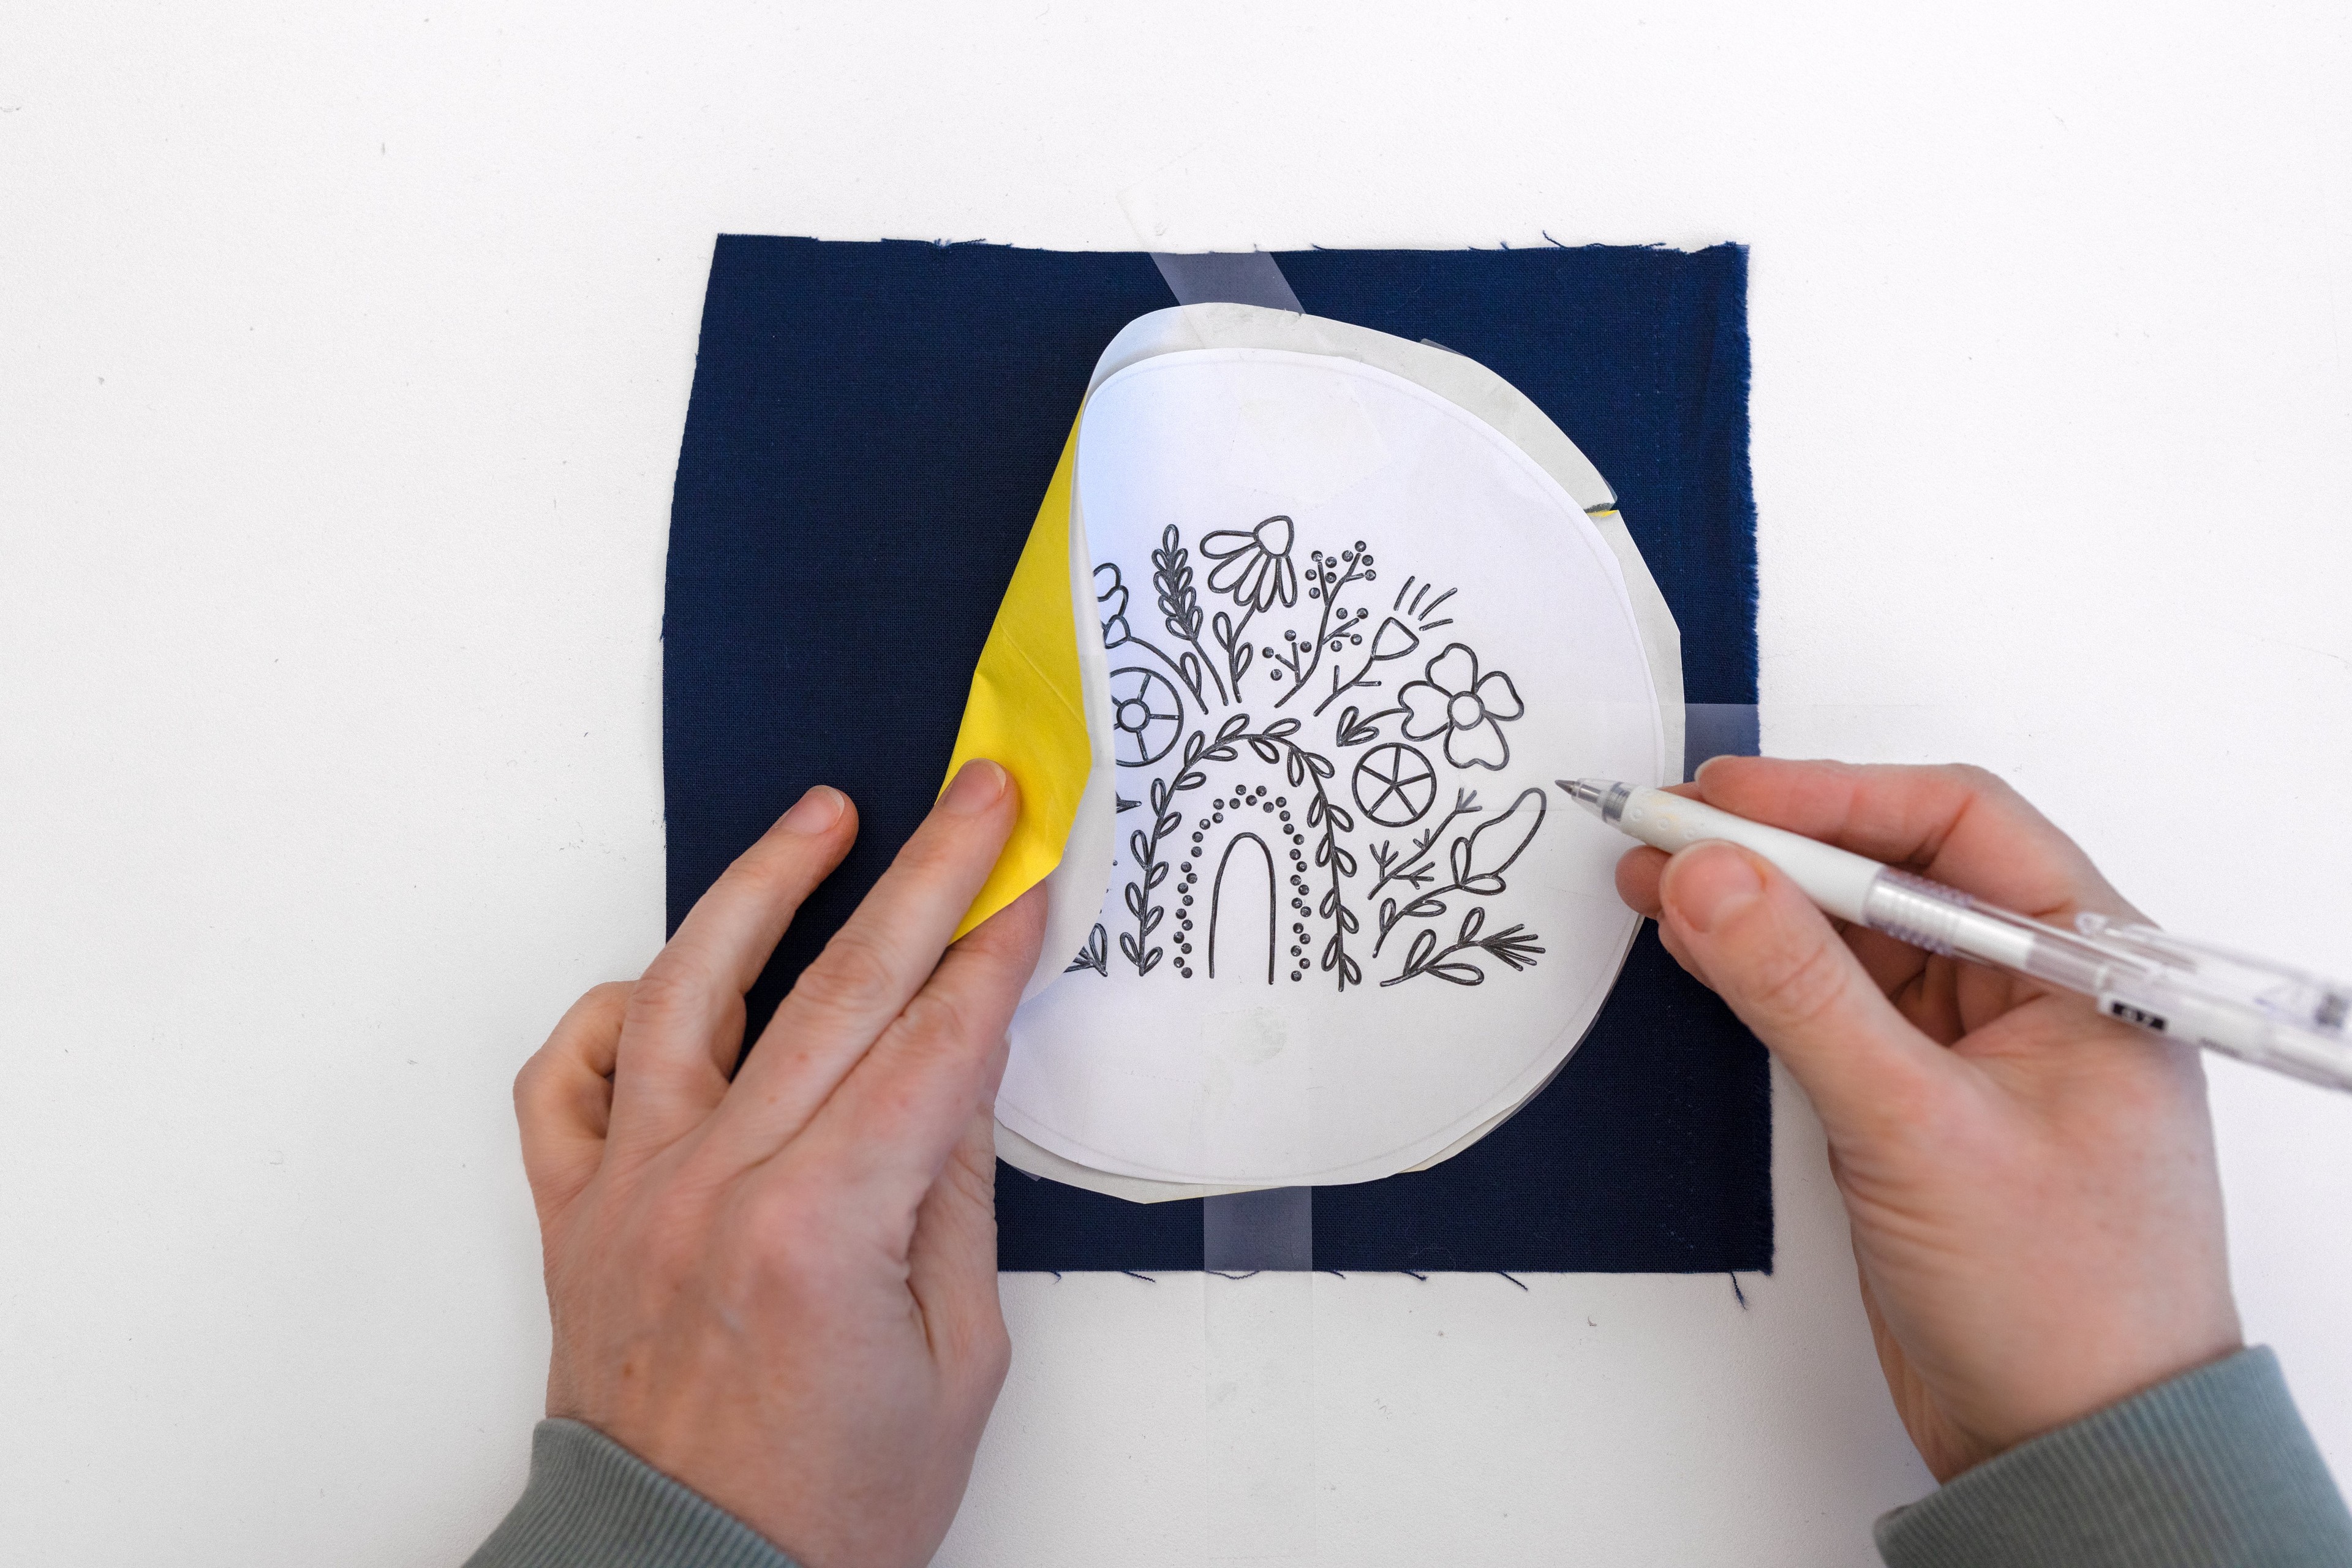
Step 3
Prep and position design template: Cut out your design template, and place it on top of the carbon paper, so that the design is face up. Secure this with clear sticky tape as well. Now your template and paper are nicely secured to your fabric and you don’t have to worry about them moving around when you start tracing.
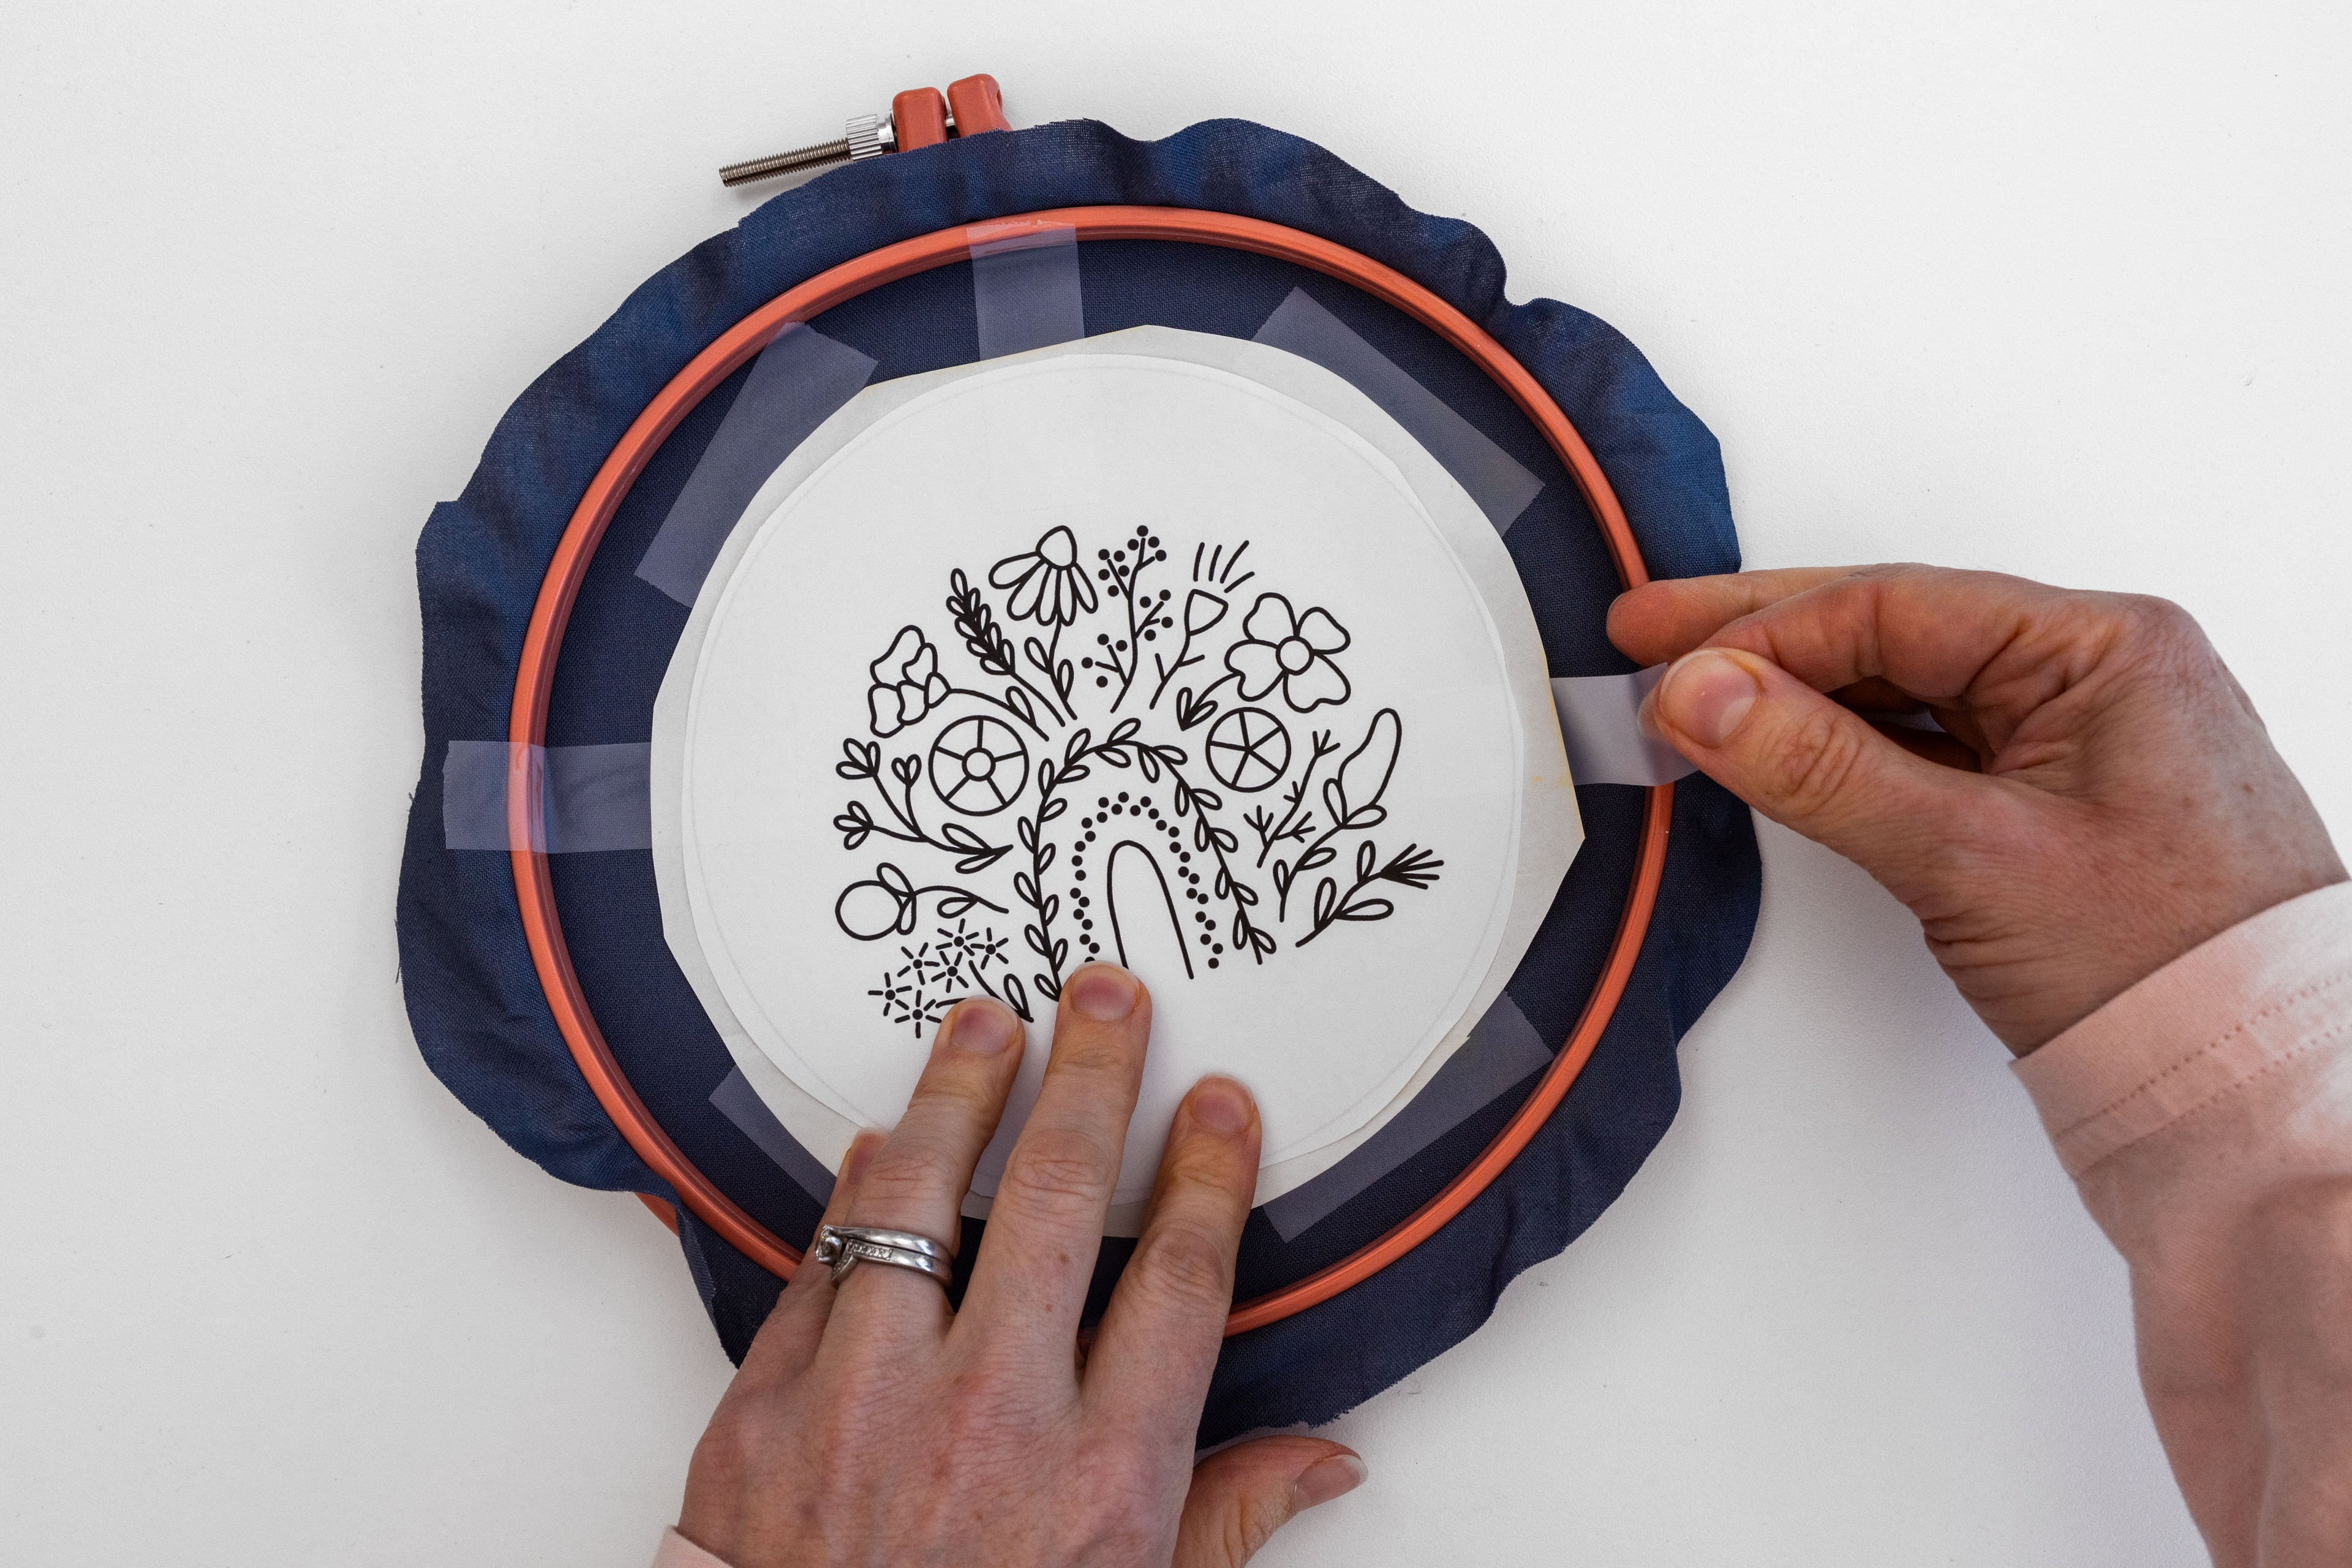
Step 4
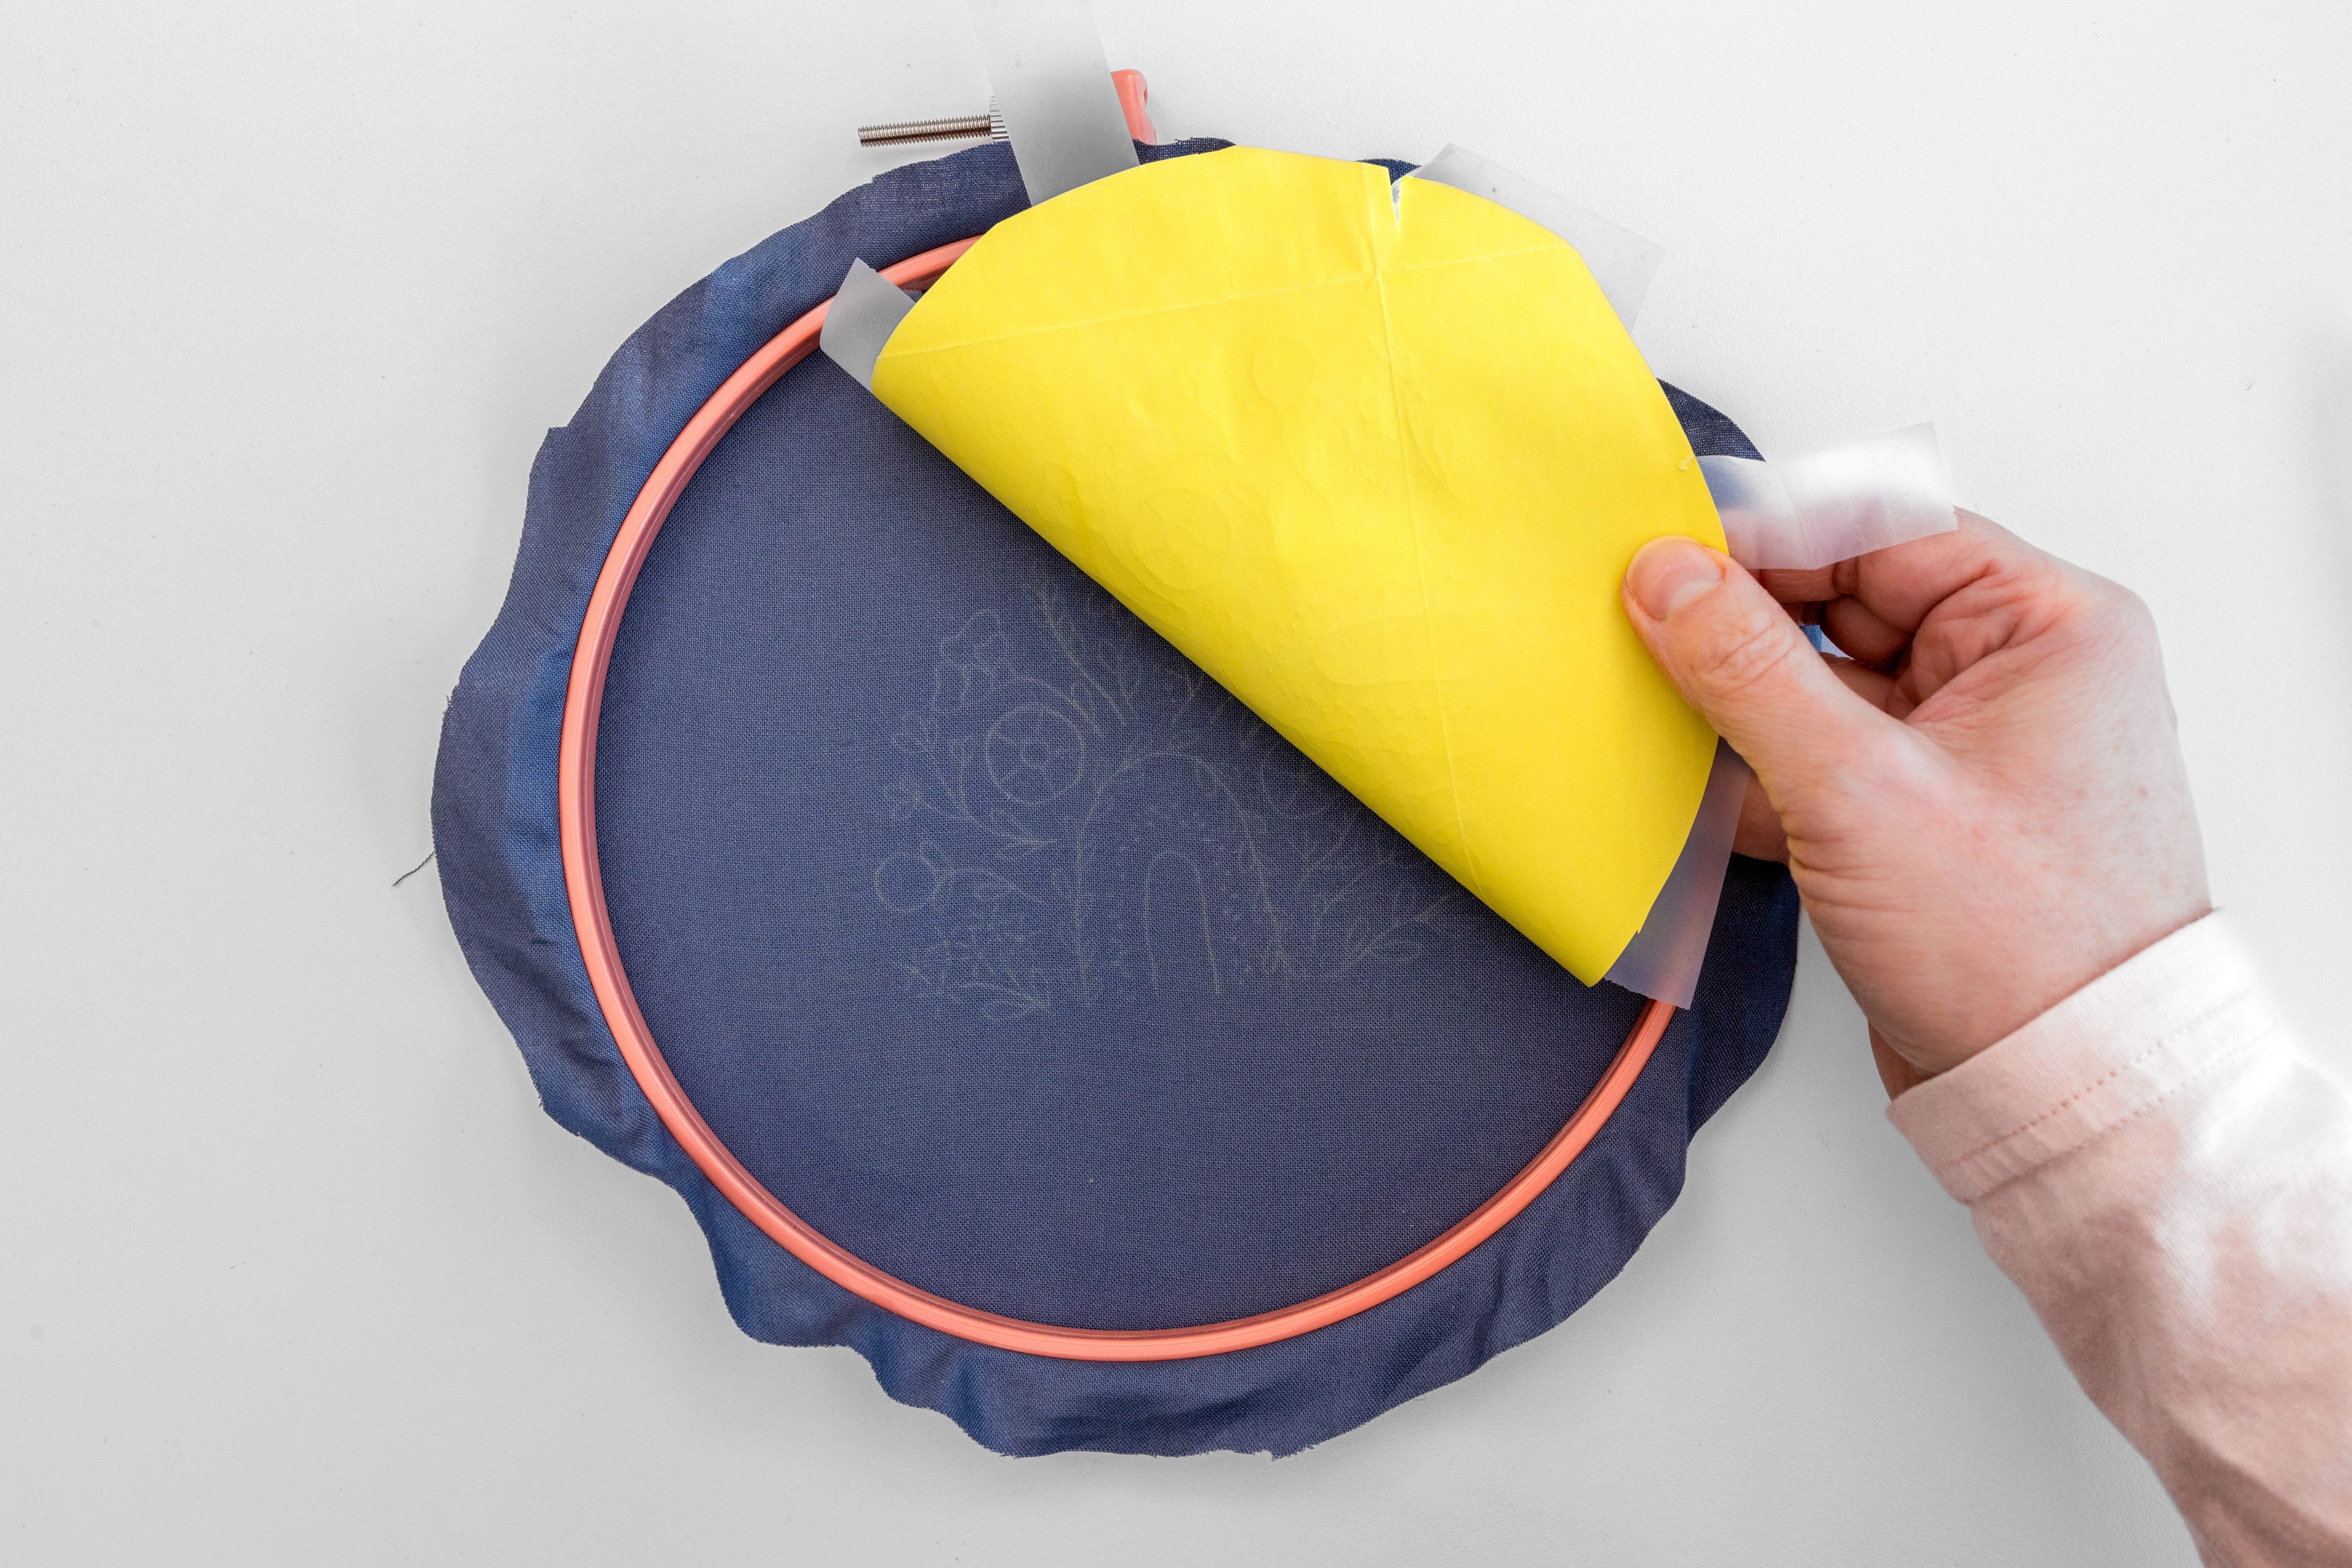
Trace: Now lay the hoop flat on your work surface, and trace over the lines of the design template, using nice firm pressure. Make double sure that you’ve gone over all of the lines in the template with good pressure. To check, you can lift up the corner of the carbon paper and template to check-but take care that you place them back in the exact same spot, if you need to keep tracing.
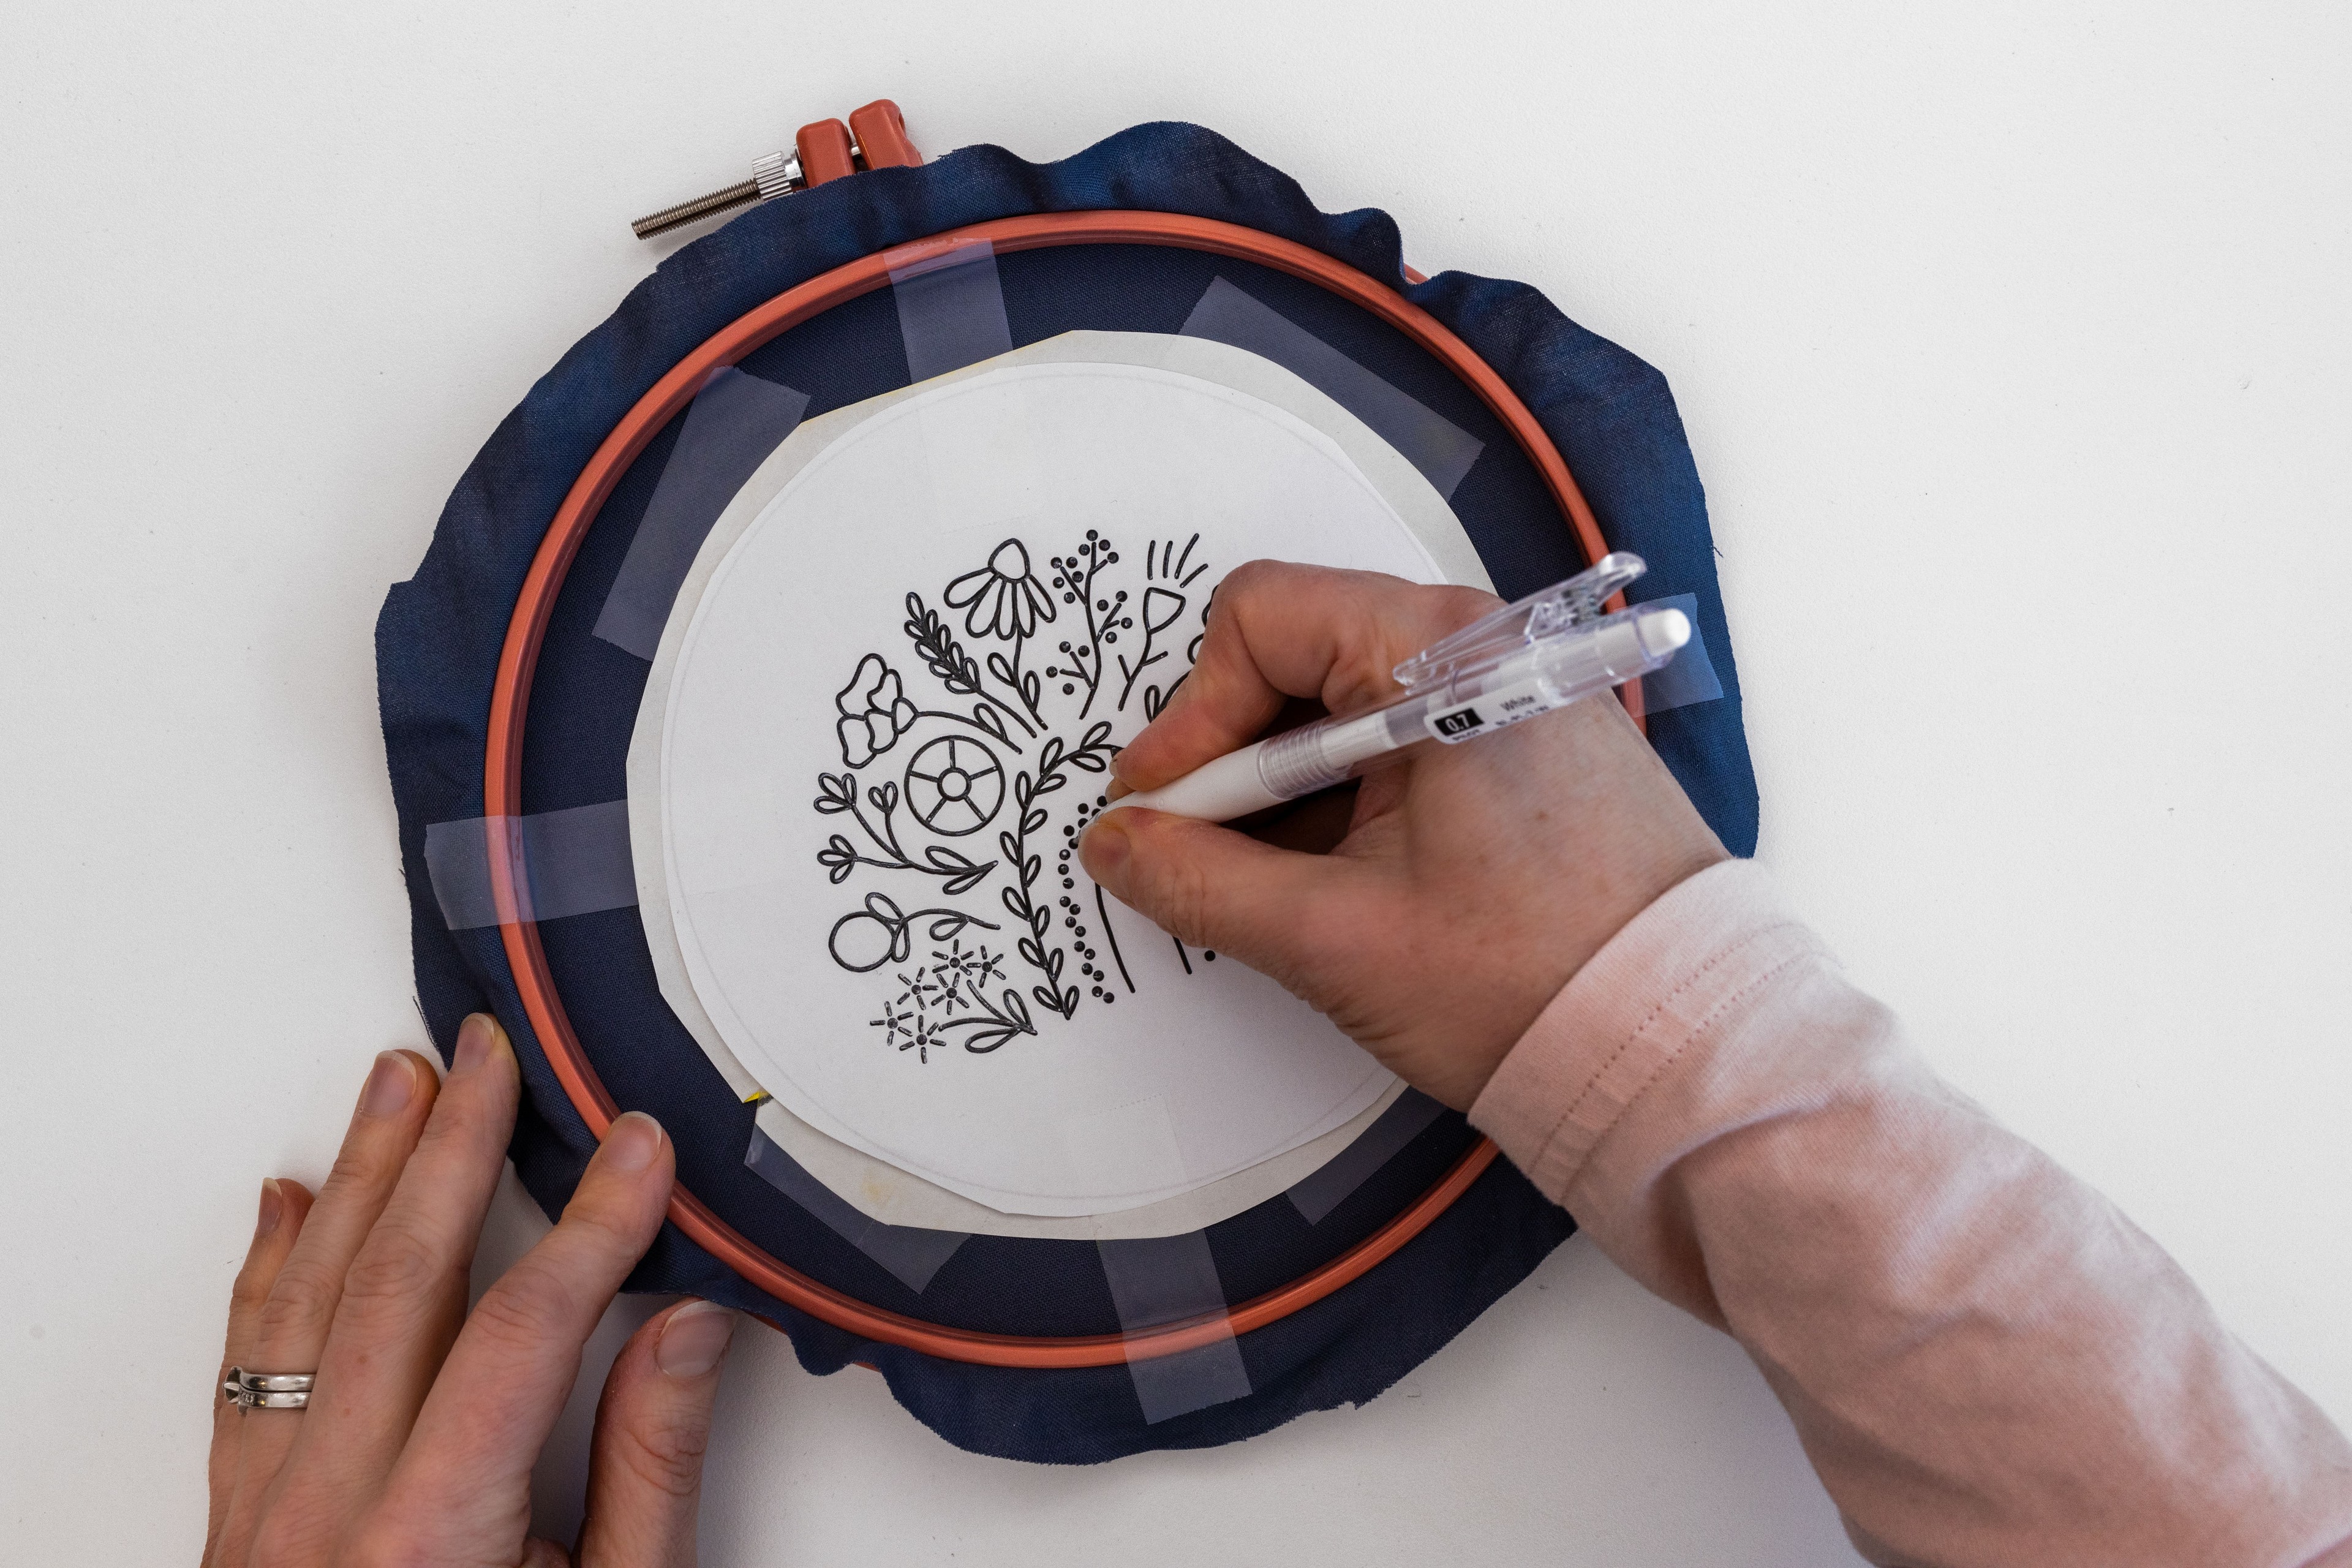
TIP: If you use a pen that’s a different colour to the template, you’ll be able to easily see which lines you’ve traced over. I’m using a white pen here and it works a treat!
Step 5
Now you can carefully remove the template and carbon paper.
Step 6
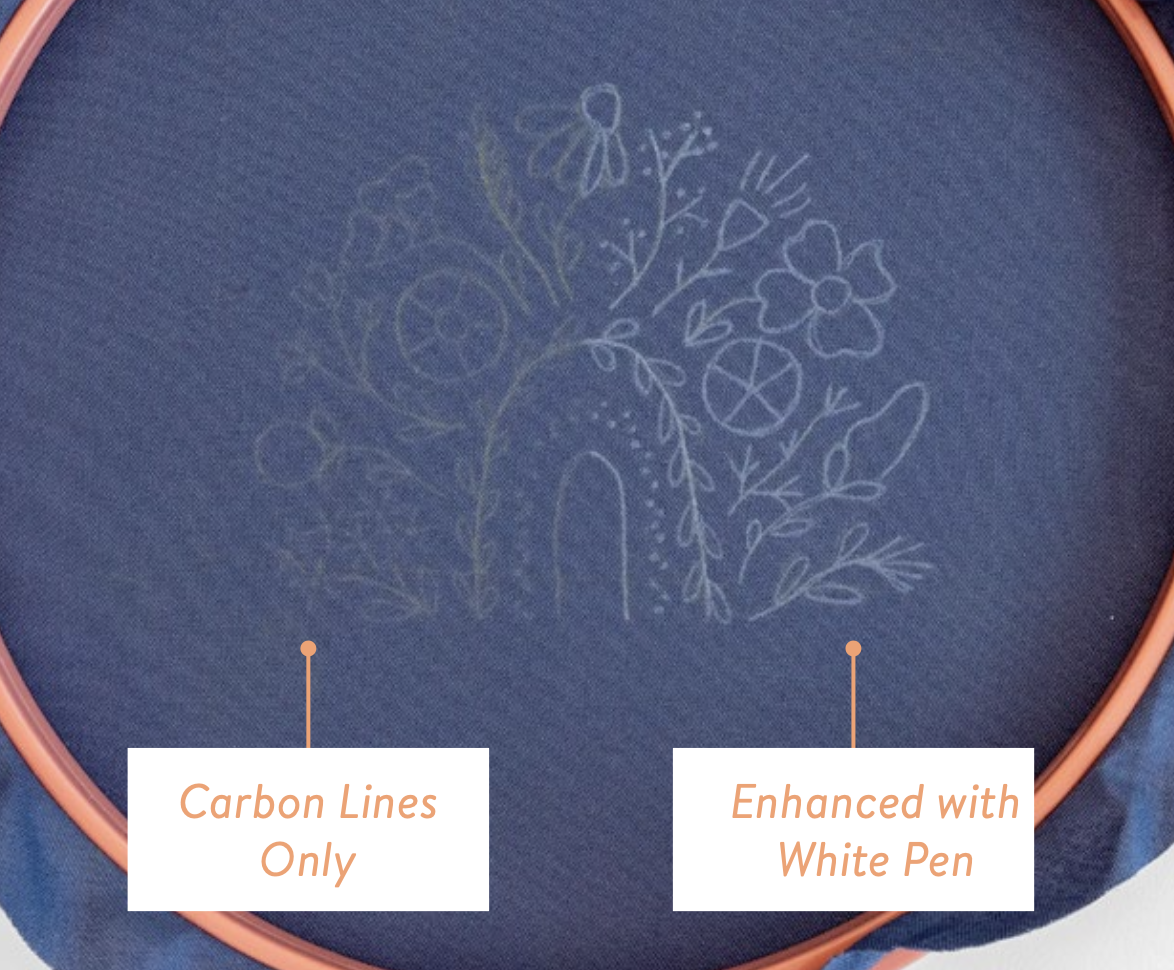
Enhancing Outlines (optional): Take a look at the carbon outlines to ensure they are clear and easily visible for your embroidery work. If you think they’re too faint or will fade overtime, consider enhancing them by going over with a transfer pen. For dark fabric, using a white pen can make the lines more prominent. Choose between are movable white pen or a permanent one, depending on your preference and desired outcome.
Step 7
Rehoop fabric (optional): You can either rehoop your fabric (so that the design is on the topside of your hoop) or stitch your design on the underside of the hoop – whichever works for you is fine!
Now your template has been transferred to your pattern and you can move to the next step of making your pattern, woo hoo!
Q & A
Should I use a pen or stylus?
Both can work well, depending on the project. Here’s a quick breakdown to help you choose:
-
Stylus: this is a pointed tool with a rounded end, which is great for precise tracing and controlled pressure. It minimises pressing too hard on the fabric, and because it’s not a pen, you don’t have to worry about any ink stains.
-
Pen: Be sure to use one with a nice rounded tip (nothing too sharp), so that you can apply even pressure without tearing the layers. And a bonus is that using a different coloured pen means that you can easily distinguish the lines you’ve already traced.
Real-life examples
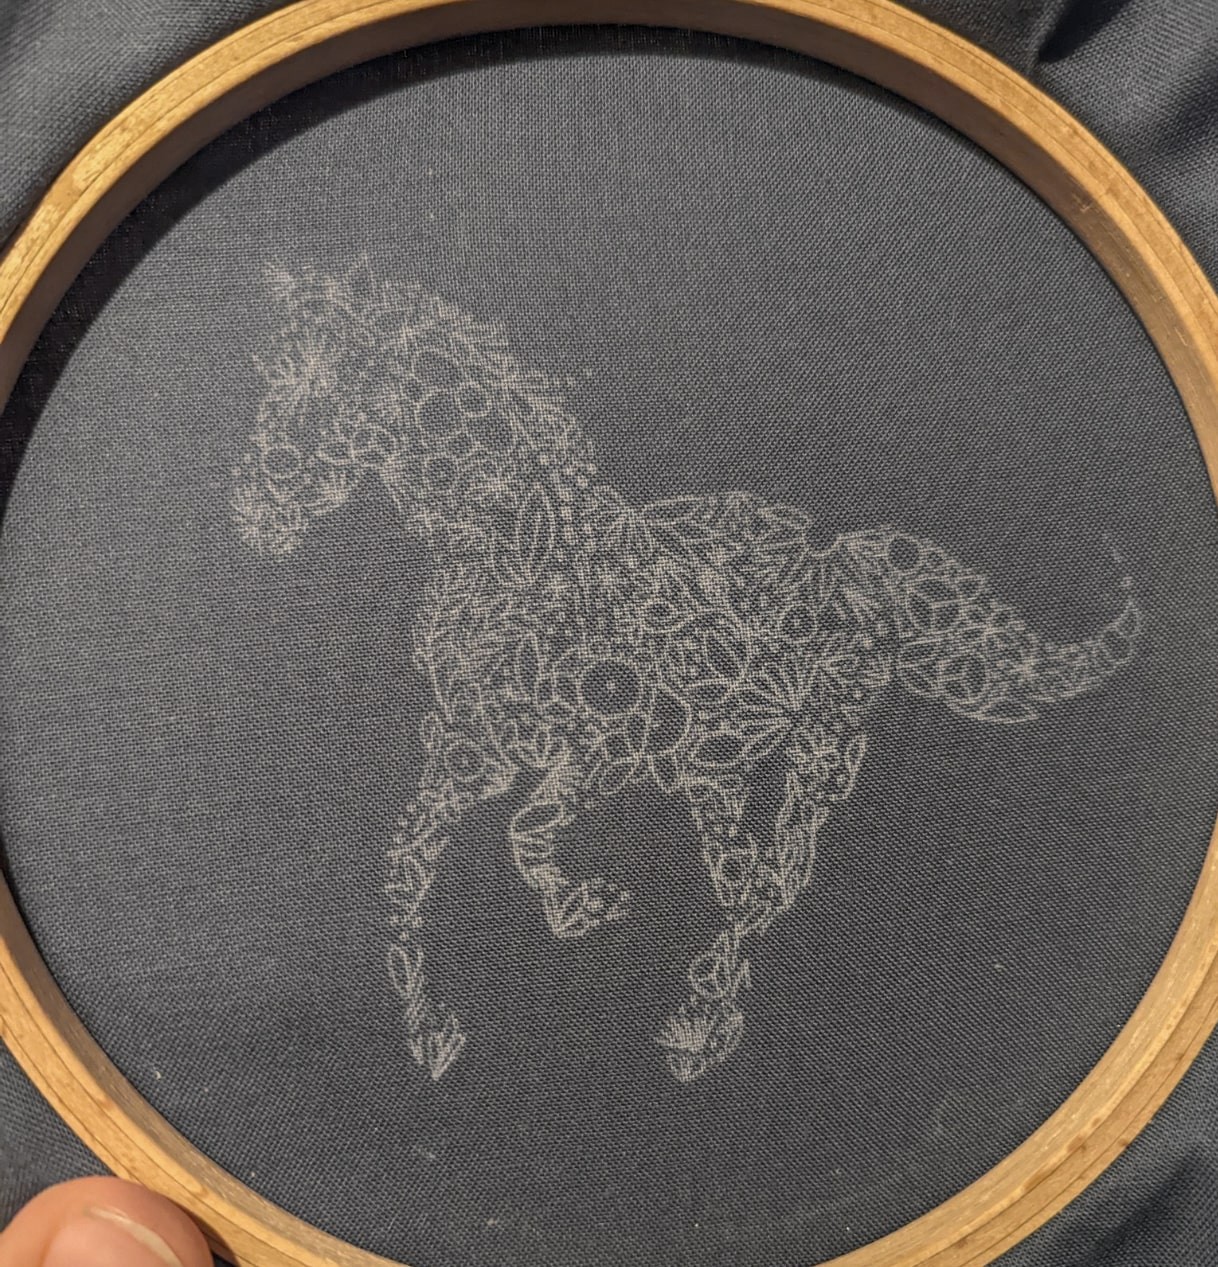
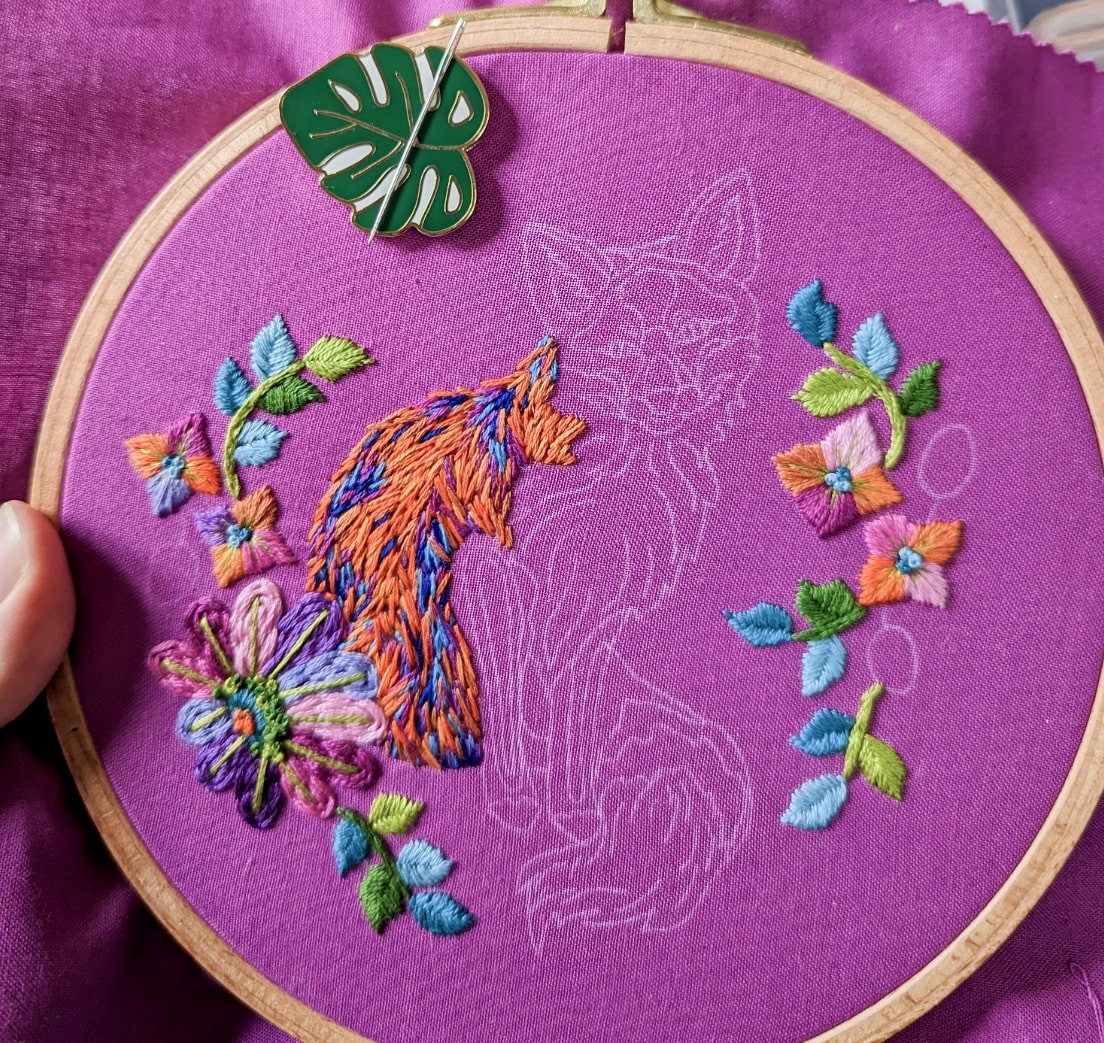
I’ve heard from a lot of customers that the carbon lines aren’t visible enough on their own. But our member Alicia loves this method, and find it works well (relying entirely on the carbon lines). See these examples which she’s done a fantastic job with!
7. Tear-Away Tracing Paper
Pros:
-
Also works on dark or thick fabrics
-
Works on fabrics which you can’t draw on (e.g knits)
-
Template lines clear and visible
-
Template lines removable
-
Works day + night
Cons:
-
Additional cost of the tracing paper
-
Stitching with tracing paper can be challenging
-
Tracing paper can be challenging to remove at the end
Let’s have a quick look at this simple, old-school method. It’s suitable for dark or thick fabrics which you can’t see through to trace. It’s also effective on textured or delicate fabrics that don’t allow you to draw, iron or stick a template to them.
IN A NUTSHELL: Trace your pattern onto lightweight tracing paper, attach that to your fabric, stitch through both layers, and then tear away the tracing paper at the end.
You will need:
-
Tracing paper
-
Printed design template
-
Loose fabric or dressed hoop (e.g. fabric mounted tightly in the hoop and excess fabric trimmed off)
-
Transfer pen
How to:
Step 1
Transfer template to paper: Lay your tracing paper over the top of your design template (could be digital if not printed), and trace the design onto the tracing paper.

Step 2
Cut out paper patch: Now cut out your design into a patch or circle, leaving a margin of at least 1⁄2 an inch (10mm).

Step 3
Attach Paper: Place the patch of transfer paper on the top-side of your dressed hoop, and secure it to place. The usual way is to use a basting stitch (e.g. work a simple Running Stitch around the clear border area of the design, to hold it in place on the fabric).
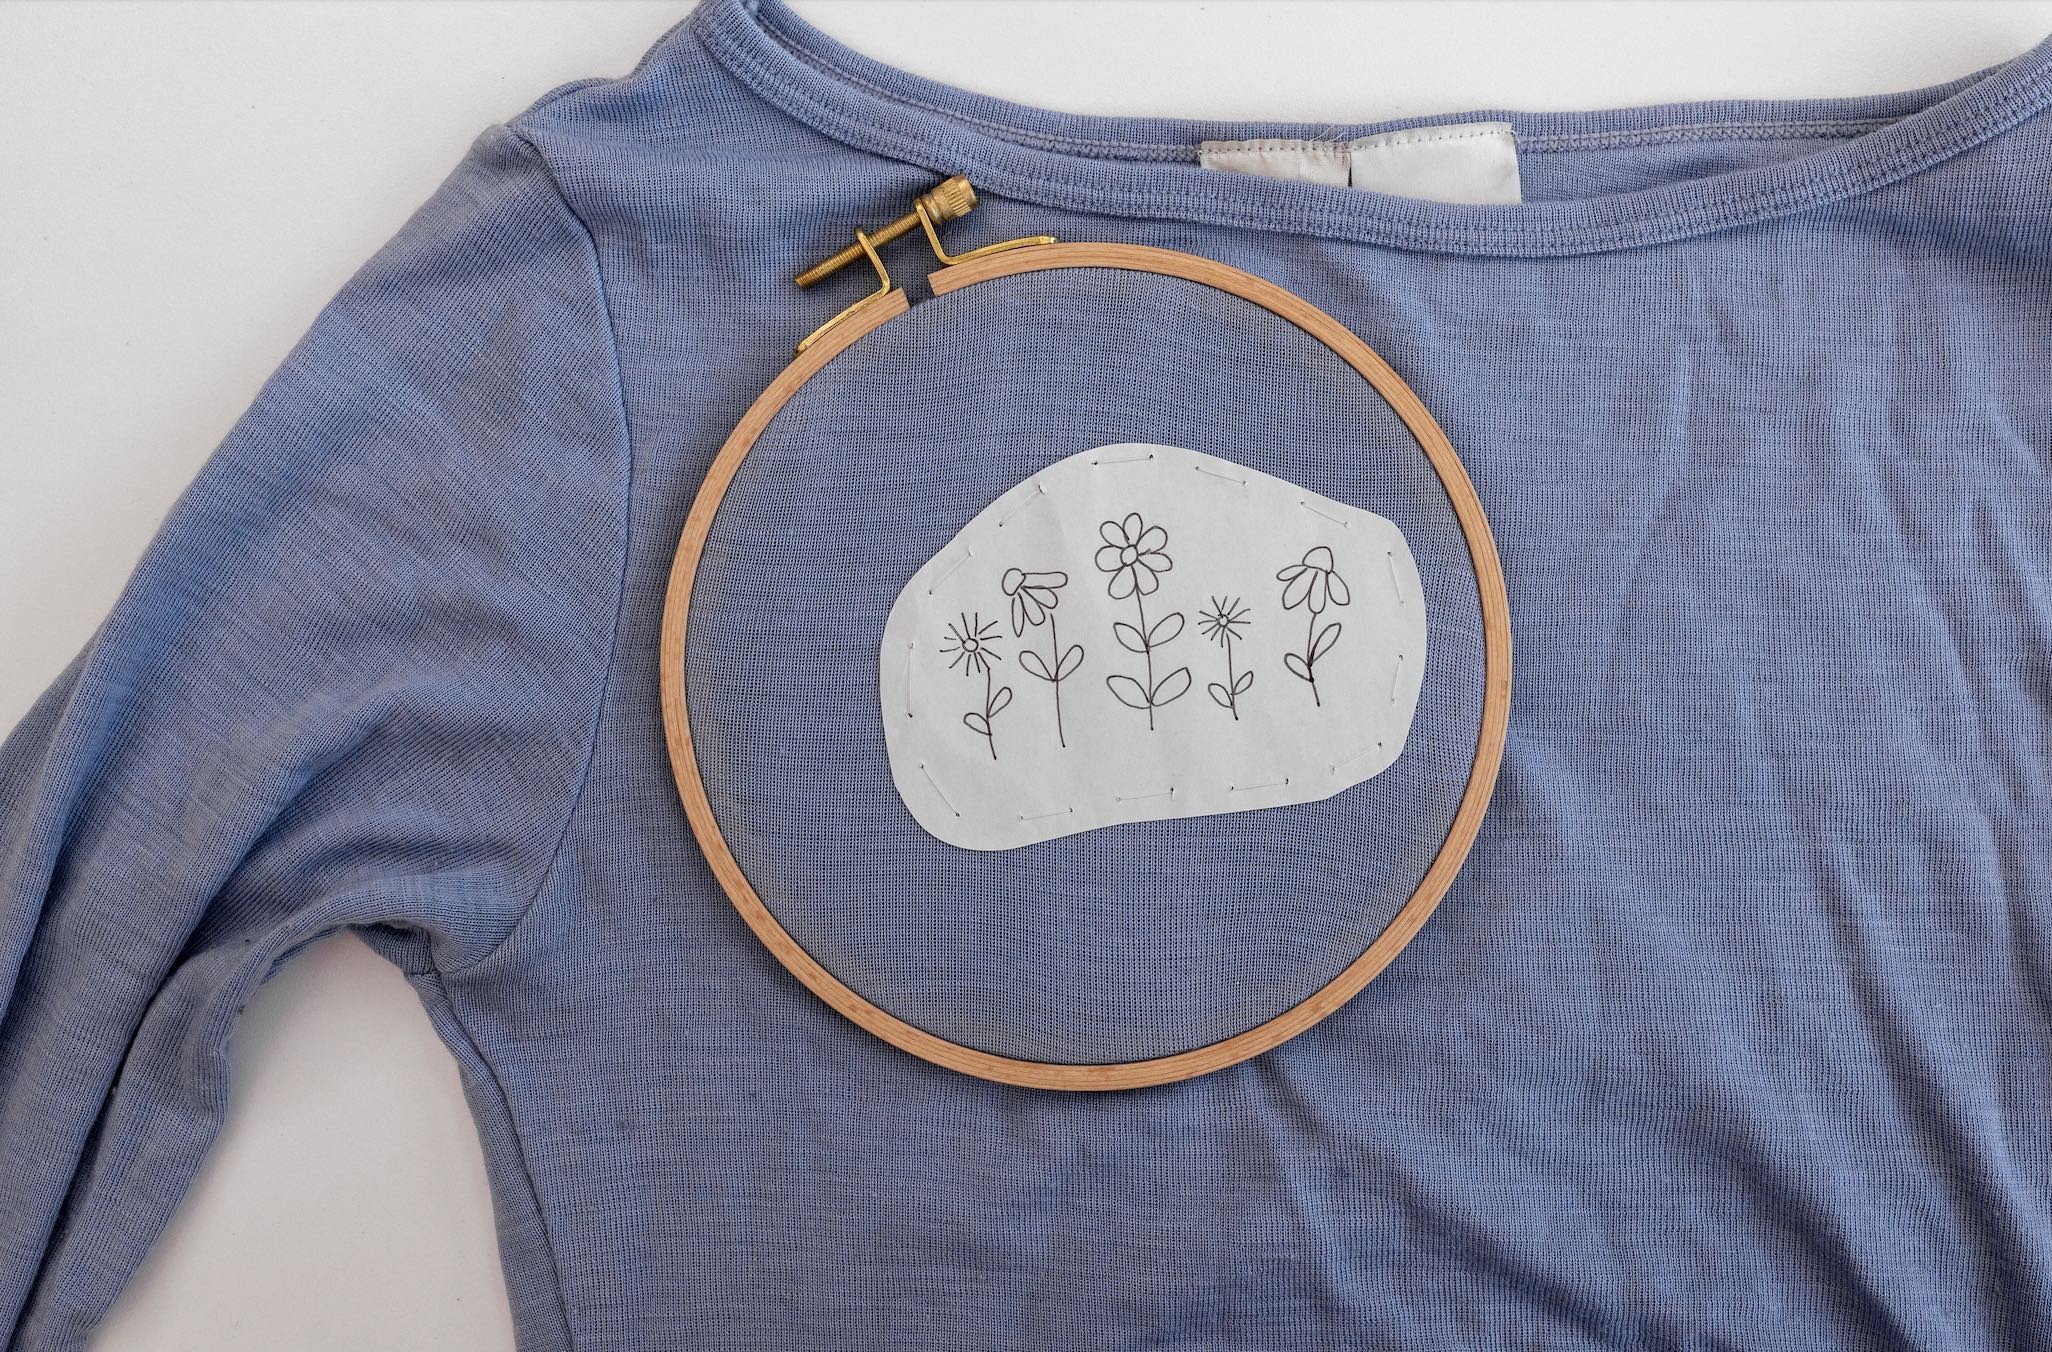
Now your template has been transferred to your pattern and you can move to the next step of making your pattern, well done!
Removing the tear-away tracing paper at the end:
After completing your stitching, you will need to tear away the tracing paper. The paper should come off relatively easily along the lines of stitching, because your stitches will have perforated it along the outlines. However, be careful not to pull or disrupt your stitches, and you might need tweezers to remove any stubborn bits.

Real-life example
This method doesn’t seem to be commonly used these days for hand embroidery. But one of our members Cath used it with success for stitching her Bunny Blooms on a woollen cape. See the images right for the before and after – it turned out so great!


Other methods:
Freehand: If you want to keep things simple, or if all else fails, then you can always try freehand tracing your design template to the fabric! You might be surprised at how worthwhile and hassle-free this is!
OR: There are lots of other methods which I haven’t covered in this guide. You’re welcome to research and try these, if you think they’ll better suit your needs. For example:
-
Prick and Pounce
-
Printing direct to fabric

Conclusion
As you can see, there are lots of options and variations about how to transfer your embroidery pattern to fabric. But I hope that this guide has helped you to choose a method that best suits your needs and preferences – without overwhelming you!
I encourage you to practice with different techniques, and you’ll find a favourite method that you can easily whip out each time you start a new project.
Enjoy the process of transferring your pattern and bringing your embroidery to life!

What's next?
Our beginner embroidery kits are a favourite among new stitchers for their simple, step-by-step instructions and beautiful designs that make learning easy and fun. Whether you’ve been wanting to learn embroidery or are just searching for your next creative hobby. These kits are the perfect introduction to embroidery.
Why people love our beginner kits:
-
Everything you need is included: fabric, thread, hoop, and more!
-
Clear instructions to guide you every step of the way.
-
Gorgeous designs you’ll be proud to display.
Our most popular beginner kits
Ready to get started? Explore our full Beginner Embroidery Collection and find the perfect kit to kick off your stitching journey!

I would love to hear how you go on your embroidery journey.
Make sure you share you progress with me! Just tag me on the 'gram @cleverpoppy.
Happy stitching!
Julie xx

